Sony DAV-DX255 Operating Instructions - Page 16
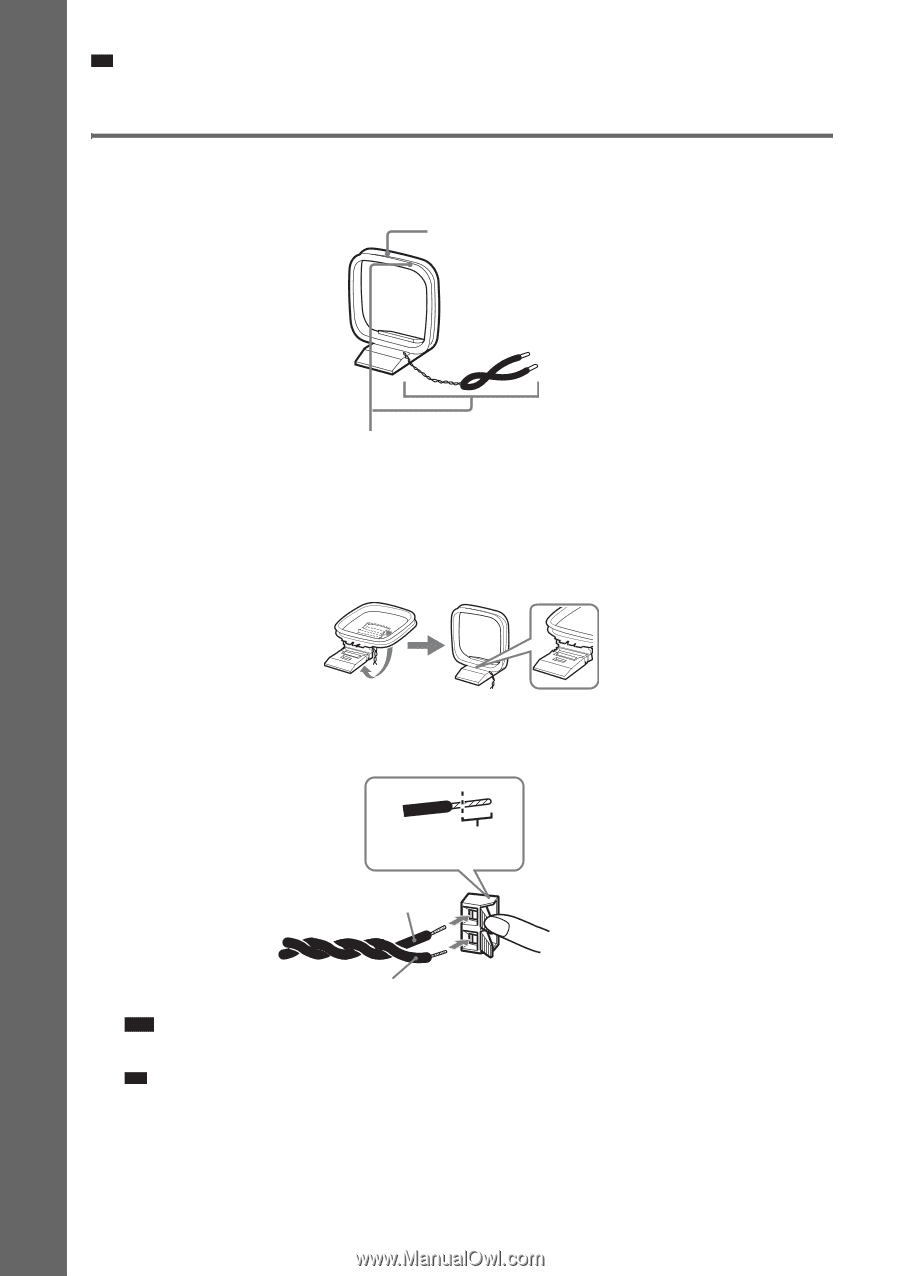
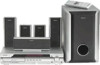
Connecting the Antenna (Aerial), Remove only the loop part from the plastic stand. - receiver
 |
View all Sony DAV-DX255 manuals
Add to My Manuals
Save this manual to your list of manuals |
Page 16 highlights
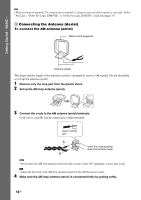
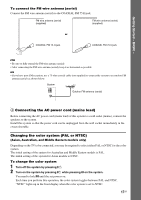
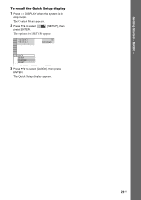
Getting Started - BASIC - Tip • When you want to output the TV sound or stereo sound of a 2 channel source from the 6 speakers, select the "Dolby Pro Logic," "Dolby Pro Logic II MOVIE," or "Dolby Pro Logic II MUSIC" sound field (page 33). 3 Connecting the Antenna (Aerial) To connect the AM antenna (aerial) Plastic stand (supplied) Antenna (aerial) The shape and the length of the antenna (aerial) is designed to receive AM signals. Do not dismantle or roll up the antenna (aerial). 1 Remove only the loop part from the plastic stand. 2 Set up the AM loop antenna (aerial). 3 Connect the cords to the AM antenna (aerial) terminals. Cord (A) or cord (B) can be connected to either terminal. Insert until this part. A B AM Insert the cords pushing down the terminal clamp. Note • Do not place the AM loop antenna (aerial) near the system or other AV equipment, as noise may result. Tip • Adjust the direction of the AM loop antenna (aerial) for best AM broadcast sound. 4 Make sure the AM loop antenna (aerial) is connected firmly by pulling softly. 16GB
-
 1
1 -
2
-
3
-
4
-
5
-
6
-
7
-
8
-
9
-
10
-
 11
11 -
 12
12 -
 13
13 -
 14
14 -
 15
15 -
 16
16 -
 17
17 -
 18
18 -
 19
19 -
 20
20 -
 21
21 -
22
-
23
-
24
-
25
-
26
-
27
-
28
-
29
-
30
-
31
-
32
-
33
-
34
-
35
-
36
-
37
-
38
-
39
-
40
-
41
-
42
-
43
-
44
-
45
-
46
-
47
-
48
-
49
-
50
-
51
-
52
-
53
-
54
-
55
-
56
-
57
-
58
-
59
-
60
-
61
-
62
-
63
-
64
-
65
-
66
-
67
-
68
-
69
-
70
-
71
-
72
-
73
-
74
-
75
-
76
-
77
-
78
-
79
-
80
-
81
-
82
-
83
-
84
-
85
-
86
-
87
-
88
-
89
-
90
-
91
-
92
-
93
-
94
-
95
-
96
-
97
-
98
-
99
-
100
 |
 |