Sony DAV-FR10W Operating Instructions - Page 27
Step 4: Connecting the AC Power Cord (Mains Lead
 |
View all Sony DAV-FR10W manuals
Add to My Manuals
Save this manual to your list of manuals |
Page 27 highlights
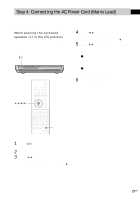
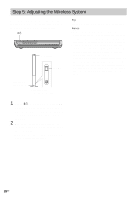
Getting Started Step 4: Connecting the AC Power Cord (Mains Lead) Before connecting the AC power cords (mains leads) of this system and the surround speaker (L) to a wall outlet (mains), connect the front and center speakers to the system and surround speaker (R) to the surround speaker (L) (see page 16). When placing the surround speaker (L) in the (R) position Depending on the location of the wall outlet (mains), you can also place the surround speaker (L) (with the IR receiver) in the (R) position if necessary. 4 Press X/x repeatedly until "SL SR REV" appears in the front panel display, then press ENTER or c. 5 Press X/x repeatedly until the item you want to set appears in the front panel display. "/1 xOFF (default) Sets the surround speaker (L) (with the IR receiver) in the (L) position. xON Sets the surround speaker (L) (with the IR receiver) in the (R) position. 6 Press AMP MENU. The AMP menu turns off. C/X/x/c/ ENTER AMP MENU With cover opened. 1 Press "/1 on the system to turn the system on. 2 Press AMP MENU. 3 Press X/x repeatedly until "CUSTOMIZE" appears in the front panel display, then press ENTER or c. The system enters the Customize Menu mode. 27US
-
 1
1 -
2
-
3
-
4
-
5
-
6
-
7
-
8
-
9
-
10
-
11
-
12
-
13
-
14
-
15
-
16
-
17
-
18
-
19
-
20
-
21
-
 22
22 -
 23
23 -
 24
24 -
 25
25 -
 26
26 -
 27
27 -
 28
28 -
 29
29 -
 30
30 -
 31
31 -
 32
32 -
33
-
34
-
35
-
36
-
37
-
38
-
39
-
40
-
41
-
42
-
43
-
44
-
45
-
46
-
47
-
48
-
49
-
50
-
51
-
52
-
53
-
54
-
55
-
56
-
57
-
58
-
59
-
60
-
61
-
62
-
63
-
64
-
65
-
66
-
67
-
68
-
69
-
70
-
71
-
72
-
73
-
74
-
75
-
76
-
77
-
78
-
79
-
80
-
81
-
82
-
83
-
84
-
85
-
86
-
87
-
88
-
89
-
90
-
91
-
92
-
93
-
94
-
95
-
96
-
97
-
98
-
99
-
100
-
101
-
102
-
103
-
104
-
105
-
106
-
107
-
108
-
109
-
110
-
111
-
112
-
113
-
114
-
115
-
116
-
117
-
118
-
119
-
120
-
121
-
122
-
123
-
124
-
125
-
126
-
127
-
128
-
129
-
130
-
131
-
132
-
133
-
134
-
135
-
136
-
137
-
138
-
139
-
140
-
141
-
142
-
143
-
144
-
145
-
146
-
147
-
148
-
149
-
150
-
151
-
152
-
153
-
154
-
155
-
156
-
157
-
158
-
159
-
160
-
161
-
162
-
163
-
164
-
165
-
166
-
167
-
168
-
169
-
170
-
171
-
172
-
173
-
174
-
175
-
176
-
177
-
178
-
179
-
180
-
181
-
182
-
183
-
184
-
185
-
186
-
187
-
188
-
189
-
190
-
191
-
192
-
193
-
194
-
195
-
196
-
197
-
198
-
199
-
200
-
201
-
202
-
203
-
204
-
205
-
206
-
207
-
208
-
209
-
210
-
211
-
212
-
213
-
214
-
215
-
216
-
217
-
218
-
219
-
220
-
221
-
222
-
223
-
224
-
225
-
226
-
227
-
228
-
229
-
230
-
231
-
232
-
233
-
234
-
235
-
236
 |
 |
