Sony DHG-HDD250 Operation Manual - Page 77
Recording from a Panel Menu, Recording Manually
 |
UPC - 027242646216
View all Sony DHG-HDD250 manuals
Add to My Manuals
Save this manual to your list of manuals |
Page 77 highlights
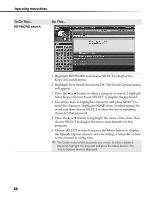
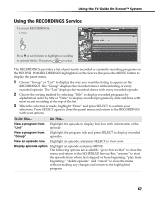
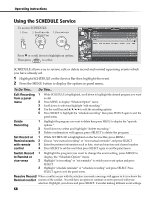
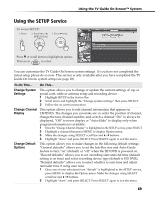
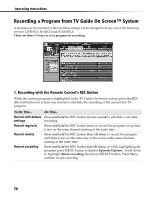
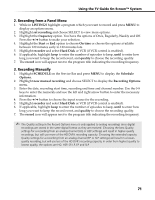
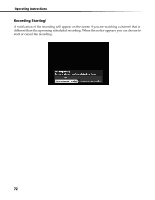
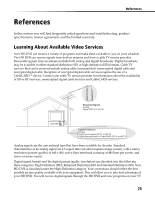
Using the TV Guide On Screen™ System 2. Recording from a Panel Menu 1. While in LISTINGS highlight a program which you want to record and press MENU to display an options menu. 2. Highlight set recording and choose SELECT to view more options. 3. Highlight the frequency option. You have the options of Once, Regularly, Weekly and Off. Press the B/b button to make your selection. 4. Highlight the Start or End option to choose On time or choose the options available between 120 minutes early to 120 minutes late. 5. Highlight recorder and select Hard Disk or VCR (if VCR control is enabled). 6. If applicable, highlight keep to enter the number of episodes to keep, until to enter how long you want to keep the record event, and quality to choose the recording quality. 7. The record icon will appear next to the program title indicating the recording frequency. 3. Recording Manually 1. Highlight SCHEDULE on the Service Bar and press MENU to display the Schedule Options. 2. Highlight new manual recording and choose SELECT to display the Recording Options menu. 3. Enter the date, recording start time, recording end time and channel number. Use the 0-9 keys to enter the numerals and use the left and right arrow button to enter the necessary information. 4. Press the B/b button to choose the input source for the recording. 5. Highlight recorder and select Hard Disk or VCR (if VCR control is enabled). 6. If applicable, highlight keep to enter the number of episodes to keep, until to enter how long you want to keep the record event, and quality to choose the recording quality. 7. The record icon will appear next to the program title indicating the recording frequency. ✍ The Quality setting in the Record Options menu is only applied to analog recordings since digital recordings are stored in the same digital format as they are received. Choosing the best Quality settings for a recording from an analog channel (HQ or HSP settings) will result in higher-quality recordings, but will use more of the HD DVR's recording capacity. Choosing the extended capacity Quality settings for a recording from an analog channel (EP or SLP settings) will result in a lowerquality recording, but will use less of the HD DVR's recording capacity. In order from highest quality to lowest quality, the options are HQ, HSP, SP, LP, EP and SLP. 71
-
 1
1 -
2
-
3
-
4
-
5
-
6
-
7
-
8
-
9
-
10
-
11
-
12
-
13
-
14
-
15
-
16
-
17
-
18
-
19
-
20
-
21
-
22
-
23
-
24
-
25
-
26
-
27
-
28
-
29
-
30
-
31
-
32
-
33
-
34
-
35
-
36
-
37
-
38
-
39
-
40
-
41
-
42
-
43
-
44
-
45
-
46
-
47
-
48
-
49
-
50
-
51
-
52
-
53
-
54
-
55
-
56
-
57
-
58
-
59
-
60
-
61
-
62
-
63
-
64
-
65
-
66
-
67
-
68
-
69
-
70
-
71
-
 72
72 -
 73
73 -
 74
74 -
 75
75 -
 76
76 -
 77
77 -
 78
78 -
 79
79 -
 80
80 -
 81
81 -
 82
82 -
83
-
84
-
85
-
86
-
87
-
88
-
89
-
90
-
91
-
92
-
93
-
94
-
95
-
96
-
97
-
98
-
99
-
100
-
101
-
102
-
103
-
104
 |
 |