Sony DSC-P41 Operating Instructions - Page 101
Others, camera does not work.
 |
View all Sony DSC-P41 manuals
Add to My Manuals
Save this manual to your list of manuals |
Page 101 highlights
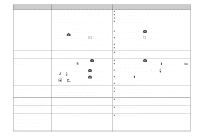
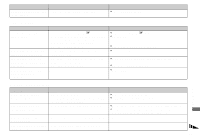
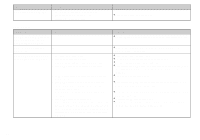
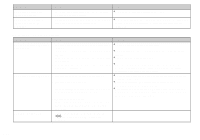
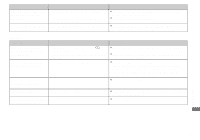
Symptom You cannot insert the date or print images in the index mode. "---- -- --"is printed on the date-inserted part. Cause • The printer does not provide these functions. • The date may not be inserted in the index mode depending on the printer. • The recording date data is not recorded on the image. Solution p Consult with the printer manufacturer whether the printer provides these function or not. p Consult with the printer manufacturer. p The images that do not have the recording date data cannot be printed with the date inserted. Set [Date] to [Off] and print it. Others Symptom Cause Solution The camera does not work, no operations can be performed. • The battery level is low or zero (The indicator appears.). • The AC Adaptor (not supplied) is not connected securely. p Charge the batteries or replace with new ones (pages 11, 12). p Connect it securely to the DC IN jack of the camera and to a wall outlet (wall socket) (page 15). The power is on, but the • The internal system is not working properly. camera does not work. p Remove, and then, after one minute, reinstall the batteries and turn on the camera. If this does not work, press the RESET button located inside the jack cover with a pointed object, then turn the power on again. (This will clear the date and time settings, etc.) You cannot identify the - indicator on the LCD screen. p Check the indicator (pages 116 to 119). The lens gets fogged. • Condensation is occurring. p Turn off the camera, leave the camera for about an hour and then try to use it again (page 111). The camera gets hot if you - use it for a long time. p This is not a malfunction. Troubleshooting 101
-
 1
1 -
2
-
3
-
4
-
5
-
6
-
7
-
8
-
9
-
10
-
11
-
12
-
13
-
14
-
15
-
16
-
17
-
18
-
19
-
20
-
21
-
22
-
23
-
24
-
25
-
26
-
27
-
28
-
29
-
30
-
31
-
32
-
33
-
34
-
35
-
36
-
37
-
38
-
39
-
40
-
41
-
42
-
43
-
44
-
45
-
46
-
47
-
48
-
49
-
50
-
51
-
52
-
53
-
54
-
55
-
56
-
57
-
58
-
59
-
60
-
61
-
62
-
63
-
64
-
65
-
66
-
67
-
68
-
69
-
70
-
71
-
72
-
73
-
74
-
75
-
76
-
77
-
78
-
79
-
80
-
81
-
82
-
83
-
84
-
85
-
86
-
87
-
88
-
89
-
90
-
91
-
92
-
93
-
94
-
95
-
 96
96 -
 97
97 -
 98
98 -
 99
99 -
 100
100 -
 101
101 -
 102
102 -
 103
103 -
 104
104 -
 105
105 -
 106
106 -
107
-
108
-
109
-
110
-
111
-
112
-
113
-
114
-
115
-
116
-
117
-
118
-
119
-
120
-
121
-
122
-
123
-
124
 |
 |
