Sony DSCF717 Operating Instructions - Page 75
Shooting movies
 |
UPC - 027242592889
View all Sony DSCF717 manuals
Add to My Manuals
Save this manual to your list of manuals |
Page 75 highlights
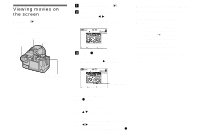
Enjoying movies Shooting movies c Select (IMAGE SIZE) with b, then select the desired mode Mode dial: You can shoot movies using your camera. Before starting with v/V. You can choose from 320 (HQX), 320×240 or 160×112. For details on the recording time for each image size, see page 105. Set [MOVING IMAGE] to [MPEG MOVIE] in the SET UP settings (pages 42 and 110). MENU Mode dial d Press the shutter button fully down. "REC" appears on the screen and the camera starts recording the image and sound. Shutter 60min 160 101 REC 00:00:24[ 00:24:35] Control button a Set the mode dial to . b Press MENU. The menu appears. • Recording stops when the "Memory Stick" is full. e Press the shutter button fully down again to stop recording. Indicators during shooting • The screen indicators are not recorded. • For a detailed description of the indicators, see page 119. • A histogram is not displayed. Shooting close-ups (Macro) Set the mode dial to and follow the procedure on page 24. Using the self-timer Set the mode dial to and follow the procedure on page 25. • The flash does not function when shooting movies. • The date and time are not superimposed onto movies. • When shooting movies (MPEG MOVIE) with Multipoint AF, the distance to the center of the screen is estimated as an average, so the AF works even with a certain amount of vibration. The Focus range select function (Center, Left, Right, Bottom and Top) focuses automatically using only the selected AF range finder. This is convenient when you want to focus only on the subject. Enjoying movies 75
-
 1
1 -
2
-
3
-
4
-
5
-
6
-
7
-
8
-
9
-
10
-
11
-
12
-
13
-
14
-
15
-
16
-
17
-
18
-
19
-
20
-
21
-
22
-
23
-
24
-
25
-
26
-
27
-
28
-
29
-
30
-
31
-
32
-
33
-
34
-
35
-
36
-
37
-
38
-
39
-
40
-
41
-
42
-
43
-
44
-
45
-
46
-
47
-
48
-
49
-
50
-
51
-
52
-
53
-
54
-
55
-
56
-
57
-
58
-
59
-
60
-
61
-
62
-
63
-
64
-
65
-
66
-
67
-
68
-
69
-
 70
70 -
 71
71 -
 72
72 -
 73
73 -
 74
74 -
 75
75 -
 76
76 -
 77
77 -
 78
78 -
 79
79 -
 80
80 -
81
-
82
-
83
-
84
-
85
-
86
-
87
-
88
-
89
-
90
-
91
-
92
-
93
-
94
-
95
-
96
-
97
-
98
-
99
-
100
-
101
-
102
-
103
-
104
-
105
-
106
-
107
-
108
-
109
-
110
-
111
-
112
-
113
-
114
-
115
-
116
-
117
-
118
-
119
-
120
-
121
-
122
-
123
-
124
 |
 |
