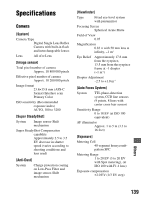
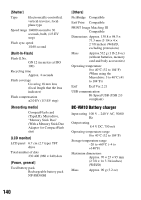
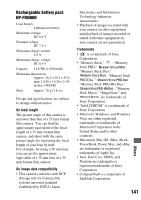
Sony DSLR-A200W Instruction Manual - Page 137
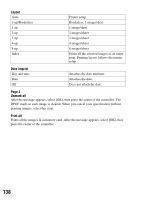
PictBridge menu, Printing images, To cancel the print,
 |
UPC - 027242714212
View all Sony DSLR-A200W manuals
Add to My Manuals
Save this manual to your list of manuals |
Page 137 highlights
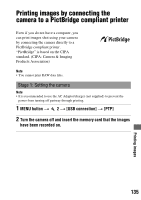
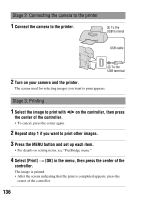
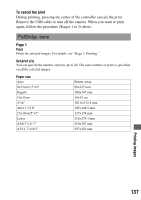
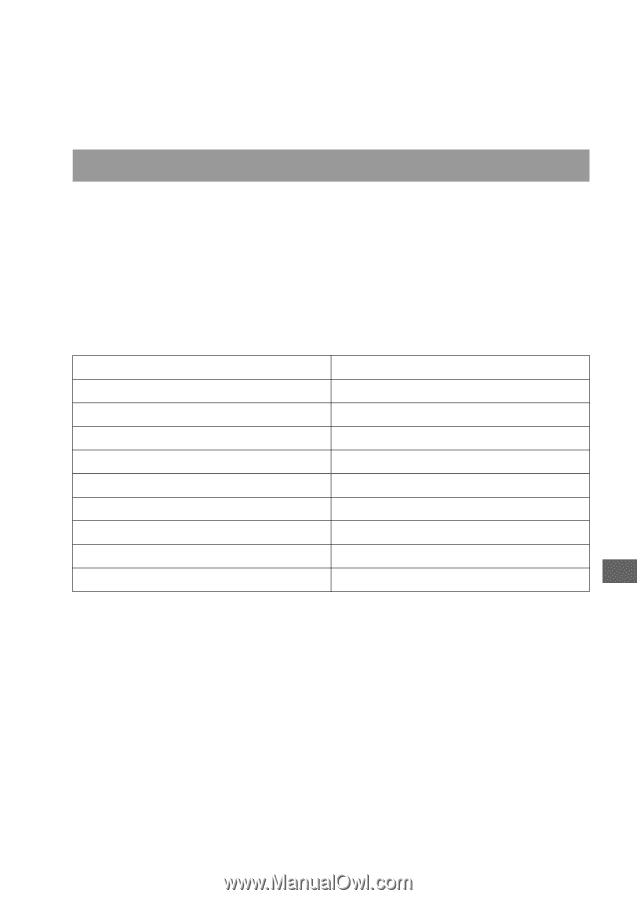
To cancel the print During printing, pressing the center of the controller cancels the print. Remove the USB cable or turn off the camera. When you want to print again, follow the procedure (Stages 1 to 3) above. PictBridge menu Page 1 Print Prints the selected images. For details, see "Stage 3: Printing." Set print q'ty You can specify the number of prints, up to 20. The same number of prints is specified on all the selected images. Paper size Auto 9×13cm/3.5"×5" Hagaki 10×15cm 4"×6" A6/4.1"×5.8" 13×18cm/5"×7" Letter A4/8.3"×11.7" A3/11.7"×16.5" Printer setup 89×127 mm 100×147 mm 10×15 cm 101.6×152.4 mm 105×148.5 mm 127×178 mm 216×279.4 mm 210×297 mm 297×420 mm Printing images 137
-
 1
1 -
2
-
3
-
4
-
5
-
6
-
7
-
8
-
9
-
10
-
11
-
12
-
13
-
14
-
15
-
16
-
17
-
18
-
19
-
20
-
21
-
22
-
23
-
24
-
25
-
26
-
27
-
28
-
29
-
30
-
31
-
32
-
33
-
34
-
35
-
36
-
37
-
38
-
39
-
40
-
41
-
42
-
43
-
44
-
45
-
46
-
47
-
48
-
49
-
50
-
51
-
52
-
53
-
54
-
55
-
56
-
57
-
58
-
59
-
60
-
61
-
62
-
63
-
64
-
65
-
66
-
67
-
68
-
69
-
70
-
71
-
72
-
73
-
74
-
75
-
76
-
77
-
78
-
79
-
80
-
81
-
82
-
83
-
84
-
85
-
86
-
87
-
88
-
89
-
90
-
91
-
92
-
93
-
94
-
95
-
96
-
97
-
98
-
99
-
100
-
101
-
102
-
103
-
104
-
105
-
106
-
107
-
108
-
109
-
110
-
111
-
112
-
113
-
114
-
115
-
116
-
117
-
118
-
119
-
120
-
121
-
122
-
123
-
124
-
125
-
126
-
127
-
128
-
129
-
130
-
131
-
 132
132 -
 133
133 -
 134
134 -
 135
135 -
 136
136 -
 137
137 -
 138
138 -
 139
139 -
 140
140 -
 141
141 -
 142
142 -
143
-
144
-
145
-
146
-
147
-
148
-
149
-
150
-
151
-
152
-
153
-
154
-
155
-
156
-
157
-
158
 |
 |
137
Printing images
To cancel the print
During printing, pressing the center of the controller cancels the print.
Remove the USB cable or turn off the camera. When you want to print
again, follow the procedure (Stages 1 to 3) above.
Page 1
Print
Prints the selected images. For details, see “Stage 3: Printing.”
Set print q’ty
You can specify the number of prints, up to 20. The same number of prints is specified
on all the selected images.
Paper size
PictBridge menu
Auto
Printer setup
9×13cm/3.5"×5"
89×127 mm
Hagaki
100×147 mm
10×15cm
10×15 cm
4"×6"
101.6×152.4 mm
A6/4.1"×5.8"
105×148.5 mm
13×18cm/5"×7"
127×178 mm
Letter
216×279.4 mm
A4/8.3"×11.7"
210×297 mm
A3/11.7"×16.5"
297×420 mm