Sony DSLR-A200W Instruction Manual - Page 143
Troubleshooting, Battery pack and power
 |
UPC - 027242714212
View all Sony DSLR-A200W manuals
Add to My Manuals
Save this manual to your list of manuals |
Page 143 highlights
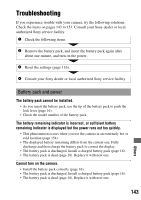
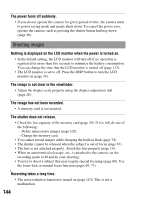
Troubleshooting If you experience trouble with your camera, try the following solutions. Check the items on pages 143 to 151. Consult your Sony dealer or local authorized Sony service facility. 1 Check the following items. 2 Remove the battery pack, and insert the battery pack again after about one minute, and turn on the power. 3 Reset the settings (page 116). 4 Consult your Sony dealer or local authorized Sony service facility. Battery pack and power The battery pack cannot be installed. • As you insert the battery pack, use the tip of the battery pack to push the lock lever (page 16). • Check the model number of the battery pack. The battery remaining indicator is incorrect, or sufficient battery remaining indicator is displayed but the power runs out too quickly. • This phenomenon occurs when you use the camera in an extremely hot or cold location (page 154). • The displayed battery remaining differs from the current one. Fully discharge and then charge the battery pack to correct the display. • The battery pack is discharged. Install a charged battery pack (page 16). • The battery pack is dead (page 18). Replace it with new one. Cannot turn on the camera. • Install the battery pack correctly (page 16). • The battery pack is discharged. Install a charged battery pack (page 16). • The battery pack is dead (page 18). Replace it with new one. 143 Others
-
 1
1 -
2
-
3
-
4
-
5
-
6
-
7
-
8
-
9
-
10
-
11
-
12
-
13
-
14
-
15
-
16
-
17
-
18
-
19
-
20
-
21
-
22
-
23
-
24
-
25
-
26
-
27
-
28
-
29
-
30
-
31
-
32
-
33
-
34
-
35
-
36
-
37
-
38
-
39
-
40
-
41
-
42
-
43
-
44
-
45
-
46
-
47
-
48
-
49
-
50
-
51
-
52
-
53
-
54
-
55
-
56
-
57
-
58
-
59
-
60
-
61
-
62
-
63
-
64
-
65
-
66
-
67
-
68
-
69
-
70
-
71
-
72
-
73
-
74
-
75
-
76
-
77
-
78
-
79
-
80
-
81
-
82
-
83
-
84
-
85
-
86
-
87
-
88
-
89
-
90
-
91
-
92
-
93
-
94
-
95
-
96
-
97
-
98
-
99
-
100
-
101
-
102
-
103
-
104
-
105
-
106
-
107
-
108
-
109
-
110
-
111
-
112
-
113
-
114
-
115
-
116
-
117
-
118
-
119
-
120
-
121
-
122
-
123
-
124
-
125
-
126
-
127
-
128
-
129
-
130
-
131
-
132
-
133
-
134
-
135
-
136
-
137
-
 138
138 -
 139
139 -
 140
140 -
 141
141 -
 142
142 -
 143
143 -
 144
144 -
 145
145 -
 146
146 -
 147
147 -
 148
148 -
149
-
150
-
151
-
152
-
153
-
154
-
155
-
156
-
157
-
158
 |
 |
