Sony DSLR-A200W Instruction Manual - Page 87
Image processing, Correcting the brightness of the image (D-Range Optimizer)
 |
UPC - 027242714212
View all Sony DSLR-A200W manuals
Add to My Manuals
Save this manual to your list of manuals |
Page 87 highlights
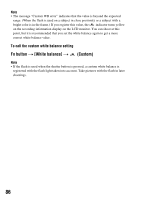
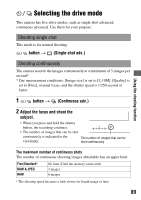
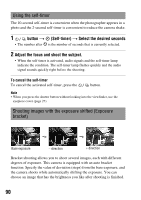
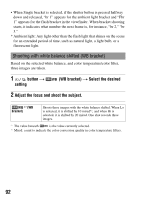
Image processing Using the shooting function Correcting the brightness of the image (D-Range Optimizer) Fn button t [D-RangeOptimizer] t Select the desired setting (Off) (Standard) (Advanced) No compensation. When there is a sharp contrast of light and shadow between the subject and the background, which is common when shooting into the sun, the camera attenuates the contrast across the entire image to produce an image with proper brightness and contrast. By dividing the image into small areas, the camera analyses the contrast of light and shadow between the subject and the background, producing the image with the optimal brightness and gradation. Selecting your desired image processing (Creative Style) MENU button t 1 t [Creative Style] t Select the desired setting • When you want to adjust (Contrast), (Saturation), or (Sharpness), select the desired item with b/B, then adjust the value with v/V. (Standard) (Vivid) (Portrait) (Landscape) (Night view) (Sunset) For shooting various scenes with rich gradation and beautiful colors. The saturation and contrast are heightened for shooting striking images of colorful scenes and subjects such as flowers, spring greenery, blue sky, or ocean views. For shooting the skin color in a soft tone, ideally suited to shooting portraits. The saturation, contrast, and sharpness are heightened for shooting vivid and crisp scenery. Distant landscapes also stand out more. The contrast is attenuated for shooting a nightscape that is more faithful to the real view. For shooting the beautiful red of the setting sun. 87
-
 1
1 -
2
-
3
-
4
-
5
-
6
-
7
-
8
-
9
-
10
-
11
-
12
-
13
-
14
-
15
-
16
-
17
-
18
-
19
-
20
-
21
-
22
-
23
-
24
-
25
-
26
-
27
-
28
-
29
-
30
-
31
-
32
-
33
-
34
-
35
-
36
-
37
-
38
-
39
-
40
-
41
-
42
-
43
-
44
-
45
-
46
-
47
-
48
-
49
-
50
-
51
-
52
-
53
-
54
-
55
-
56
-
57
-
58
-
59
-
60
-
61
-
62
-
63
-
64
-
65
-
66
-
67
-
68
-
69
-
70
-
71
-
72
-
73
-
74
-
75
-
76
-
77
-
78
-
79
-
80
-
81
-
 82
82 -
 83
83 -
 84
84 -
 85
85 -
 86
86 -
 87
87 -
 88
88 -
 89
89 -
 90
90 -
 91
91 -
 92
92 -
93
-
94
-
95
-
96
-
97
-
98
-
99
-
100
-
101
-
102
-
103
-
104
-
105
-
106
-
107
-
108
-
109
-
110
-
111
-
112
-
113
-
114
-
115
-
116
-
117
-
118
-
119
-
120
-
121
-
122
-
123
-
124
-
125
-
126
-
127
-
128
-
129
-
130
-
131
-
132
-
133
-
134
-
135
-
136
-
137
-
138
-
139
-
140
-
141
-
142
-
143
-
144
-
145
-
146
-
147
-
148
-
149
-
150
-
151
-
152
-
153
-
154
-
155
-
156
-
157
-
158
 |
 |