Sony FWD-50PX3 Operating Instructions - Page 59
ID MODE ON/0-9/SET/C/OFF buttons, button, DISPLAY button, OPTION 1/OPTION 2 button, HD15 IN button - specifications
 |
UPC - 027242722484
View all Sony FWD-50PX3 manuals
Add to My Manuals
Save this manual to your list of manuals |
Page 59 highlights
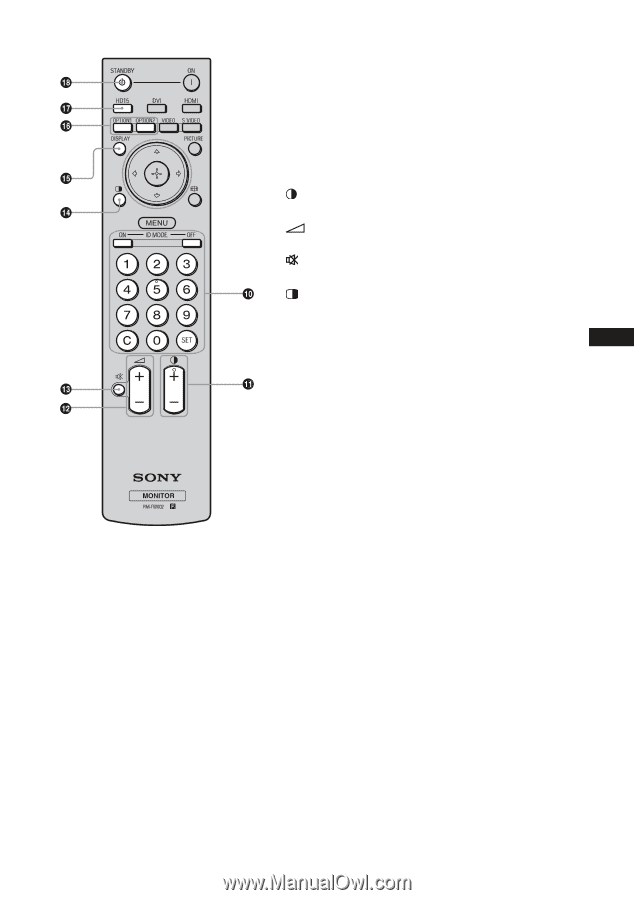
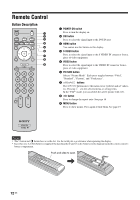
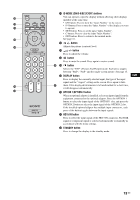
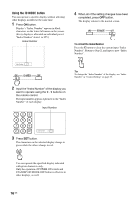
0 ID MODE (ON/0-9/SET/C/OFF) buttons You can operate a specific display without affecting other displays installed at the same time. • ON button: Press to show the "Index Number" on the screen. • 0-9 button: Press to enter the "Index Number" of the display you want to operate. • SET button: Press to set the input "Index Number". • C button: Press to clear the input "Index Number". • OFF button: Press to return to the normal mode. See page 16. qa +/- button Adjusts the picture (contrast) level. qs +/- button Press to adjust the volume. qd button Press to mute the sound. Press again to restore sound. qf button Selects the "PAP" (Picture And Picture) mode. Each press toggles between "P&P", "PinP" and the single-screen picture. See page 15. qg DISPLAY button Press to display the currently selected input, the type of the input signal and the "Aspect" setting on the screen. Press again to hide them. If this displayed information is left undisturbed for a short time, it will disappear automatically. qh OPTION 1/OPTION 2 button When an optional adaptor is installed, selects an input signal from the equipment connected to the optional adaptor. Press the OPTION 1 button to select the input signal of the OPTION 1 slot, and press the OPTION 2 button to select the input signal of the OPTION 2 slot. If the installed optional adaptor has multiple input connectors, each press of the button toggles between the input signals. qj HD15 IN button Press to select the input signal of the HD15 IN connector. The RGB signal or component signal is selected automatically or manually in accordance with the menu settings. qk STANDBY button Press to change the display to the standby mode. GB 13 GB
-
 1
1 -
2
-
3
-
4
-
5
-
6
-
7
-
8
-
9
-
10
-
11
-
12
-
13
-
14
-
15
-
16
-
17
-
18
-
19
-
20
-
21
-
22
-
23
-
24
-
25
-
26
-
27
-
28
-
29
-
30
-
31
-
32
-
33
-
34
-
35
-
36
-
37
-
38
-
39
-
40
-
41
-
42
-
43
-
44
-
45
-
46
-
47
-
48
-
49
-
50
-
51
-
52
-
53
-
 54
54 -
 55
55 -
 56
56 -
 57
57 -
 58
58 -
 59
59 -
 60
60 -
 61
61 -
 62
62 -
 63
63 -
 64
64 -
65
-
66
-
67
-
68
-
69
-
70
-
71
-
72
-
73
-
74
-
75
-
76
-
77
-
78
-
79
-
80
-
81
-
82
-
83
-
84
-
85
-
86
-
87
-
88
-
89
-
90
-
91
-
92
-
93
-
94
-
95
-
96
-
97
-
98
-
99
-
100
-
101
-
102
-
103
-
104
-
105
-
106
-
107
-
108
-
109
-
110
-
111
-
112
-
113
-
114
-
115
-
116
-
117
-
118
-
119
-
120
-
121
-
122
-
123
-
124
-
125
-
126
-
127
-
128
-
129
-
130
-
131
-
132
-
133
-
134
-
135
-
136
-
137
-
138
-
139
-
140
-
141
-
142
-
143
-
144
-
145
-
146
-
147
-
148
-
149
-
150
-
151
-
152
-
153
-
154
-
155
-
156
-
157
-
158
-
159
-
160
-
161
-
162
-
163
-
164
-
165
-
166
-
167
-
168
-
169
-
170
-
171
-
172
-
173
-
174
-
175
-
176
-
177
-
178
-
179
-
180
-
181
-
182
-
183
-
184
-
185
-
186
-
187
-
188
-
189
-
190
-
191
-
192
-
193
-
194
-
195
-
196
-
197
-
198
-
199
-
200
-
201
-
202
-
203
-
204
-
205
-
206
-
207
-
208
-
209
-
210
-
211
-
212
-
213
-
214
-
215
-
216
-
217
-
218
-
219
-
220
-
221
-
222
-
223
-
224
-
225
-
226
-
227
-
228
-
229
-
230
-
231
-
232
-
233
-
234
-
235
-
236
-
237
-
238
-
239
-
240
-
241
-
242
-
243
-
244
-
245
-
246
-
247
-
248
-
249
-
250
-
251
-
252
-
253
-
254
-
255
-
256
-
257
-
258
-
259
-
260
-
261
-
262
-
263
-
264
-
265
-
266
-
267
-
268
-
269
-
270
-
271
-
272
-
273
-
274
-
275
-
276
-
277
-
278
-
279
-
280
-
281
-
282
-
283
-
284
-
285
-
286
-
287
-
288
-
289
-
290
-
291
-
292
-
293
-
294
-
295
-
296
-
297
-
298
-
299
-
300
-
301
-
302
-
303
-
304
-
305
-
306
-
307
-
308
 |
 |