Sony FWD-50PX3 Operating Instructions - Page 75
Advanced Setup, Control Setting, Index Number, Control Mode, Display+Remote, Display Only, Remote Only
 |
UPC - 027242722484
View all Sony FWD-50PX3 manuals
Add to My Manuals
Save this manual to your list of manuals |
Page 75 highlights
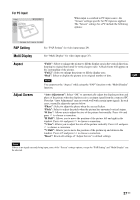
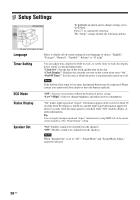
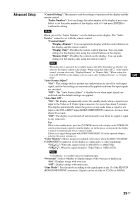
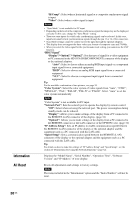
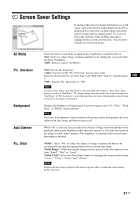
Advanced Setup "Control Setting": This menu is used for settings of operation of the display and the remote control. "Index Number": You can change the index number of the display if necessary. Select to set the index number of the display with F/f and press ENTER to confirm the setting. Note When you set the "Index Number", use the buttons on the display. The "Index Number" cannot be set with the remote control. "Control Mode" "Display+Remote": You can operate the display with the control buttons on the display and the remote control. "Display Only": Disables the remote control function. You can make settings for the display only using the control buttons on the display. "Remote Only": Disables the controls on the display. You can make settings for the display only using the remote control. Note When this item is operated, the available modes will differ depending on whether you select by the remote control or the display. When setting this item with on the remote control, you can select only "Display+Remote" or "Remote Only". When setting this item with ENTER on the display, you can select only "Display+Remote" or "Display Only". "Auto Screen Adjust" "On": The settings such as picture size and position are saved for each input signal, and the last settings are automatically applied each time the input signals are switched. "Off": The "Auto Screen Adjust" is disabled even when input signals are switched and the default settings are applied. "Auto Shut Off": "On": The display automatically enters the standby mode when a signal is not input to the Video or S Video input connectors for more than about 5 minutes. The display automatically enters the power saving mode when a signal is not input to the DVI or HD15 input (RGB/COMPONENT) connectors for more than about 30 seconds. "Off": The display is not turned off automatically even when no signal is input to any connector. Tip While in the standby mode, press the 1 POWER switch on the display or the POWER ON switch on the remote control to turn the display on. In the power saving mode, the display is turned on automatically when a signal is input. If there is no signal being input with RGB/COMPONENT IN of the optional adaptor selected, the power remains on. "Color Matrix": Shows pictures in natural color tones when the HD15 IN (RGB/ COMPONENT) connector of the display is connected to a video equipment. "Y/CB/CR": When the signal format is 480i(525i) or 480p(525p) "Y/PB/PR": When the signal format is 720p(750p) or 1080i(1125i) Note "Color Matrix" is available only for Component input. "Overscan": Selects whether to display images with overscan or underscan. "On": Displays image with overscan. "Off": Displays image with underscan. "Sync Mode": Sets the mode according to the signal input at pin 13 of the HD15 IN (RGB/COMPONENT) connector. Signals can be set only to 575/50i or 480/60i. GB 29 GB
-
 1
1 -
2
-
3
-
4
-
5
-
6
-
7
-
8
-
9
-
10
-
11
-
12
-
13
-
14
-
15
-
16
-
17
-
18
-
19
-
20
-
21
-
22
-
23
-
24
-
25
-
26
-
27
-
28
-
29
-
30
-
31
-
32
-
33
-
34
-
35
-
36
-
37
-
38
-
39
-
40
-
41
-
42
-
43
-
44
-
45
-
46
-
47
-
48
-
49
-
50
-
51
-
52
-
53
-
54
-
55
-
56
-
57
-
58
-
59
-
60
-
61
-
62
-
63
-
64
-
65
-
66
-
67
-
68
-
69
-
 70
70 -
 71
71 -
 72
72 -
 73
73 -
 74
74 -
 75
75 -
 76
76 -
 77
77 -
 78
78 -
 79
79 -
 80
80 -
81
-
82
-
83
-
84
-
85
-
86
-
87
-
88
-
89
-
90
-
91
-
92
-
93
-
94
-
95
-
96
-
97
-
98
-
99
-
100
-
101
-
102
-
103
-
104
-
105
-
106
-
107
-
108
-
109
-
110
-
111
-
112
-
113
-
114
-
115
-
116
-
117
-
118
-
119
-
120
-
121
-
122
-
123
-
124
-
125
-
126
-
127
-
128
-
129
-
130
-
131
-
132
-
133
-
134
-
135
-
136
-
137
-
138
-
139
-
140
-
141
-
142
-
143
-
144
-
145
-
146
-
147
-
148
-
149
-
150
-
151
-
152
-
153
-
154
-
155
-
156
-
157
-
158
-
159
-
160
-
161
-
162
-
163
-
164
-
165
-
166
-
167
-
168
-
169
-
170
-
171
-
172
-
173
-
174
-
175
-
176
-
177
-
178
-
179
-
180
-
181
-
182
-
183
-
184
-
185
-
186
-
187
-
188
-
189
-
190
-
191
-
192
-
193
-
194
-
195
-
196
-
197
-
198
-
199
-
200
-
201
-
202
-
203
-
204
-
205
-
206
-
207
-
208
-
209
-
210
-
211
-
212
-
213
-
214
-
215
-
216
-
217
-
218
-
219
-
220
-
221
-
222
-
223
-
224
-
225
-
226
-
227
-
228
-
229
-
230
-
231
-
232
-
233
-
234
-
235
-
236
-
237
-
238
-
239
-
240
-
241
-
242
-
243
-
244
-
245
-
246
-
247
-
248
-
249
-
250
-
251
-
252
-
253
-
254
-
255
-
256
-
257
-
258
-
259
-
260
-
261
-
262
-
263
-
264
-
265
-
266
-
267
-
268
-
269
-
270
-
271
-
272
-
273
-
274
-
275
-
276
-
277
-
278
-
279
-
280
-
281
-
282
-
283
-
284
-
285
-
286
-
287
-
288
-
289
-
290
-
291
-
292
-
293
-
294
-
295
-
296
-
297
-
298
-
299
-
300
-
301
-
302
-
303
-
304
-
305
-
306
-
307
-
308
 |
 |
