Sony FWD-50PX3 Operating Instructions - Page 79
Checking the automatically assigned IP, Automatically obtaining an IP address
 |
UPC - 027242722484
View all Sony FWD-50PX3 manuals
Add to My Manuals
Save this manual to your list of manuals |
Page 79 highlights
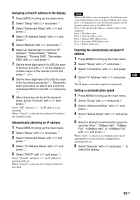
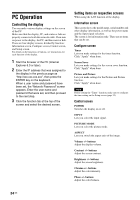
Assigning a fixed IP address to the display 1 Press MENU to bring up the main menu. 2 Select "Setup" with F/f and press . 3 Select "Advanced Setup" with F/f and press . 4 Select "IP Address Setup" with F/f and press . 5 Select "Manual" with F/f and press . 6 Select an desired item to set from "IP Address", "Subnet Mask", "Default Gateway", "Primary DNS", "Secondary DNS" with F/f and press . 7 Set the three digit value (0 to 255) for each of the four box with F/f on the display or numeric keys on the remote control and press or g. 8 Set the three digit value (0 to 255) for each of the four boxes and press . Repeat the same procedure as step 6 and select the next desired item to set with F/f and press . 9 After values are set for all the desired items, select "Execute" with F/f, then press . Select "OK" and press . An IP address is set manually. When "Cancel" is selected, the setting will return to the original setting. Automatically obtaining an IP address 1 Press MENU to bring up the main menu. 2 Select "Setup" with F/f and press . 3 Select "Advanced Setup" with F/f and press . 4 Select "IP Address Setup" with F/f and press . 5 Select "DHCP" with F/f and press . Select "Execute" and press . An IP address is automatically set. When "Cancel" is selected, the setting will not be executed. Note When an IP address is not set properly, the following error codes will be displayed in accordance with the error cause. Error 1: Communication error between the display and the optional adaptor such as the BKM-FW50 Error 2: The specified IP address is already used for other equipment Error 3: IP address error Error 4: Gateway address error Error 5: Primary DNS address error Error 6: Secondary DNS address error Error 7: Subnet mask error Checking the automatically assigned IP address 1 Press MENU to bring up the main menu. 2 Select "Setup" with F/f and press . 3 Select "Information" with F/f and press . 4 Select "IP Address" with F/f and press GB . The IP address currently acquired is displayed. Setting a communication speed 1 Press MENU to bring up the main menu. 2 Select "Setup" with F/f and press . 3 Select "Advanced Setup" with F/f and press . 4 Select "Speed Setup" with F/f and press . 5 Select a desired communication speed to set from "Auto", "10Mbps Half", "10Mbps Full", "100Mbps Half", or "100Mbps Full" with F/f and press . When "Auto" is selected, a communication speed appropriate for your network configuration is automatically set. 6 Select "Execute" with F/f and press to reflect the setting. 33 GB
-
 1
1 -
2
-
3
-
4
-
5
-
6
-
7
-
8
-
9
-
10
-
11
-
12
-
13
-
14
-
15
-
16
-
17
-
18
-
19
-
20
-
21
-
22
-
23
-
24
-
25
-
26
-
27
-
28
-
29
-
30
-
31
-
32
-
33
-
34
-
35
-
36
-
37
-
38
-
39
-
40
-
41
-
42
-
43
-
44
-
45
-
46
-
47
-
48
-
49
-
50
-
51
-
52
-
53
-
54
-
55
-
56
-
57
-
58
-
59
-
60
-
61
-
62
-
63
-
64
-
65
-
66
-
67
-
68
-
69
-
70
-
71
-
72
-
73
-
 74
74 -
 75
75 -
 76
76 -
 77
77 -
 78
78 -
 79
79 -
 80
80 -
 81
81 -
 82
82 -
 83
83 -
 84
84 -
85
-
86
-
87
-
88
-
89
-
90
-
91
-
92
-
93
-
94
-
95
-
96
-
97
-
98
-
99
-
100
-
101
-
102
-
103
-
104
-
105
-
106
-
107
-
108
-
109
-
110
-
111
-
112
-
113
-
114
-
115
-
116
-
117
-
118
-
119
-
120
-
121
-
122
-
123
-
124
-
125
-
126
-
127
-
128
-
129
-
130
-
131
-
132
-
133
-
134
-
135
-
136
-
137
-
138
-
139
-
140
-
141
-
142
-
143
-
144
-
145
-
146
-
147
-
148
-
149
-
150
-
151
-
152
-
153
-
154
-
155
-
156
-
157
-
158
-
159
-
160
-
161
-
162
-
163
-
164
-
165
-
166
-
167
-
168
-
169
-
170
-
171
-
172
-
173
-
174
-
175
-
176
-
177
-
178
-
179
-
180
-
181
-
182
-
183
-
184
-
185
-
186
-
187
-
188
-
189
-
190
-
191
-
192
-
193
-
194
-
195
-
196
-
197
-
198
-
199
-
200
-
201
-
202
-
203
-
204
-
205
-
206
-
207
-
208
-
209
-
210
-
211
-
212
-
213
-
214
-
215
-
216
-
217
-
218
-
219
-
220
-
221
-
222
-
223
-
224
-
225
-
226
-
227
-
228
-
229
-
230
-
231
-
232
-
233
-
234
-
235
-
236
-
237
-
238
-
239
-
240
-
241
-
242
-
243
-
244
-
245
-
246
-
247
-
248
-
249
-
250
-
251
-
252
-
253
-
254
-
255
-
256
-
257
-
258
-
259
-
260
-
261
-
262
-
263
-
264
-
265
-
266
-
267
-
268
-
269
-
270
-
271
-
272
-
273
-
274
-
275
-
276
-
277
-
278
-
279
-
280
-
281
-
282
-
283
-
284
-
285
-
286
-
287
-
288
-
289
-
290
-
291
-
292
-
293
-
294
-
295
-
296
-
297
-
298
-
299
-
300
-
301
-
302
-
303
-
304
-
305
-
306
-
307
-
308
 |
 |