Sony HDR TG1 Operating Guide - Page 19
Connecting to other devices, A/V Remote Connector/A/V OUT - cables
 |
UPC - 027242729810
View all Sony HDR TG1 manuals
Add to My Manuals
Save this manual to your list of manuals |
Page 19 highlights
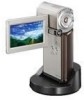
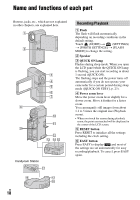
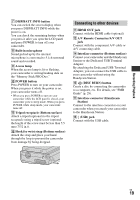
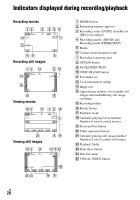
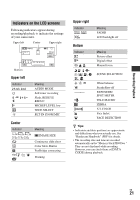
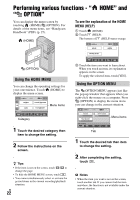
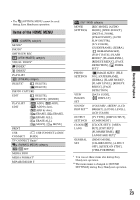
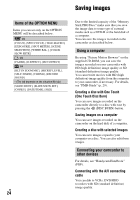
Recording/Playback G DISP/BATT INFO button You can switch the screen display when you press DISP/BATT INFO while the power is on. You can check the remaining battery when you press it after you open the LCD panel and press POWER to turn off your camcorder. H Built-in microphone Sound picked up by the internal microphone is converted to 5.1ch surround sound and recorded. I Access lamp When the access lamp is lit or flashing, your camcorder is writing/reading data on the "Memory Stick PRO Duo." J POWER button Press POWER to turn on your camcorder. When you press it while the power is on, your camcorder turns off. • When you press POWER to turn on your camcorder while the LCD panel is closed, your camcorder goes to sleep mode. When you press POWER while sleep mode, your camcorder turns off. M Tripod receptacle (Bottom surface) Attach a tripod (optional) to the tripod receptacle using a tripod screw (optional: the length of the screw must be less than 5.5 mm (7/32 in.)). O Hook for wrist strap (Bottom surface) Attach the strap and place your hand through the loop to prevent the camcorder from damage by being dropped. Connecting to other devices K HDMI OUT jack Connect with the HDMI cable (optional). L A/V Remote Connector/A/V OUT jack Connect with the component A/V cable or A/V connecting cable. N Interface connector (Bottom surface) Connect your camcorder and the Handycam Station or the Dedicated USB Terminal Adaptor. By attaching the Dedicated USB Terminal Adaptor, you can connect the USB cable to your camcorder without using the Handycam Station. P (DISC BURN) button Create a disc by connecting the camcorder to a computer, etc. For details, see "PMB Guide" (p. 29). Q Interface connector (Handycam Station) Connect to the interface connector on your camcorder when you attach your camcorder to the Handycam Station. R (USB) jack Connect with the USB cable. US 19
-
 1
1 -
2
-
3
-
4
-
5
-
6
-
7
-
8
-
9
-
10
-
11
-
12
-
13
-
 14
14 -
 15
15 -
 16
16 -
 17
17 -
 18
18 -
 19
19 -
 20
20 -
 21
21 -
 22
22 -
 23
23 -
 24
24 -
25
-
26
-
27
-
28
-
29
-
30
-
31
-
32
-
33
-
34
-
35
-
36
-
37
-
38
-
39
-
40
-
41
-
42
-
43
-
44
-
45
-
46
-
47
-
48
-
49
-
50
-
51
-
52
-
53
-
54
-
55
-
56
-
57
-
58
-
59
-
60
-
61
-
62
-
63
-
64
-
65
-
66
-
67
-
68
-
69
-
70
-
71
-
72
-
73
-
74
-
75
-
76
 |
 |
