Sony HDR TG1 Operating Guide - Page 8
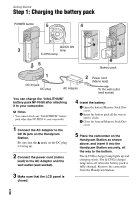
Getting Started, Step 1: Charging the battery pack
 |
UPC - 027242729810
View all Sony HDR TG1 manuals
Add to My Manuals
Save this manual to your list of manuals |
Page 8 highlights
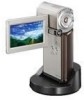
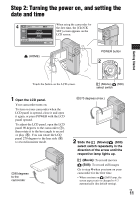
Getting Started Step 1: Charging the battery pack POWER button QUICK ON lamp /CHG lamp Battery pack DC IN jack DC plug AC Adaptor Power cord (Mains lead) To the wall outlet (wall socket) You can charge the "InfoLITHIUM" battery pack NP-FH50 after attaching it to your camcorder. b Notes • You cannot attach any "InfoLITHIUM" battery pack other than NP-FH50 to your camcorder. 1 Connect the AC Adaptor to the DC IN jack on the Handycam Station. Be sure that the v mark on the DC plug is facing up. 2 Connect the power cord (mains lead) to the AC Adaptor and the wall outlet (wall socket). 3 Make sure that the LCD panel is closed. 4 Insert the battery. 1 Open the battery/Memory Stick Duo cover. 2 Insert the battery pack all the way in until it clicks. 3 Close the battery/Memory Stick Duo cover. 5 Place the camcorder on the Handycam Station as shown above, and insert it into the Handycam Station securely, all the way to the bottom. The /CHG (charge) lamp lights up and charging starts. The /CHG (charge) lamp turns off when the battery pack is fully charged. Remove the camcorder from the Handycam Station. US 8
-
 1
1 -
2
-
 3
3 -
 4
4 -
 5
5 -
 6
6 -
 7
7 -
 8
8 -
 9
9 -
 10
10 -
 11
11 -
 12
12 -
 13
13 -
14
-
15
-
16
-
17
-
18
-
19
-
20
-
21
-
22
-
23
-
24
-
25
-
26
-
27
-
28
-
29
-
30
-
31
-
32
-
33
-
34
-
35
-
36
-
37
-
38
-
39
-
40
-
41
-
42
-
43
-
44
-
45
-
46
-
47
-
48
-
49
-
50
-
51
-
52
-
53
-
54
-
55
-
56
-
57
-
58
-
59
-
60
-
61
-
62
-
63
-
64
-
65
-
66
-
67
-
68
-
69
-
70
-
71
-
72
-
73
-
74
-
75
-
76
 |
 |
