Sony HVR1500A Product Manual (HVE-1500A Operating Manuals) - Page 25
Preparations, Before Using this Unit, Setting the system frequency, Setup menu
 |
View all Sony HVR1500A manuals
Add to My Manuals
Save this manual to your list of manuals |
Page 25 highlights
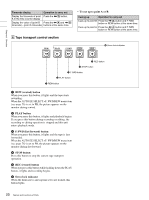
Preparations 2 Chapter Chapter 2 Preparations Before Using this Unit Setting the system frequency This unit is shipped with the system frequency still unset. Therefore, you need to set the system frequency before using the unit. (The unit cannot be used unless the system frequency is set.) Once it is set, the system frequency is retained even when the unit is powered off. To set the system frequency Use the following procedure. 1,4 POWER EJECT INPUT SELECT HD VIDEO SD VIDEO CH1 1/2 CH2 3/4 REC/PB LEVEL 1 2 3 4 LEVEL PHONES VARIABLE REC PRESET PB CONTROL-S MONITOR SELECT REW OVER OVER 0 REPEAT 1080 525 -12 -20 -30 -40 -60 CH1 CH2 EDIT MODE REC INHI TC VITC 44.1K 01:23:45:15 DISPLAY COUNTER SELECT PLAY F FWD STOP REC LOCAL 9PIN i.LINK MENU HDV DVCAM (DV) ASSIGN RESET(NO) TC PRESET SET(YES) A B 3 2 1 Power on this unit by pressing on the " " side of the POWER switch. SYSTEM SEL display appears on the LCD monitor. SETUP MENU SYSTEM SEL :UC 59.94i(UC) 59.94i(J) 50i(PAL) 59.94i J Time counter display Monitor screen 2 Press the M button or the m button to select the system frequency to use. 3 Press the SET (YES) button. The message "NOW SAVING..." appears on the monitor screen, and "Saving..." appears in the time counter display, while the new settings are saved in the unit's memory. "SYSTEM SETTING HAS BEEN CHANGED. PLEASE RE-POWER ON." appears when save processing finishes. 4 Press the POWER switch to power the unit off, and then press it again to power the unit on. The selected system frequency becomes available for use. You can change the system frequency setting with the setup menu item SYSTEM SEL. For the setup menu, see the next column, and for more details, see Chapter 7, "Menus" (page 72). Setup menu Make the necessary settings for using this unit in the setup menu. The setup menu consists of a BASIC menu and an ENHANCHED menu. Each menu has items as follows: BASIC menu • Items regarding operational function • Items regarding display control • Items regarding timecode • Items regarding system frequency selection ENHANCED menu • Items regarding tape protection • Items regarding video control • Items regarding audio control 25 Before Using this Unit
-
 1
1 -
2
-
3
-
4
-
5
-
6
-
7
-
8
-
9
-
10
-
11
-
12
-
13
-
14
-
15
-
16
-
17
-
18
-
19
-
 20
20 -
 21
21 -
 22
22 -
 23
23 -
 24
24 -
 25
25 -
 26
26 -
 27
27 -
 28
28 -
 29
29 -
 30
30 -
31
-
32
-
33
-
34
-
35
-
36
-
37
-
38
-
39
-
40
-
41
-
42
-
43
-
44
-
45
-
46
-
47
-
48
-
49
-
50
-
51
-
52
-
53
-
54
-
55
-
56
-
57
-
58
-
59
-
60
-
61
-
62
-
63
-
64
-
65
-
66
-
67
-
68
-
69
-
70
-
71
-
72
-
73
-
74
-
75
-
76
-
77
-
78
-
79
-
80
-
81
-
82
-
83
-
84
-
85
-
86
-
87
-
88
-
89
-
90
-
91
-
92
-
93
-
94
-
95
-
96
-
97
-
98
-
99
-
100
-
101
-
102
-
103
-
104
-
105
-
106
-
107
-
108
-
109
-
110
-
111
 |
 |
