Sony HVR1500A Product Manual (HVE-1500A Operating Manuals) - Page 44
Carrying out recording, Timecode setting
 |
View all Sony HVR1500A manuals
Add to My Manuals
Save this manual to your list of manuals |
Page 44 highlights
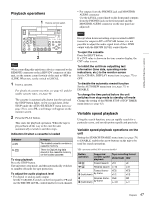
Chapter 3 Recording and Playback Audio mode 4-channel mode Audio mode display 32 K Cautions • When audio signals are recorded in the HDV format, 2 channels of audio are recorded, regardless of the audio recording mode. • When recording in DVCAM format or DV (SP) format, it is possible to use either of two audio recording modes: two channels at 48 kHz or four channels at 32 kHz, can be used. It is not possible to select any other mode (for example with four channels at 48 kHz). When recording in HDV format, audio recording mode is always two channels at 48 kHz. • In audio editing in assemble or insert mode, if audio signals are recorded in a different mode from that of the audio signals recorded on the tape, the resulting audio recording will be discontinuous at the edit points. For this reason, the menu settings on this unit are such that audio editing across different modes is inhibited. For smooth editing operations, check the audio recording mode of the tape beforehand. • Once you have started recording, you cannot change the audio mode or recording format. • If on a tape there is a point where the audio mode is switched, it is not possible to carry out insert editing over a section including that point. • When, in 4-channel mode, analog audio is selected for all four channels (channels 1/2 and 3/4), the same analog audio signals are recorded on channels 1 and 3 and on channels 2 and 4, respectively. 5 Adjust the audio input levels. When recording at manually adjusted audio input levels With the VARIABLE switch on the front panel set to REC, use the REC/PB LEVEL control knobs for each channel to adjust the audio input level. Watching the audio level meter in E-E mode, adjust the level so that the meter does not indicate higher values than 0 dB when the audio signal is at its maximum. When the level exceeds 0 dB, the "OVER" indicator lights. When recording at reference level When the VARIABLE switch on the front panel is set to PRESET, recording is carried out at the preset reference level. Reference level setting The factory-preset reference level for analog audio input is -20 dB. This setting can be changed to -18, -16 or -12 dB using the LEVEL SELECT menu item (see page 84). For recording in DV (SP) format, the reference level is fixed at -12 dB. Timecode setting For details of timecode settings when recording, see Chapter 4, "Using Time Data" (page 52). Carrying out recording This section describes how to record video and audio signals input to the input connectors of this unit. 1 Remote control switch POWER EJECT INPUT SELECT HD VIDEO SD VIDEO CH1 1/2 CH2 3/4 REC/PB LEVEL 1 2 3 4 LEVEL PHONES VARIABLE REC PRESET PB CONTROL-S MONITOR SELECT REW LOCAL 9PIN i.LINK OVER OVER 0 REPEAT 1080 525 -12 -20 -30 -40 -60 CH1 CH2 EDIT MODE REC INHI TC VITC 44.1K 01:23:45:15 DISPLAY COUNTER SELECT MENU TC PRESET HDV DVCAM (DV) ASSIGN RESET(NO) SET(YES) PLAY F FWD STOP REC A B 2 Note When controlling this unit from an editing control unit connected to the REMOTE connector or the HDV/DV connector, set the remote control switch to 9PIN or i.LINK. When not, set the switch to LOCAL. 1 After checking the following items, hold the cassette with the tape window facing upward, then insert it into the recorder (this unit) as illustrated on page 41. Item to check See section Make sure that the REC/ "Preventing accidental SAVE switch of the erasure" (page 41) cassette is set to REC. Check for tape slack. "Checking the tape for slack" (page 40) Make sure that the "HUMID!" alarm is not shown in the time counter display. "Condensation" (page 94) The cassette is automatically drawn into the unit and the tape is wound round the head drum. The tape is 44 Recording
-
 1
1 -
2
-
3
-
4
-
5
-
6
-
7
-
8
-
9
-
10
-
11
-
12
-
13
-
14
-
15
-
16
-
17
-
18
-
19
-
20
-
21
-
22
-
23
-
24
-
25
-
26
-
27
-
28
-
29
-
30
-
31
-
32
-
33
-
34
-
35
-
36
-
37
-
38
-
 39
39 -
 40
40 -
 41
41 -
 42
42 -
 43
43 -
 44
44 -
 45
45 -
 46
46 -
 47
47 -
 48
48 -
 49
49 -
50
-
51
-
52
-
53
-
54
-
55
-
56
-
57
-
58
-
59
-
60
-
61
-
62
-
63
-
64
-
65
-
66
-
67
-
68
-
69
-
70
-
71
-
72
-
73
-
74
-
75
-
76
-
77
-
78
-
79
-
80
-
81
-
82
-
83
-
84
-
85
-
86
-
87
-
88
-
89
-
90
-
91
-
92
-
93
-
94
-
95
-
96
-
97
-
98
-
99
-
100
-
101
-
102
-
103
-
104
-
105
-
106
-
107
-
108
-
109
-
110
-
111
 |
 |