Sony HVR1500A Product Manual (HVE-1500A Operating Manuals) - Page 26
Menu settings, Buttons used to change settings, Displaying the ENHANCED menu items
 |
View all Sony HVR1500A manuals
Add to My Manuals
Save this manual to your list of manuals |
Page 26 highlights
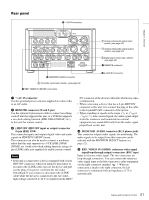
Chapter 2 Preparations • Items regarding interface (format) selection • Items regarding the menu bank operations For details of each menu item, see Chapter 7, "Menus" (page 72). Menu settings Buttons used to change settings Use the following buttons in the menu control section to change the menu settings. Menu control buttons Functions MENU button • Opens the menu and launches menu control mode. • Closes the menu and exits menu control mode. M and m buttons These buttons move the highlighted cursor up and down within the current level to select an item or setting. Hold down one of these buttons to make the highlighted cursor move continuously.
-
 1
1 -
2
-
3
-
4
-
5
-
6
-
7
-
8
-
9
-
10
-
11
-
12
-
13
-
14
-
15
-
16
-
17
-
18
-
19
-
20
-
 21
21 -
 22
22 -
 23
23 -
 24
24 -
 25
25 -
 26
26 -
 27
27 -
 28
28 -
 29
29 -
 30
30 -
 31
31 -
32
-
33
-
34
-
35
-
36
-
37
-
38
-
39
-
40
-
41
-
42
-
43
-
44
-
45
-
46
-
47
-
48
-
49
-
50
-
51
-
52
-
53
-
54
-
55
-
56
-
57
-
58
-
59
-
60
-
61
-
62
-
63
-
64
-
65
-
66
-
67
-
68
-
69
-
70
-
71
-
72
-
73
-
74
-
75
-
76
-
77
-
78
-
79
-
80
-
81
-
82
-
83
-
84
-
85
-
86
-
87
-
88
-
89
-
90
-
91
-
92
-
93
-
94
-
95
-
96
-
97
-
98
-
99
-
100
-
101
-
102
-
103
-
104
-
105
-
106
-
107
-
108
-
109
-
110
-
111
 |
 |

26
Before Using this Unit
Chapter 2
Preparations
•
Items regarding interface (format) selection
•
Items regarding the menu bank operations
For details of each menu item, see Chapter 7, “Menus”
(page 72).
Menu settings
Buttons used to change settings
Use the following buttons in the menu control section to
change the menu settings.
Displaying the ENHANCED menu items
The factory default setting is to display only the BASIC
menu items. To display the ENHANCED menu items,
proceed as follows.
1
Press the MENU button.
The menu selection level display appears on the LCD
monitor or the external video monitor.
In the figure below, SETUP MENU is selected (shown
in reverse video).
The time counter display of this unit shows only the
currently selected item. When the item name is long, it
is abbreviated.
2
With SETUP MENU selected in reverse video, press
the
,
/
B
button.
This displays all BASIC menus on menu level 1.
3
Press the
M
or
m
button to select MENU GRADE.
4
Press the
,
/
B
button.
This displays menu level 2 for MENU GRADE.
5
Press the
m
button to select ENHANCED.
Menu control
buttons
Functions
MENU button
•
Opens the menu and launches menu
control mode.
•
Closes the menu and exits menu
control mode.
M
and
m
buttons
These buttons move the highlighted
cursor up and down within the current
level to select an item or setting.
Hold down one of these buttons to
make the highlighted cursor move
continuously.
<
/
A
and
,
/
B
buttons
•
Press the
,
/
B
button to go down
one level.
•
Press the
<
/
A
button to go up one
level.
Hold down one of these buttons to
make the highlighted cursor move
continuously.
RESET (NO)
button
•
Returns the setting to the factory
default setting.
•
Sends a negative response to
prompts on the monitor screen.
SET (YES)
button
•
Saves the new setting in memory.
•
Sends a positive response to prompts
on the monitor screen.
A
B
MENU
RESET(NO)
SET(YES)
TC
PRESET
ASSIGN
2,4
1
6
5
3
Setup menu
SYSTEM MENU
SETUP MENU
AUTO FUNCTION
HOURS METER
Monitor screen
Time counter display
Operational
SETUP MENU
OPERATIONAL FUNCTION
DISPLAY CONTROL
TIME CODE
SETUP BANK OPERATION
SYSTEM SEL
: J
MENU GRADE
: BASIC
Monitor screen
Time counter display
Menu
g
rade
SETUP MENU
OPERATIONAL FUNCTION
DISPLAY CONTROL
TIME CODE
SETUP BANK OPERATION
SYSTEM SEL
: J
MENU GRADE
: BASIC
Monitor screen
Time counter display
Basic
SETUP MENU
MENU GRADE
*BASIC
ENHANCED
:BASIC
Monitor screen
Time counter display