Sony HVR1500A Product Manual (HVE-1500A Operating Manuals) - Page 71
To cancel the TC insert operation, To stop the TC insert during operation
 |
View all Sony HVR1500A manuals
Add to My Manuals
Save this manual to your list of manuals |
Page 71 highlights
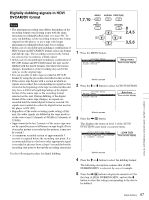
Note If the recording format is not DVCAM, a different message appears. For details, see "When the recording format is not DVCAM" (page 71). 6 Insert the cassette. A message to confirm whether to execute the TC insert operation appears. TC INSERT :DVCAM START TC INSERT? TC insert? Time counter display START: YES KEY ABORT: MENU KEY Monitor screen To cancel the TC insert operation Press the MENU button. 7 Press the SET (YES) button. Timecode recording starts from the current tape position. TC INSERT :DVCAM EXECUTING. TCR 00:00:00:00 UBR 00:00:00:00 ABORT:STOP KEY Executing Time counter display TC INSERT :DVCAM NO TC INSERT FUNCTION AVAILABLE, DV RECORDING FORMAT SELECTED. SELECT DVCAM RECORDING FORMAT. PUSH THE YES BUTTON. Not DVCAM! Time counter display Monitor screen Press the SET (YES) button to end the operation and do it over again after setting the REC FORMAT menu item (see page 76) to DVCAM. You can use the TC insert function in DVCAM format only. When the recording format of the tape is not DVCAM When you carry out step 7 of the foregoing procedure, the following message appears. TC INSERT :DVCAM TC INSERT IS ABORTED DUE TO NON DVCAM FORMAT SOURCE. PUSH THE YES BUTTON. Not DVCAM! Time counter display Monitor screen Press the SET (YES) button to end the operation and do it over again after replacing the tape with one recorded in DVCAM format. Monitor screen When the recording ends, the message "TC INSERT COMPLETED. PUSH THE YES BUTTON." appears on the monitor screen and "Completed" appears in the time counter display. 8 Press the SET (YES) button again. The menu is exited. To stop the TC insert during operation Press the STOP button. The TC insertion ends at the tape position where the button is pressed. When the recording format is not DVCAM When you carry out step 5 of the foregoing procedure, the following message appears. Chapter 6 Using the i.LINK Connector for Dubbing and TC Insert 71 Rerecording the Timecode - TC Insert Function (DVCAM Format Only)
-
 1
1 -
2
-
3
-
4
-
5
-
6
-
7
-
8
-
9
-
10
-
11
-
12
-
13
-
14
-
15
-
16
-
17
-
18
-
19
-
20
-
21
-
22
-
23
-
24
-
25
-
26
-
27
-
28
-
29
-
30
-
31
-
32
-
33
-
34
-
35
-
36
-
37
-
38
-
39
-
40
-
41
-
42
-
43
-
44
-
45
-
46
-
47
-
48
-
49
-
50
-
51
-
52
-
53
-
54
-
55
-
56
-
57
-
58
-
59
-
60
-
61
-
62
-
63
-
64
-
65
-
 66
66 -
 67
67 -
 68
68 -
 69
69 -
 70
70 -
 71
71 -
 72
72 -
 73
73 -
 74
74 -
 75
75 -
 76
76 -
77
-
78
-
79
-
80
-
81
-
82
-
83
-
84
-
85
-
86
-
87
-
88
-
89
-
90
-
91
-
92
-
93
-
94
-
95
-
96
-
97
-
98
-
99
-
100
-
101
-
102
-
103
-
104
-
105
-
106
-
107
-
108
-
109
-
110
-
111
 |
 |
