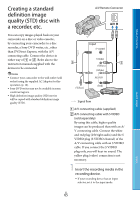
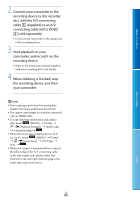
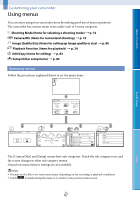
Sony NEX-VG20 Handycam® Handbook - Page 70
Setup, Repair Img. DB F. - info
 |
View all Sony NEX-VG20 manuals
Add to My Manuals
Save this manual to your list of manuals |
Page 70 highlights
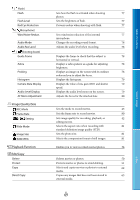
Setup ( Media Settings) Media Info Format Repair Img. DB F. File Number ( Playback Settings) Data Code Volume ( Connection) TV Type Component Output HDMI Resolution CTRL FOR HDMI USB Connect USB Connect Setting Disc Burn ( General Settings) Beep LCD Brightness VF Brightness Display Setting REC Lamp Shooting w/o Lens Remote Ctrl A. Shut Off Language Setting Displays information on the recording media, such as free space. Deletes all data on the recording media. Repairs the image database file on the internal recording media or a memory card. Sets how to assign the file number. 82 82 92, 95 83 Displays the detailed recording data during 83 playback. Adjusts the volume during playback, and the 83 volume for the headphones during recording. Converts the output signal depending on the 83 aspect ratio of the connected TV. Sets this when connecting your camcorder to a TV 84 with a component input jack. Selects the type of signal output to a TV via the 84 HDMI jack. When connecting your camcorder to a "BRAVIA" 85 Sync compatible TV with an HDMI cable (sold separately), you can play back movies on your camcorder by aiming the TV's Remote Commander at the TV. Uses a USB connection with the USB cable. 85 Sets the USB transfer mode for connecting the 85 camcorder to a computer or other USB device. Allows you to save images onto discs by a single 55 press of a button. Sets whether the camcorder sounds operation 85 beeps or not. Adjusts the brightness of the LCD screen. 85 Adjusts the brightness of the viewfinder. 85 Sets the duration that icons or indicators are 86 displayed on the LCD screen. Turns off the recording lamp on the front of your 86 camcorder. Sets whether or not to record images when there 86 is no lens. Enables/disables use of the supplied Wireless 86 Remote Commander. Sets your camcorder to turn off automatically. 86 Selects the language to be used on the LCD screen. 86 US 70 Index Search image Table of Contents
-
 1
1 -
2
-
3
-
4
-
5
-
6
-
7
-
8
-
9
-
10
-
11
-
12
-
13
-
14
-
15
-
16
-
17
-
18
-
19
-
20
-
21
-
22
-
23
-
24
-
25
-
26
-
27
-
28
-
29
-
30
-
31
-
32
-
33
-
34
-
35
-
36
-
37
-
38
-
39
-
40
-
41
-
42
-
43
-
44
-
45
-
46
-
47
-
48
-
49
-
50
-
51
-
52
-
53
-
54
-
55
-
56
-
57
-
58
-
59
-
60
-
61
-
62
-
63
-
64
-
 65
65 -
 66
66 -
 67
67 -
 68
68 -
 69
69 -
 70
70 -
 71
71 -
 72
72 -
 73
73 -
 74
74 -
 75
75 -
76
-
77
-
78
-
79
-
80
-
81
-
82
-
83
-
84
-
85
-
86
-
87
-
88
-
89
-
90
-
91
-
92
-
93
-
94
-
95
-
96
-
97
-
98
-
99
-
100
-
101
-
102
-
103
-
104
-
105
-
106
-
107
-
108
-
109
-
110
-
111
-
112
-
113
-
114
-
115
-
116
-
117
 |
 |
