Sony PCV-RX380DS Primary User Manual - Page 52
DVGate
 |
View all Sony PCV-RX380DS manuals
Add to My Manuals
Save this manual to your list of manuals |
Page 52 highlights
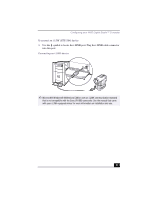
VAIO Digital Studio™ User Guide DVGate™ Connecting a digital video camera recorder Before connecting a digital video camera recorder to your computer, turn off the power on the camera. After connecting the camera, turn the power back on. You do not need to turn off the computer when connecting a camera. Using DVgate™ software with a digital video camera recorder When capturing clips ❑ Do not use DVgate software when the connected digital video device is in Timer Recording mode, as this could produce a malfunction in the device. ❑ Captures larger than 2 GB (9 minutes and 30 seconds) are automatically continued in a second file. ❑ You can record stereo audio (stereo 1) while capturing video or you can add audio on the stereo 2 track after capturing the video data. ❑ You cannot use different audio modes on the same tape. You should perform a separate capture for each audio mode you wish to use. ❑ DVgate software does not support hard disk compression. You should not use disk compression if you are planning to work with DVgate. ❑ Title data is saved in the flash memory of a digital video camera and is not transferred to tape by DVgate software. ❑ To avoid interruption of capture sessions, you should disable the screen saver. ❑ The drop frame compensation feature does not provide accurate compensation adjustments for tapes recorded in LP mode. ❑ For tapes that include a mixture of both SP and LP mode, the information displayed by the capture progress indicator may not be accurate. ❑ Make sure the video head of your digital video device is properly cleaned. Anomalies that you see in captured data could be due to dust or other particles on the video head. ❑ The last frame captured is one frame before your selected [OUT] point. The frame you see immediately after clicking the [OUT] button is not captured. 52
-
 1
1 -
2
-
3
-
4
-
5
-
6
-
7
-
8
-
9
-
10
-
11
-
12
-
13
-
14
-
15
-
16
-
17
-
18
-
19
-
20
-
21
-
22
-
23
-
24
-
25
-
26
-
27
-
28
-
29
-
30
-
31
-
32
-
33
-
34
-
35
-
36
-
37
-
38
-
39
-
40
-
41
-
42
-
43
-
44
-
45
-
46
-
 47
47 -
 48
48 -
 49
49 -
 50
50 -
 51
51 -
 52
52 -
 53
53 -
 54
54 -
 55
55 -
 56
56 -
 57
57 -
58
-
59
-
60
-
61
-
62
-
63
-
64
-
65
-
66
-
67
-
68
-
69
-
70
-
71
-
72
-
73
-
74
-
75
-
76
-
77
-
78
-
79
-
80
-
81
-
82
-
83
-
84
-
85
-
86
-
87
-
88
-
89
-
90
-
91
-
92
-
93
-
94
-
95
-
96
-
97
-
98
-
99
-
100
 |
 |
