Sony RDR-GX330 Operating Instructions - Page 27
Eight Basic Operations - Getting to Know Your DVD Recorder, 1. Inserting a Disc - can not open tray
 |
UPC - 027242692510
View all Sony RDR-GX330 manuals
Add to My Manuals
Save this manual to your list of manuals |
Page 27 highlights
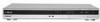
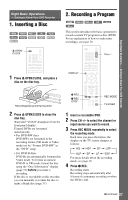
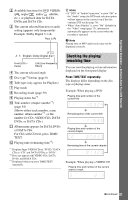
Eight Basic Operations - Getting to Know Your DVD Recorder 1. Inserting a Disc +RW -RWVR -RWVideo +R -RVR -RVideo DVD VCD CD DATA DVD DATA CD Z OPEN/ CLOSE 2. Recording a Program +RW -RWVR -RWVideo +R -RVideo -RVR This section introduces the basic operation to record a current TV program to a disc (DVD). For an explanation of how to make timer recordings, see page 39. CH +/- Eight Basic Operations - Getting to Know Your DVD Recorder 1 Press Z OPEN/CLOSE, and place a disc on the disc tray. DISPLAY Recording/playing side facing down z REC x REC STOP REC MODE TV/VIDEO 2 Press Z OPEN/CLOSE to close the disc tray. Wait until "LOAD" disappears from the front panel display. Unused DVDs are formatted automatically. • For DVD-RW discs DVD-RWs are formatted in the recording format (VR mode or Video mode) set by "Format DVD-RW" in the "DVD" setup. • For DVD-R discs DVD-Rs are automatically formatted in Video mode. To format an unused DVD-R in VR mode, format the disc using the "Disc Information" display (page 37) before you make a recording. If the disc is recordable on this recorder, you can manually re-format the disc to make a blank disc (page 37). 1 Insert a recordable DVD. 2 Press CH +/- to select the channel or input source you want to record. 3 Press REC MODE repeatedly to select the recording mode. Each time you press the button, the display on the TV screen changes as follows: For more details about the recording mode, see page 39. 4 Press z REC. Recording starts. Recording stops automatically after 8 hours of continuous recording or when the DVD is full. ,continued 27
-
 1
1 -
2
-
3
-
4
-
5
-
6
-
7
-
8
-
9
-
10
-
11
-
12
-
13
-
14
-
15
-
16
-
17
-
18
-
19
-
20
-
21
-
 22
22 -
 23
23 -
 24
24 -
 25
25 -
 26
26 -
 27
27 -
 28
28 -
 29
29 -
 30
30 -
 31
31 -
 32
32 -
33
-
34
-
35
-
36
-
37
-
38
-
39
-
40
-
41
-
42
-
43
-
44
-
45
-
46
-
47
-
48
-
49
-
50
-
51
-
52
-
53
-
54
-
55
-
56
-
57
-
58
-
59
-
60
-
61
-
62
-
63
-
64
-
65
-
66
-
67
-
68
-
69
-
70
-
71
-
72
-
73
-
74
-
75
-
76
-
77
-
78
-
79
-
80
-
81
-
82
-
83
-
84
-
85
-
86
-
87
-
88
-
89
-
90
-
91
-
92
-
93
-
94
-
95
-
96
-
97
-
98
-
99
-
100
 |
 |
