Sony RDR-GX330 Operating Instructions - Page 34
Labeling and Protecting a Disc, Labeling a disc
 |
UPC - 027242692510
View all Sony RDR-GX330 manuals
Add to My Manuals
Save this manual to your list of manuals |
Page 34 highlights
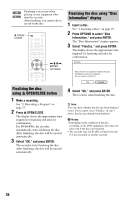
To use the number buttons You can also use the number buttons to enter characters. Refer to the number next to each row of letters on your TV screen. 1 In step 5 above, press a number button repeatedly to select a character. Example: Press the number 3 button once to enter "D." Press the number 3 button three times to enter "F." 2 Press ENTER or SET and select the next character. 3 Select "Finish" and press ENTER. z Hint You can switch between "A" (upper-case), "a" (lower-case), or "Symbol" by pressing INPUT SELECT. 6. Labeling and Protecting a Disc You can execute options effective for the entire disc using the "Disc Information" display.
-
 1
1 -
2
-
3
-
4
-
5
-
6
-
7
-
8
-
9
-
10
-
11
-
12
-
13
-
14
-
15
-
16
-
17
-
18
-
19
-
20
-
21
-
22
-
23
-
24
-
25
-
26
-
27
-
28
-
 29
29 -
 30
30 -
 31
31 -
 32
32 -
 33
33 -
 34
34 -
 35
35 -
 36
36 -
 37
37 -
 38
38 -
 39
39 -
40
-
41
-
42
-
43
-
44
-
45
-
46
-
47
-
48
-
49
-
50
-
51
-
52
-
53
-
54
-
55
-
56
-
57
-
58
-
59
-
60
-
61
-
62
-
63
-
64
-
65
-
66
-
67
-
68
-
69
-
70
-
71
-
72
-
73
-
74
-
75
-
76
-
77
-
78
-
79
-
80
-
81
-
82
-
83
-
84
-
85
-
86
-
87
-
88
-
89
-
90
-
91
-
92
-
93
-
94
-
95
-
96
-
97
-
98
-
99
-
100
 |
 |

34
To use the number buttons
You can also use the number buttons to enter
characters. Refer to the number next to each
row of letters on your TV screen.
1
In step 5 above, press a number button
repeatedly to select a character.
Example:
Press the number 3 button once to enter
“D.”
Press the number 3 button three times to
enter “F.”
2
Press ENTER or SET and select the next
character.
3
Select “Finish” and press ENTER.
z
Hint
You can switch between “A” (upper-case), “a”
(lower-case), or “Symbol” by pressing INPUT
SELECT.
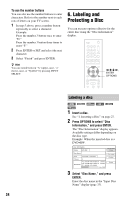
6. Labeling and
Protecting a Disc
You can execute options effective for the
entire disc using the “Disc Information”
display.
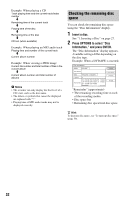
1
Insert a disc.
See “1. Inserting a Disc” on page 27.
2
Press OPTIONS to select “Disc
Information,” and press ENTER.
The “Disc Information” display appears.
Available settings differ depending on
the disc type.
Example: When the inserted disc is a
DVD+RW.
3
Select “Disc Name,” and press
ENTER.
Enter the disc name in the “Input Disc
Name” display (page 33).
Labeling a disc
OPTIONS
<
/
M
/
m
/
,
,
ENTER
+
RW
-
RW
VR
-
RW
Video
-
R
VR
+
R
-
R
Video