Sony RDR-GX330 Operating Instructions - Page 66
DV/Digital8 Dubbing, Preparing for DV/Digital8 dubbing, dubbing
 |
UPC - 027242692510
View all Sony RDR-GX330 manuals
Add to My Manuals
Save this manual to your list of manuals |
Page 66 highlights
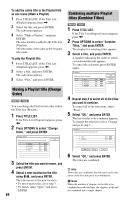
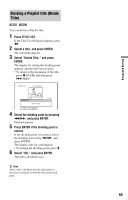
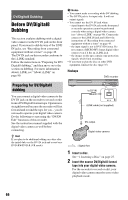
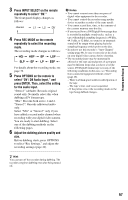
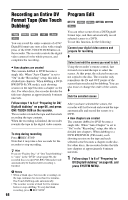
DV/Digital8 Dubbing Before DV/Digital8 Dubbing This section explains dubbing with a digital video camera via the DV IN jack on the front panel. If you want to dub by way of the LINE IN jacks, see "Recording from connected equipment without a timer" on page 48. The DV IN jack on this recorder conforms to the i.LINK standard. Follow the instructions in "Preparing for DV/ Digital8 dubbing," and then move on to the section on dubbing. For more information about i.LINK, see "About i.LINK" on page 90. b Notes • You cannot make a recording while DV dubbing. • The DV IN jack is for input only. It will not output signals. • You cannot use the DV IN jack when: - signal input to the DV IN jack on the front panel or recorder operation cannot be performed correctly when using a digital video camera (see "About i.LINK" on page 90). Connect the camera to the LINE IN jack and follow the instructions of "Recording from connected equipment without a timer" on page 48. - the input signal is not in DVC-SD format. Do not connect a MICRO MV format digital video camera even if it has an i.LINK jack. - the images on the tape contain copy protection signals, which limit recording. • If you want to play the disc on other DVD equipment, finalize the disc (page 35). Hookups DVD recorder Preparing for DV/Digital8 dubbing You can connect a digital video camera to the DV IN jack on the recorder to record or edit from a DV/Digital8 format tape. Operation is straightforward because the recorder will fast forward and rewind the tape for you - you do not need to operate your digital video camera. Do the following to start using the "DV/D8 Edit" functions of this recorder. See the instruction manual supplied with the digital video camera as well before connecting. z Hint If you plan to do additional editing on a disc after the initial dub, use the DV IN jack and record on a DVD-RW/DVD-R (VR mode). to DV IN i.LINK cable (not supplied) DV output Digital video camera : Signal flow 1 Insert a disc. See "1. Inserting a Disc" on page 27. 2 Insert the source DV/Digital8 format tape into your digital video camera. For the recorder to record or edit, your digital video camera must be set to video playback mode. 66
-
 1
1 -
2
-
3
-
4
-
5
-
6
-
7
-
8
-
9
-
10
-
11
-
12
-
13
-
14
-
15
-
16
-
17
-
18
-
19
-
20
-
21
-
22
-
23
-
24
-
25
-
26
-
27
-
28
-
29
-
30
-
31
-
32
-
33
-
34
-
35
-
36
-
37
-
38
-
39
-
40
-
41
-
42
-
43
-
44
-
45
-
46
-
47
-
48
-
49
-
50
-
51
-
52
-
53
-
54
-
55
-
56
-
57
-
58
-
59
-
60
-
 61
61 -
 62
62 -
 63
63 -
 64
64 -
 65
65 -
 66
66 -
 67
67 -
 68
68 -
 69
69 -
 70
70 -
 71
71 -
72
-
73
-
74
-
75
-
76
-
77
-
78
-
79
-
80
-
81
-
82
-
83
-
84
-
85
-
86
-
87
-
88
-
89
-
90
-
91
-
92
-
93
-
94
-
95
-
96
-
97
-
98
-
99
-
100
 |
 |
