Sony RDR-GX330 Operating Instructions - Page 61
Erasing a of a title (A-B Erase), Select OK and press ENTER.
 |
UPC - 027242692510
View all Sony RDR-GX330 manuals
Add to My Manuals
Save this manual to your list of manuals |
Page 61 highlights
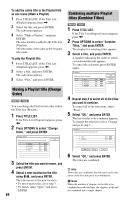
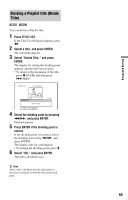
Erasing and Editing 5 When you finish selecting titles, select "OK," and press ENTER. The list of the titles to be erased appears for confirmation. • To change the selection, select "Change," and repeat from step 3. 6 Select "OK" and press ENTER. The titles are erased. To erase all titles on the disc You can reformat a DVD+RW or DVD-RW to make the disc blank. See "8. Reformatting a disc" on page 37. Erasing a section of a title (A-B Erase) +RW -RWVR -RVR You can select a section (scene) in a title and erase it. Note that erasing scenes in a title cannot be undone. 1 After step 2 of "Erasing and Editing a Title," select "A-B Erase" and press ENTER. The display for setting point A appears. The title starts to play. • To return to the beginning of the title, press X PAUSE and then press . PREV. 4 Select point B using m/M, and press ENTER. Playback pauses. 5 Press ENTER if point B is correct. If point B is incorrect, select point B using c/C, and press ENTER. The display asks for confirmation. • To reset point A, press M and O RETURN, and go to step 2. • To reset point B, press M and repeat step 4. • To preview the title without scenes to be erased, select "Preview" (except for DVD+RWs). 6 Select "OK," and press ENTER. The scene is erased. The display for setting point A appears. • To continue, go to step 2. • To finish, select "Quit." z Hint A chapter mark is inserted after the scene was erased. The chapter mark divides the title into separate chapters on either side of the mark. b Notes • Images or sound may be momentarily interrupted at the point where you erase a section of a title. • Sections shorter than five seconds may not be erased. • For DVD+RWs, the erased section may be slightly different from the points you selected. Playback point 2 Select point A using m/M, and press ENTER. Playback pauses. 3 Press ENTER if point A is correct. If point A is incorrect, select point A using c/C, and press ENTER. The display for setting point B appears. ,continued 6 1
-
 1
1 -
2
-
3
-
4
-
5
-
6
-
7
-
8
-
9
-
10
-
11
-
12
-
13
-
14
-
15
-
16
-
17
-
18
-
19
-
20
-
21
-
22
-
23
-
24
-
25
-
26
-
27
-
28
-
29
-
30
-
31
-
32
-
33
-
34
-
35
-
36
-
37
-
38
-
39
-
40
-
41
-
42
-
43
-
44
-
45
-
46
-
47
-
48
-
49
-
50
-
51
-
52
-
53
-
54
-
55
-
 56
56 -
 57
57 -
 58
58 -
 59
59 -
 60
60 -
 61
61 -
 62
62 -
 63
63 -
 64
64 -
 65
65 -
 66
66 -
67
-
68
-
69
-
70
-
71
-
72
-
73
-
74
-
75
-
76
-
77
-
78
-
79
-
80
-
81
-
82
-
83
-
84
-
85
-
86
-
87
-
88
-
89
-
90
-
91
-
92
-
93
-
94
-
95
-
96
-
97
-
98
-
99
-
100
 |
 |
