Sony RDR-GX330 Operating Instructions - Page 69
Select DV / D8 EDIT, and press, Select Start, and press ENTER.
 |
UPC - 027242692510
View all Sony RDR-GX330 manuals
Add to My Manuals
Save this manual to your list of manuals |
Page 69 highlights
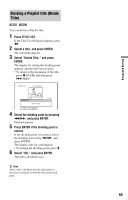
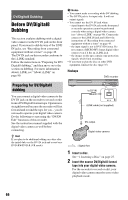
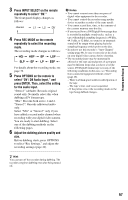
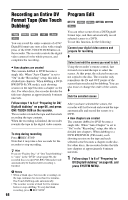
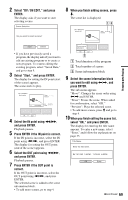
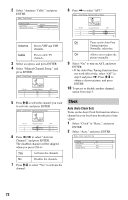
2 Select "DV / D8 EDIT," and press ENTER. The display asks if you want to start selecting scenes. 8 When you finish adding scenes, press m. The scene list is displayed. DV/Digital8 Dubbing • If you have previously saved a program, the display asks if you want to edit an existing program or to create a new program. To resume editing the existing program, select "Saved Data," and go to step 9. 3 Select "Start," and press ENTER. The display for setting the IN point (start of the scene) appears. The scene starts to play. 4 Select the IN point using m/M, and press ENTER. Playback pauses. 5 Press ENTER if the IN point is correct. If the IN point is incorrect, select the IN point using c/C, and press ENTER. The display for setting the OUT point (end of the scene) appears. 6 Select the OUT point using m/M, and press ENTER. Playback pauses. 7 Press ENTER if the OUT point is correct. If the OUT point is incorrect, select the OUT point using c/C, and press ENTER. The selected scene is added to the scene information block. • To add more scenes, go to step 4. A Total duration of the program B Total number of scenes C Scene information block 9 Select the scene information block you want to edit using
-
 1
1 -
2
-
3
-
4
-
5
-
6
-
7
-
8
-
9
-
10
-
11
-
12
-
13
-
14
-
15
-
16
-
17
-
18
-
19
-
20
-
21
-
22
-
23
-
24
-
25
-
26
-
27
-
28
-
29
-
30
-
31
-
32
-
33
-
34
-
35
-
36
-
37
-
38
-
39
-
40
-
41
-
42
-
43
-
44
-
45
-
46
-
47
-
48
-
49
-
50
-
51
-
52
-
53
-
54
-
55
-
56
-
57
-
58
-
59
-
60
-
61
-
62
-
63
-
 64
64 -
 65
65 -
 66
66 -
 67
67 -
 68
68 -
 69
69 -
 70
70 -
 71
71 -
 72
72 -
 73
73 -
 74
74 -
75
-
76
-
77
-
78
-
79
-
80
-
81
-
82
-
83
-
84
-
85
-
86
-
87
-
88
-
89
-
90
-
91
-
92
-
93
-
94
-
95
-
96
-
97
-
98
-
99
-
100
 |
 |
