Sony UPX-C300 Operating Instructions - Page 19
Turning On the Power, To attach the tray cover, To connect the printer to a power outlet - digital camera
 |
UPC - 027242731219
View all Sony UPX-C300 manuals
Add to My Manuals
Save this manual to your list of manuals |
Page 19 highlights
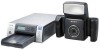
To attach the tray cover Keep the supplied tray cover on the paper tray when not in use to protect the print paper inside from dust and other particles. You can attach a tray cover to any of the UPC-X46, and UPC-X34 series' paper trays. Turning On the Power 1 DIGITAL PHOTO PRINTER MENU EXEC PRINT ALARM PUSH OPEN Tray cover 2 To connect the printer to a power outlet Connect the printer to a power outlet using the power 3 cord. 4 Printer Power cord 19 Preparations to power outlet 1 Turn on the printer. Check that Ready BT RSSI [- - - -] appears on the operation display. 2 Set the mode switch to . 3 Set the POWER switch of the camera to ON. When turning on the camera for the first time, the default setting screen appears. For details on default settings, see "The first time you turn on the camera (default setting)" on page 20. The camera starts searching for the printer, and "DISCOVERING" appears on the LCD. When the camera finds the printer, "DISCOVERED" appears, and the printer name and Bluetooth address are displayed in black on the LCD. If the color of the printer name and Bluetooth address do not change to black but remain in gray, turn the printer and camera off and perform steps 1 through 3 again. 4 Press any button on the camera. The Bluetooth display is turned off, and you can start taking a picture.
-
 1
1 -
2
-
3
-
4
-
5
-
6
-
7
-
8
-
9
-
10
-
11
-
12
-
13
-
 14
14 -
 15
15 -
 16
16 -
 17
17 -
 18
18 -
 19
19 -
 20
20 -
 21
21 -
 22
22 -
 23
23 -
 24
24 -
25
-
26
-
27
-
28
-
29
-
30
-
31
-
32
-
33
-
34
-
35
-
36
-
37
-
38
-
39
-
40
-
41
-
42
-
43
-
44
-
45
-
46
-
47
-
48
-
49
-
50
-
51
-
52
-
53
-
54
-
55
-
56
-
57
-
58
-
59
-
60
-
61
-
62
-
63
-
64
-
65
-
66
-
67
-
68
-
69
 |
 |
