Sony UPX-C300 Operating Instructions - Page 51
Passkey Authentication, Bluetooth Connection, Changing the passkey settings, To interrupt searching
 |
UPC - 027242731219
View all Sony UPX-C300 manuals
Add to My Manuals
Save this manual to your list of manuals |
Page 51 highlights
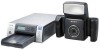
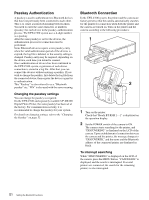
Passkey Authentication A passkey is used to authenticate two Bluetooth devices that have not previously been connected to each other. This is to create a trusted relationship between them. You need to enter the same characters or numbers (passkey) for each device in the passkey-authentication process. The UPX-C300 system uses a 4-digit number as a passkey. After the same passkey is set for the devices, the authentication process for connection must be performed. Some Bluetooth devices require a new passkey entry when the valid authentication period of the devices is expired, the log file is deleted, or the security setting is changed. Passkey entry may be required, depending on the device, each time you intend to connect. Once authentication of devices has been confirmed in the UPX-C300 system, registration of each device connection is stored in a log file. After that, you can connect the devices without entering a passkey. If you wish to change the passkey, first delete the log file from the connected device, then register the devices again for re-authentication. This "Passkey" is also referred to as a "Bluetooth passkey" etc. "PIN" is also used with the same meaning. Changing the passkey settings You can change the passkey as required. On the UPX-C300 and separately available UP-DX100 Digital Photo Printer, the same passkey has been set at the factory. For communication security, it is recommended to change the passkey for your system. For details on changing settings, refer to the "Changing the Passkey" on page 52. Bluetooth Connection In the UPX-C300 system, the printer and the camera are factory preset so that the camera automatically searches for the printer for connection when both the printer and the camera are turned on. Turn on the printer and the camera according to the following procedures: 1 DIGITAL PHOTO PRINTER MENU EXEC PRINT ALARM PUSH OPEN 2 1 Turn on the printer. Check that "Ready BT RSSI [----]" is displayed on the operation display. 2 Set the POWER switch of the camera to ON. The camera starts searching for the printer, and "DISCOVERING" is displayed on the LCD of the camera. Upon establishment of connection between the camera and the printer, the message changes to "DISCOVERED," and the name and the Bluetooth address of the connected printer are displayed in black. To interrupt searching While "DISCOVERING" is displayed on the LCD of the camera, press the MENU button. "CANCELING" is displayed, and the search is interrupted. If several printers are connected, the search for the remaining printers is also interrupted. 51 Setting the Bluetooth Functions
-
 1
1 -
2
-
3
-
4
-
5
-
6
-
7
-
8
-
9
-
10
-
11
-
12
-
13
-
14
-
15
-
16
-
17
-
18
-
19
-
20
-
21
-
22
-
23
-
24
-
25
-
26
-
27
-
28
-
29
-
30
-
31
-
32
-
33
-
34
-
35
-
36
-
37
-
38
-
39
-
40
-
41
-
42
-
43
-
44
-
45
-
 46
46 -
 47
47 -
 48
48 -
 49
49 -
 50
50 -
 51
51 -
 52
52 -
 53
53 -
 54
54 -
 55
55 -
 56
56 -
57
-
58
-
59
-
60
-
61
-
62
-
63
-
64
-
65
-
66
-
67
-
68
-
69
 |
 |
