Sony UPX-C300 Operating Instructions - Page 55
Checking the Connection Record of the Printer, Adding/Registering a Printer
 |
UPC - 027242731219
View all Sony UPX-C300 manuals
Add to My Manuals
Save this manual to your list of manuals |
Page 55 highlights
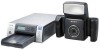
Checking the Connection Record of the Printer 1 Turn on the printer. 2 Press the MENU button. 3 Press V of the control button to display "Bluetooth SETTING[>>]." 4 Press B of the control button. "Bluetooth ADDR" appears. 5 Press V of the control button to display "CONNECTION RECORD [>>]." 6 Press B of the control button. The name and Bluetooth address of the devices being connected with the printer are displayed. To scroll the display to check the information on other devices, press v or V of the control button. To return to the "CONNECTION RECORD [>>]" display, press the EXEC button. To return to the Ready display, press the MENU button. Adding/Registering a Printer Up to three printers can be connected with the Bluetooth function in the UPX-C300 system. Printers can be added using the Setup menu of the camera. Before adding a printer, the same passkey as that of the camera must be assigned for the printer. If "NO PRINTER" is indicated when the camera is turned on, register the printer in the following manner: For details on passkey setting, see "Changing the Passkey" on page 52. 1 DIGITAL PHOTO PRINTER MENU EXEC PRINT ALARM PUSH OPEN 55 Setting the Bluetooth Functions Control button 1 Turn on the printer to be registered additionally. 2 Display the Setup display. For details, see "Displaying the SETUP Menu" on page 28. 3 Press v or V of the control button to select Bluetooth. 4 Press the ENTER button. The Bluetooth Menu display appears. 5 Press v or V of the control button to select ADD PRINTER.
-
 1
1 -
2
-
3
-
4
-
5
-
6
-
7
-
8
-
9
-
10
-
11
-
12
-
13
-
14
-
15
-
16
-
17
-
18
-
19
-
20
-
21
-
22
-
23
-
24
-
25
-
26
-
27
-
28
-
29
-
30
-
31
-
32
-
33
-
34
-
35
-
36
-
37
-
38
-
39
-
40
-
41
-
42
-
43
-
44
-
45
-
46
-
47
-
48
-
49
-
 50
50 -
 51
51 -
 52
52 -
 53
53 -
 54
54 -
 55
55 -
 56
56 -
 57
57 -
 58
58 -
 59
59 -
 60
60 -
61
-
62
-
63
-
64
-
65
-
66
-
67
-
68
-
69
 |
 |
