Sony UPX-C300 Operating Instructions - Page 7
Flash Modes and Example Shooting Conditions, Auto Flash, Forced flash + manual exposure mode
 |
UPC - 027242731219
View all Sony UPX-C300 manuals
Add to My Manuals
Save this manual to your list of manuals |
Page 7 highlights
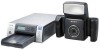
Flash Modes and Example Shooting Conditions The camera offers three flash modes. When setting up, make sure the distance between the camera and the subject (L) is set so that apparent face size fits the selected frame (guidelines) at about 1.8 meter. Minor adjustments to apparent face size can be made with the zoom. Auto Flash ( ) The built-in flash fires at optimum brightness for a subject about 1.8 meter away. Use the v and V control buttons to set a negative EV value when the distance L is less than 1.8 meter, or a positive EV value when the distance is more than 1 meter. Be sure to take a test picture to check the results. This mode is suitable for indoor ID portraits in which the built-in flash is the main light source and a shadow-clearing flash is connected to the camera by synchronization cord. Forced flash + manual exposure mode () You can manually set aperture and, shutter speed, and select one of seven flash intensity levels (2 0.5EV) for the built-in flash before shooting. This mode is suitable for shooting portraits in which the built-in flash acts as a trigger for the main light source, an external flash connected to the camera by synchronization cord. Large-size synchronized flash L Synchronized L flash No flash + manual exposure mode ( ) In this flash mode, the aperture and shutter speed are set manually, and the built-in flash does not fire. The built-in flash does not fire. This mode is suitable for shooting indoors under stable light sources, such as studio light, video light, and fluorescent light. Studio light (halogen light, etc.) L 7 System Overview
-
 1
1 -
 2
2 -
 3
3 -
 4
4 -
 5
5 -
 6
6 -
 7
7 -
 8
8 -
 9
9 -
 10
10 -
 11
11 -
 12
12 -
13
-
14
-
15
-
16
-
17
-
18
-
19
-
20
-
21
-
22
-
23
-
24
-
25
-
26
-
27
-
28
-
29
-
30
-
31
-
32
-
33
-
34
-
35
-
36
-
37
-
38
-
39
-
40
-
41
-
42
-
43
-
44
-
45
-
46
-
47
-
48
-
49
-
50
-
51
-
52
-
53
-
54
-
55
-
56
-
57
-
58
-
59
-
60
-
61
-
62
-
63
-
64
-
65
-
66
-
67
-
68
-
69
 |
 |
