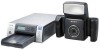
Sony UPX-C300 Operating Instructions - Page 53
Setting the Module Power, Changing the passkey of the printer
 |
UPC - 027242731219
View all Sony UPX-C300 manuals
Add to My Manuals
Save this manual to your list of manuals |
Page 53 highlights
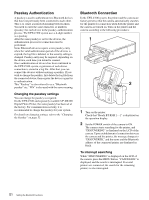
5 Press the ENTER button. The CHANGE PASSKEY display appears. Bluetooth CHANGE PASSKEY CURRENT KEY : 1234 NEW KEY OK CANCEL MOVE VALUE 6 Press b or B of the control button to select a digit you wish to change. 7 Press v or V of the control button to set the value. A value 0 to 9 can be used. Repeat Steps 6 and 7 above to set a four-digit passkey. 8 Press B of the control button to select OK. 9 Press the ENTER button. A new passkey has been set, and the display returns to Bluetooth Menu. To cancel changing the passkey setting In Step 8 above, select CANCEL instead of OK, then Press the ENTER button. Changing the passkey of the printer 1 Turn on the printer. "Ready BT RSSI [----]"appears on the operation display. 2 Press the MENU button. 3 Press V of the control button to display "Bluetooth SETTING [>>]." 4 Press B of the control button. "Bluetooth ADDR" appears. 5 Press V of the control button to display "PASSKEY INPUT [>>]." 6 Press B of the control button. "PASSKEY INPUT [X:X:X:X]" appears. || Current digit to be set Passkey 7 Press b or B of the control button to select a digit of the passkey to be changed. This shows the leftmost digit, and shows the rightmost digit. 8 Press v or V of the control button to set the value of the passkey. A value from 0 to 9 can be used. Repeat Steps 7 and 8 until the four-digit passkey is set. 9 Press the EXEC button. "PASSKEY INPUT Saving..." appears, and your passkey setting is stored. 10 When the setting is completed, press the MENU button. Setting the Module Power The Bluetooth Module Power must be set to ON to connect the camera and the printer using the Bluetooth function. If it is set to OFF, Bluetooth connection between devices is not possible. Changing the setting for Module Power of the camera 1 Display the Setup display. For details, see "Displaying the SETUP Menu" on page 28. 2 Press v or V of the control button to select Bluetooth. 3 Press the ENTER button. The Bluetooth Menu display appears. 4 Press v or V of the control button to select MODULE. 5 Press the ENTER button. The BT MODULE POWER display appears. 6 Confirm that either ON or OFF is selected, then Press the ENTER button. The display returns to Bluetooth Menu. To cancel changing the setting In Step 6, press b of the control button. The display returns to Bluetooth Menu. 53 Setting the Bluetooth Functions
-
 1
1 -
2
-
3
-
4
-
5
-
6
-
7
-
8
-
9
-
10
-
11
-
12
-
13
-
14
-
15
-
16
-
17
-
18
-
19
-
20
-
21
-
22
-
23
-
24
-
25
-
26
-
27
-
28
-
29
-
30
-
31
-
32
-
33
-
34
-
35
-
36
-
37
-
38
-
39
-
40
-
41
-
42
-
43
-
44
-
45
-
46
-
47
-
 48
48 -
 49
49 -
 50
50 -
 51
51 -
 52
52 -
 53
53 -
 54
54 -
 55
55 -
 56
56 -
 57
57 -
 58
58 -
59
-
60
-
61
-
62
-
63
-
64
-
65
-
66
-
67
-
68
-
69
 |
 |
