Sony UPX-C300 Operating Instructions - Page 52
Checking the Bluetooth Connection Statuses of the Camera (PROPERTY)
 |
UPC - 027242731219
View all Sony UPX-C300 manuals
Add to My Manuals
Save this manual to your list of manuals |
Page 52 highlights
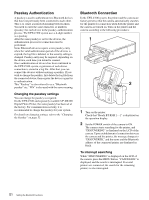
If the connection fails The message "NOT DISCOVERED" is displayed on the LCD of the camera, and the printer name and the Bluetooth address remains displayed in gray. Even if the connection fails, shooting and playback can be performed on the camera. If the connection fails, before retrying to connect, check the following, then press the PRINT button. The message "Reconnecting" is displayed and the reconnection starts. • The printer is turned on. • The Bluetooth module of the camera and the printer is set to ON. • Between the camera and the printer, there is no obstacle that disturbs data transmission. For use with several printers connected, see "Operation with Several Printers" on page 58 as well. Checking the Bluetooth Connection Statuses of the Camera (PROPERTY) 1 Display the Setup display. For details, see "Displaying the SETUP Menu" on page 28. 2 Press v or V of the control button to select Bluetooth. 3 Press the ENTER button. The Bluetooth Menu display appears. 4 Press v or V of the control button to select PROPERTY. 5 Press the ENTER button. The Bluetooth information for the camera is displayed. You can scroll the printer list with v or V of the control button. Bluetooth Sony DKC-C300X ADDRESS: 00:13:E0:6F:4B:7F PASS KEY: 1234 PRINTER LIST 1. Sony UP-DX100 ADDRESS 00:A0:96:12:24:E1 2 ADDRESS 3 ADDRESS OK Bluetooth address of the camera Passkey List of the connected printers When ENTER button is pressed, the display returns to Bluetooth Menu. Confirming the Bluetooth Address of the Printer 1 1 DIGITAL PHOTO PRINTER 2 3,4 MENU EXEC PRINT ALARM 1 Turn on the printer. 2 Press the MENU button. 3 Press V of the control button to display "Bluetooth SETTING[>>]." 4 Press B of the control button. The Bluetooth address appears. To return to Ready, press the MENU button. Changing the Passkey The same passkey is set for all cameras and printers at the factory. If the passkey needs to be changed, set a new passkey, following the procedures below. Once a new passkey is set, remove the printer registration, and register it again. Then authentication of the new passkey will be valid. For details on removing a printer, see "Removing a Printer" on page 57, and on registering a printer, see "Adding/Registering a Printer" on page 55. Changing the passkey of the camera 1 Display the Setup display. For details, see "Displaying the SETUP Menu" on page 28. 2 Press v or V of the control button to select Bluetooth. 3 Press the ENTER button. The Bluetooth Menu display appears. 4 Press v or V of the control button to select CHANGE PASSKEY. 52 Setting the Bluetooth Functions
-
 1
1 -
2
-
3
-
4
-
5
-
6
-
7
-
8
-
9
-
10
-
11
-
12
-
13
-
14
-
15
-
16
-
17
-
18
-
19
-
20
-
21
-
22
-
23
-
24
-
25
-
26
-
27
-
28
-
29
-
30
-
31
-
32
-
33
-
34
-
35
-
36
-
37
-
38
-
39
-
40
-
41
-
42
-
43
-
44
-
45
-
46
-
 47
47 -
 48
48 -
 49
49 -
 50
50 -
 51
51 -
 52
52 -
 53
53 -
 54
54 -
 55
55 -
 56
56 -
 57
57 -
58
-
59
-
60
-
61
-
62
-
63
-
64
-
65
-
66
-
67
-
68
-
69
 |
 |
