Sony VPL-PX10 Operating Instructions - Page 19
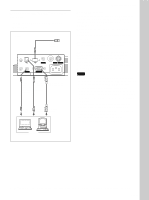
Setting Up and Pr, ojecting, To connect an IBM, PC/AT, compatible, computer
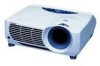 |
View all Sony VPL-PX10 manuals
Add to My Manuals
Save this manual to your list of manuals |
Page 19 highlights
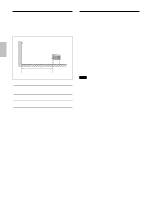
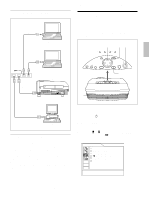
Setting Up and Projecting To connect an IBM1) PC/AT1) compatible computer When you use a USB mouse and USB equipment Left side to USB equipment MOUSE PLUG IN POWER CTRL S AUDIO AUDIO VIDEO S VIDEO INPUT A ~AC IN Stereo audio connecting cable (not supplied) USB cable A type - B type (supplied) HD D-sub 15-pin cable (supplied) to audio output to USB connector to monitor output Connecting the Projector On the USB function When connecting the projector to a computer using the USB cable for the first time, the computer recognizes the following devices automatically. 1 USB hub (general use) 2 USB human interface device (wireless mouse function) 3 USB human interface device (projector control function) The computer also recognizes the device connected to the downstream connector on the projector. Recommended operating environment When you use the USB function, connect your computer as illustrated in the box on the left. This application software and the USB function can be used on a computer loaded with Windows 98, Windows 98 SE or Windows 2000. Notes • As the projector recognizes the USB mouse when the computer is connected to the USB connector, do not connect anything to the MOUSE connector. • Your computer may not start correctly when connected to the projector via the USB cable. In this case, disconnect the USB cable, restart the computer, then connect the computer to the projector using the USB cable. • This projector is not guaranteed for suspend or standby mode. When you use the projector in suspend or standby mode, disconnect the projector from the USB port on the computer. • Operations are not guaranteed for all the recommended computer environments. Computer ...1) IBM® and PC/AT are a trademark and a registered trademark of International Business Machines Corporation, U.S.A. 19 (GB)
-
 1
1 -
2
-
3
-
4
-
5
-
6
-
7
-
8
-
9
-
10
-
11
-
12
-
13
-
 14
14 -
 15
15 -
 16
16 -
 17
17 -
 18
18 -
 19
19 -
 20
20 -
 21
21 -
 22
22 -
 23
23 -
 24
24 -
25
-
26
-
27
-
28
-
29
-
30
-
31
-
32
-
33
-
34
-
35
-
36
-
37
-
38
-
39
-
40
-
41
-
42
-
43
-
44
-
45
-
46
-
47
-
48
-
49
-
50
-
51
-
52
-
53
-
54
-
55
-
56
-
57
-
58
-
59
-
60
-
61
-
62
-
63
-
64
-
65
-
66
-
67
-
68
-
69
-
70
-
71
-
72
-
73
-
74
-
75
-
76
-
77
-
78
-
79
-
80
-
81
-
82
-
83
-
84
-
85
-
86
-
87
-
88
-
89
-
90
-
91
-
92
-
93
-
94
-
95
-
96
-
97
-
98
-
99
-
100
-
101
-
102
-
103
-
104
-
105
-
106
-
107
-
108
-
109
-
110
-
111
-
112
-
113
-
114
-
115
-
116
-
117
-
118
-
119
-
120
-
121
-
122
-
123
-
124
-
125
-
126
-
127
-
128
 |
 |
