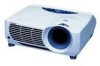
Sony VPL-PX10 Operating Instructions - Page 21
Connecting to a LAN (VPL-PX15 only), To connect 15k RGB/Component, equipment, Installing a PC card - vpl px15
 |
View all Sony VPL-PX10 manuals
Add to My Manuals
Save this manual to your list of manuals |
Page 21 highlights
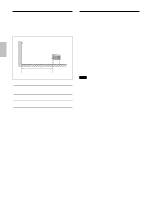
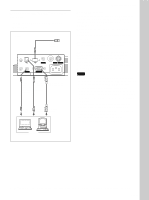
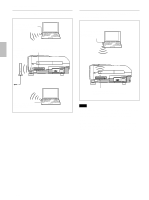
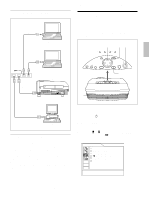
To connect 15k RGB/Component equipment Left side MOUSE PLUG IN POWER CTRL S AUDIO AUDIO VIDEO S VIDEO INPUT A ~AC IN Stereo audio connecting cable (not supplied) to audio output SMF-402 Signal Cable (not supplied) HD D-sub 15-pin (male) y 3 × phono jack to RGB/ component output 15k RGB/Component equipment Connecting the Projector Connecting to a LAN (VPL-PX15 only) This projector is networking compatible. Using a wireless LAN PC card or a 10BASE-T/100BASE-TX LAN cable, you can connect the projector to a wireless or wired LAN. You can also install a PC memory card. This section describes how to connect to a LAN and how to install a PC card. Whenever you connect the projector to a LAN or use a memory card, set INPUT-B FUNC. in the INSTALL SETTING menu to ON. For details, see page 33 (GB). Installing a PC card When you use a wireless LAN PC card or memory card, insert the card into the INPUT B PC CARD slot. The eject button pops out when the card is inserted. PUSH Notes • Set the aspect ratio using ASPECT in the INPUT SETTING menu according to the input signal. For details, see page 30 (GB). • When you connect the projector to 15k RGB/ component video equipment, select RGB, component or VCR GBR with the INPUT-A setting in the SET SETTING menu. • Use the composite sync signal when you input the external sync signal from 15k RGB/component equipment. PC card Insert the card with the arrow mark facing toward the slot. To remove the PC card from the slot, press the eject button. 21 (GB)
-
 1
1 -
2
-
3
-
4
-
5
-
6
-
7
-
8
-
9
-
10
-
11
-
12
-
13
-
14
-
15
-
 16
16 -
 17
17 -
 18
18 -
 19
19 -
 20
20 -
 21
21 -
 22
22 -
 23
23 -
 24
24 -
 25
25 -
 26
26 -
27
-
28
-
29
-
30
-
31
-
32
-
33
-
34
-
35
-
36
-
37
-
38
-
39
-
40
-
41
-
42
-
43
-
44
-
45
-
46
-
47
-
48
-
49
-
50
-
51
-
52
-
53
-
54
-
55
-
56
-
57
-
58
-
59
-
60
-
61
-
62
-
63
-
64
-
65
-
66
-
67
-
68
-
69
-
70
-
71
-
72
-
73
-
74
-
75
-
76
-
77
-
78
-
79
-
80
-
81
-
82
-
83
-
84
-
85
-
86
-
87
-
88
-
89
-
90
-
91
-
92
-
93
-
94
-
95
-
96
-
97
-
98
-
99
-
100
-
101
-
102
-
103
-
104
-
105
-
106
-
107
-
108
-
109
-
110
-
111
-
112
-
113
-
114
-
115
-
116
-
117
-
118
-
119
-
120
-
121
-
122
-
123
-
124
-
125
-
126
-
127
-
128
 |
 |
