Sony VPL PX31 Operating Instructions
Sony VPL PX31 - LCD Projector - 2800 ANSI Lumens Manual
 |
UPC - 027242578814
View all Sony VPL PX31 manuals
Add to My Manuals
Save this manual to your list of manuals |
Sony VPL PX31 manual content summary:
- Sony VPL PX31 | Operating Instructions - Page 1
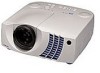
VPL-PX21/PX31 4-080-134-11(2) LCD Data Projector Operating Instructions GB Mode d'emploi FR Manual de instrucciones ES VPL-PX21 VPL-PX31 2000 Sony Corporation - Sony VPL PX31 | Operating Instructions - Page 2
the user to the presence of important operating and maintenance (servicing) instructions in SONY CORPORATION 6-7-35 KITASHINAGAWA SHINAGAWA-KU,TOKYO,JAPAN A MANUFACTURED; This label is located on the rear of the Remote used in accordance with the instruction manual, may cause harmful interference to - Sony VPL PX31 | Operating Instructions - Page 3
For the customers in Canada This Class A digital apparatus complies with Canadian ICES-003. For the customers in the United Kingdom WARNING THIS APPARATUS MUST BE EARTHED IMPORTANT The wires in this mains lead are coloured in accordance with the following code: Green-and-Yellow: Earth Blue: - Sony VPL PX31 | Operating Instructions - Page 4
4 (GB) - Sony VPL PX31 | Operating Instructions - Page 5
Front/Left Side 9 (GB) Rear/Right Side/Bottom 9 (GB) Control panel 11 (GB) Connector panel 12 (GB) Remote Commander 13 (GB) Setting up and projecting Installing the Projector 14 (GB) Connecting 15 (GB) Connecting with a Computer 15 (GB) GB Connecting with a VCR/15k RGB/Component Equipment - Sony VPL PX31 | Operating Instructions - Page 6
Maintenance Other Maintenance 32 (GB) Replacing the Lamp 32 (GB) Cleaning the Air Filter 33 (GB) Troubleshooting 34 (GB) Specifications 36 (GB) Index 42 (GB) 6 (GB) - Sony VPL PX31 | Operating Instructions - Page 7
lens while the lamp is on. air coming out is hot. • Be careful not to catch your fingers by the adjuster when you lift up the projector. Do not push hard on the top of the projector on the Remote Commander or on thinner. • Clean the filter at regular intervals every LCD projector The LCD projector is - Sony VPL PX31 | Operating Instructions - Page 8
W UHP lamp allow high brightness (light output 1800 ANSI lumen for VPL-PX21 (without a microlens), and 2800 ANSI lumen for VPL-PX31) and excellent uniformity on the picture. • High resolution By adopting three 1.3-inch, approximately 790,000pixels XGA panels, this projector can project sharp picture - Sony VPL PX31 | Operating Instructions - Page 9
holes (exhaust) 5 Front remote control detector (SIRCS receiver) 6 Adjuster When a picture is projected on the out of the screen, adjust the picture using this adjuster. For details on how to use the adjusters, see "How to use the adjuster" on page 10 (GB). 7 Security lock Connects to an optional - Sony VPL PX31 | Operating Instructions - Page 10
the Air Filter" on page 33 (GB). Note Clean the air filter every 300 hours to ensure optimal performance. ql Adjuster buttons w; Connector panel For details, see page 12 (GB). How to use the adjuster To adjust the height Adjust the height of the projector as follows: 1 Lift the projector and - Sony VPL PX31 | Operating Instructions - Page 11
menu lists error recoveries depending on problem type. 5 Indicators LAMP/COVER: Lights up or flashes under the following conditions: • Lights up when the lamp has reached the end of its life or becomes a high temperature. • Flashes when the lamp cover or air filter on the projector with the projected - Sony VPL PX31 | Operating Instructions - Page 12
mouse from the Remote Commander. The application software supplied with the projector allows you to control the projector from your computer S out jacks of the Sony equipment. Connects to the CONTROL S OUT jack on the supplied Remote Commander when using it as a wired Remote Commander. In this case, - Sony VPL PX31 | Operating Instructions - Page 13
INPUT MUTING AUDIO PIC FUNCTION 1 2 MENU + VOLUME - LASER ENTER R CLICK RESET D ZOOM + - 1 2 3 Remote Commander as a wired one. In this case, you do not need to install the batteries since the power is supplied via the CONTROL S IN jack on the projector. Notes on laser beam qd RESET - Sony VPL PX31 | Operating Instructions - Page 14
them, wipe the battery compartment dry and replace the batteries with new ones. Notes on Remote Commander operation • Make sure that there is nothing to obstruct the infrared beam between the Remote Commander and the remote control detector on the projector. • The operation range is limited. The - Sony VPL PX31 | Operating Instructions - Page 15
to obstruct the infrared beam between the Remote Commander and the remoter control detector on the projector. When connecting with an IBM PC/AT Also refer to the instruction manual of equipment to SIC-S21 (for be connected. Notes • This unit accepts the VGA, SVGA, XGA or SXGA Speaker HD D-sub 15 - Sony VPL PX31 | Operating Instructions - Page 16
Connecting When connecting with a Macintosh computer Right side DIGITAL RGB RGB Speaker Monitor cable SMF-410 (not supplied) 5BNC REMOTE RS-232C OUTPUT CONTROL S VIDEO IN IN PLUG IN POWER S VIDEO VIDEO INPUT B L R (MONO) AUDIO MONITOR INPUT A USB AUDIO DIGITAL RGB RGB 5BNC RGB RGB - Sony VPL PX31 | Operating Instructions - Page 17
connect the projector with a VCR, external active speakers, and 15k RGB/ component equipment. Also refer to the instruction manuals of the be sure to pull it out from the plug, not the cable itself. Right side REMOTE RS-232C OUTPUT CONTROL S VIDEO IN IN PLUG IN POWER S VIDEO VIDEO INPUT - Sony VPL PX31 | Operating Instructions - Page 18
Connecting / Selecting the Menu Language Right side DIGITAL RGB RGB 5BNC REMOTE RS-232C OUTPUT CONTROL S VIDEO IN IN menu and other on screen displays. The factory setting is ENGLISH. LAMP/ TEMP/ POWER ON/ COVER FAN SAVING STANDBY 4, 5, 6 3 2 VOL + MENU HELP INPUT VOL - ENTER RESET - Sony VPL PX31 | Operating Instructions - Page 19
Projecting VOL + VOL - 1 ON/STANDBY indicator LAMP/ TEMP/ POWER ON/ COVER FAN SAVING STANDBY MENU HELP ENTER RESET INPUT APA LIGHT 2 3 APA key 4 (Front) 5 Rear remote control detector APA key COMMAND / OFF ON HELP APA INPUT MUTING AUDIO PIC FUNCTION 1 2 MENU + VOLUME - LASER - Sony VPL PX31 | Operating Instructions - Page 20
SETTING menu when you adjust the picture manually. For details, see page 24 (GB). To correct the trapezoid When the projecting image is a trapezoid, change the projector's the projector. About the air filter cleaning Clean the air filter every 300 hours to ensure optimal performance. 20 (GB) - Sony VPL PX31 | Operating Instructions - Page 21
point in the image to enlarge. 1 Press the D ZOOM + key on the Remote Commander. The Digital Zoom icon appears at the center of the image. Digital Zoom D ZOOM - key on the Remote Commander. To use the Laser Pointer function Press the LASER key on the Remote Commander. The laser pointer appears. The - Sony VPL PX31 | Operating Instructions - Page 22
MENU / The PICTURE CTRL Menu Using the MENU The projector is equipped with an on-screen menu for making various adjustments and settings. To select the language used in the menu, see page 26 (GB). 1 Press the MENU key. The menu display appears. The bar on the icon of the currently selected menu - Sony VPL PX31 | Operating Instructions - Page 23
Adjustments and settings using the menu To decrease the number, press the m or < key. Press the ENTER . Normally, set to AUTO. If the picture is distorted or colorless, select the color system according to the input signal. HUE Adjusts color tones. Input signals and adjustable/setting items - Sony VPL PX31 | Operating Instructions - Page 24
Unadjustable items depending on the input signal are not displayed in the menu. When the video signal is input INPUT SETTING ASPECT: SHIFT picture element to that of the LCD. The picture will be clear but the picture size will be smaller. Note When the XGA or SXGA signal is input, this item will - Sony VPL PX31 | Operating Instructions - Page 25
adjust the picture through the INPUT SETTING menu. This projector also has 20 kinds of user memories for each INPUT-A/B. When an XGA VESA 85 Hz 68.677 84.997 H-pos V-pos 1376 27 1152 × 864 SXGA VESA 70 Hz 63.995 70.016 H-pos V-pos 1472 28 SXGA VESA 75 Hz 67.500 75.000 H-pos V-pos 1600 29 SXGA - Sony VPL PX31 | Operating Instructions - Page 26
and the color of the picture becomes strange or the picture is not displayed. The SET SETTING Menu The SET SETTING menu is used for changing the settings of the projector. SET SETTING INPUT-A STATUS: ON INPUT-A: COMPUTER AUTO INPUT SEL: OFF LANGUAGE: ENGLISH SPEAKER: ON POWER SAVING - Sony VPL PX31 | Operating Instructions - Page 27
: CEILING-FRONT LAMP MODE: STANDARD LAMP TIMER: 234h The SET SETTING Menu/The INSTALL SETTING Menu KEYSTONE MEM ON: DIGIT KEYSTONE setting is stored. The data is retrieved when the projector power is turned on. The setting will remain the same every time. OFF: DIGIT KEYSTONE is reset to 0 when - Sony VPL PX31 | Operating Instructions - Page 28
lens b: Distance from the floor to the center of the lens Wall Center of the screen c: Distance from the floor to the foot of the projector x: Free Distance from the front of the cabinet and the center of the lens Center of the lens Standard lens: 10 mm (13/32 inches - Sony VPL PX31 | Operating Instructions - Page 29
Installation Installation Examples Ceiling Installation When installing the projector on the ceiling, use the PSS-610 Projector Suspension Support. For ceiling installation, consult with qualified Sony personnel. a: Distance between the screen and the center of the lens b: Distance between the - Sony VPL PX31 | Operating Instructions - Page 30
the block-up, the temperature sensor will function with the message "High temp.! Lamp off in 1 min." The power will be turned off automatically after one , the air filter will be obstructed. The dust blocking the air through the filter may cause raising the internal heat of the projector. Clean it - Sony VPL PX31 | Operating Instructions - Page 31
Blocking the ventilation holes Avoid using something to cover over the ventilation holes; otherwise, the internal heat may build up. Notes for Installation 31 (GB) - Sony VPL PX31 | Operating Instructions - Page 32
up. Do not tilt the lamp unit. If you pull out the lamp unit while tilted and if the lamp breaks, the pieces may scatter, causing injury. Replacing the Lamp When it is time to replace the lamp, replace the lamp promptly with a new LMP-P201 Projector Lamp. The lamp reaches the end of its life - Sony VPL PX31 | Operating Instructions - Page 33
in the figure. Install the air filter cover on the projector. Notch Cleaning the Air Filter The air filter should be cleaned every 300 hours. When it becomes difficult to remove the dust from the filter, replace the filter with a new one. To clean the air filter, follow the steps below: 1 Turn - Sony VPL PX31 | Operating Instructions - Page 34
messages, please check the following. If the problem persists, contact your Sony dealer. Power Symptom The power is not turned on. Cause The power has been turned off and on with the I / 1 key at a short interval. The lamp cover is detached. The air filter cover is detached. Remedy Wait for about - Sony VPL PX31 | Operating Instructions - Page 35
or the air filter cover is detached. The lamp has reached the end of its life. The lamp becomes a high temperature. The fan is broken. The internal temperature is unusually high. The electric system failed. Remedy Attach the cover securely (see pages 32 (GB) and 33 (GB)). Replace the lamp (see page - Sony VPL PX31 | Operating Instructions - Page 36
Projection system 3 LCD panels, 1 lens, projection system LCD panel VPL-PX21: 1.3-inch TFT SONY LCD panel VPL-PX31: 1.3-inch TFT SONY LCD panel with micro-lens array, 2,359,296 pixels (1024 × 768 pixels × 3) Lens Approx. 1.3 times zoom lens f 50.8 to 64.0 mm/F 1.7 to 2.0 Lamp - Sony VPL PX31 | Operating Instructions - Page 37
104°F) Operating humidity 35% to 85% (no condensation) Storage temperature -20°C to 60°C (-4°F to 140°F) Storage humidity 10% to 90% Supplied accessories Remote Commander RM-PJM610 (1) Size AA (R6) batteries (2) HD D-sub 15-pin Cable (1) (1-791-992-11 or 1-791-992-21) (Continued) 37 (GB - Sony VPL PX31 | Operating Instructions - Page 38
Air filter (for replacement) (1) Operating Instructions (1) Installation Manual for Dealers (1) Quick Reference Card (1) Warranty Booklet (1) Design and specifications are subject to change without notice. Optional accessories Projector Lamp LMP-P201 (for replacement) Projector Suspension Support - Sony VPL PX31 | Operating Instructions - Page 39
DIGITAL RGB input connector (DFP 20-pin, female) 10 1 20 11 1 TX0- 11 TXC- 2 TX0+ 12 TXC+ 3 TX0 SHIELD 13 TXC SHIELD 4 TX2 SHIELD 14 TX1 SHIELD 5 TX2- 15 TX1- 6 TX2+ 16 TX1+ 7 DDC/SCL 17 NC 8 DDC/SDA 18 SENSE 9 NC 19 +5V DC 10 NC 20 GND USB connector Plug B (female) 2 Plug A - Sony VPL PX31 | Operating Instructions - Page 40
Specifications Dimensions Front 339 (13 11/32) 142 (5 19/32) 55 (2 5/32) 64.3 (2 9/16) 58 (2 9/32) Top 16.6(21/32) 82 (3 7/32) Center of the lens Center of the unit 248 (9 3/4) 142.6 (5 5/8) 89 (3 1/2) 24.5 (31/32) 100.7 (3 31/32) 22.4 (7/8) 106.2 (4 3/16) 109.4 (4 5/16) 257 (10 1/8) 220 (8 - Sony VPL PX31 | Operating Instructions - Page 41
Side Specifications 116.8 (4 19/32) 95 (3 3/4) 23.8 (15/16) 146 (5 3/4) 335.5 (13 7/32) 28.4 35.4 (1 1/8) (1 13/32) 45.4 (1 25/32) 0 - 2.1 (0 - 3/32) Bottom 32 ( 1 1/4) 279 (10 31/32) 26.5 (1 1/32) 82.5 (3 1/4) 117.2 (4 5/8) 7.2 (9/32) 1.8 (1/16) 81.5 (3 7/32) 38.4(1 1/2) 16.8 (21/32) - Sony VPL PX31 | Operating Instructions - Page 42
GB) O Optional accessories 38 (GB) P, Q PICTURE CTRL menu 22 (GB) Pin assignment 38 (GB) Power turn off 20 (GB) turn on 19 (GB) POWER SAVING 11 (GB), 27 (GB) Precautions 7 (GB) Projecting 19 (GB) PSS-610 Projector Suspension Support 29 (GB) R Remote Commander battery installation 14 (GB) D ZOOM key - Sony VPL PX31 | Operating Instructions - Page 43
43 (GB) - Sony VPL PX31 | Operating Instructions - Page 44
en direction de personnes et ne regardez pas dans l'émetteur laser. • En cas de problème avec la télécommande, adressez- vous à un personnel Sony qualifié. Nous remplaçons la télécommande par une neuve conformément aux termes de la garantie. Avertissement sur la connexion électrique Utilisez un - Sony VPL PX31 | Operating Instructions - Page 45
des menus ..... 17 (FR) Projection 17 (FR) Outils nécessaires pour votre présentation 19 (FR) Ajustements et réglages à l'aide du menu Utilisation du MENU 20 (FR) Le menu CTRL IMAGE 20 (FR) Le menu REGL ENTREE 22 (FR) Le menu REGLAGE 25 (FR) Le menu REGL. INSTAL 26 (FR) Installation - Sony VPL PX31 | Operating Instructions - Page 46
Entretien Divers Entretien 31 (FR) Remplacement de la lampe 31 (FR) Nettoyage du filtre à air 32 (FR) Dépannage 33 (FR) Spécifications 35 (FR) Index 41 (FR) 4 (FR) - Sony VPL PX31 | Operating Instructions - Page 47
qualifié avant de le remettre en service. • Débranchez l'appareil de la regardez pas vers l'objectif lorsque la lampe est allumée. • N'orientez pas le air expulsé est brûlant. • Veillez à ne pas vous coincer les doigts dans le support usine. Sur le projecteur LCD Le projecteur LCD est fabriqué selon - Sony VPL PX31 | Operating Instructions - Page 48
LCD de rapport d'ouverture élevé, doté de micro-lentilles, et la lampe 200 W UHP vous permettent une luminosité élevée (flux lumineux 1800 lumen ANSI pour VPL-PX21 (sans microlentilles) et 2800 lumen ANSI pour VPL-PX31 performances Sony originale 2) VGA, SVGA, XGA et SXGA sont des marques commerciales - Sony VPL PX31 | Operating Instructions - Page 49
point Ajuste la mise au point de l'image. 3 Objectif Ouvrez le volet de l'objectif avant la projection. 4 Orifices de ventilation (sortie d'air) 5 Capteur de télécommande frontal (récepteur SIRCS) 6 Support réglable Lorsqu'une image est projetée en-dehors de l'écran, ajustez l'image à l'aide de ce - Sony VPL PX31 | Operating Instructions - Page 50
air toutes les 300 heures afin d'assurer des performances optimales. ql Boutons des molettes de réglage w; Panneau des connecteurs Pour plus de détails, voir page 10 (FR). Utilisation du support 2 34 LAMP/ COVER TEMP/ POWER ON/ FAN SAVING STANDBY 5 6 VOL + VOL - MENU HELP ENTER RESET INPUT APA - Sony VPL PX31 | Operating Instructions - Page 51
température élevée. • Clignote lorsque le couvercle de la lampe ou le couvercle du filtre à air n'est pas correctement fixé. TEMP (Température)/FAN: S' de l'écran. q; Touche RESET Restaure la valeur de réglage par défaut d'un paramètre. Cette touche est opérante lorsque le menu ou un paramètre de - Sony VPL PX31 | Operating Instructions - Page 52
) AUDIO MONITOR INPUT A USB AUDIO DIGITAL RGB RGB 5BNC RGB RGB AUDIO MOUUSE AUDIO MOUUSE DIGITAL RGB R/R-Y/PR G/Y B/B-Y/PB SYNC/HD VD 4 3 5 6 REMOTE RS-232C OUTPUT CONTROL S VIDEO IN IN PLUG IN POWER S VIDEO VIDEO INPUT B L R (MONO) AUDIO MONITOR INPUT A USB AUDIO DIGITAL RGB RGB - Sony VPL PX31 | Operating Instructions - Page 53
5 V CC) : Se branche aux prises CONTROL S OUT de l'appareil Sony. Se branche à la prise CONTROL S OUT de la télécommande fournie lorsqu'elle qd COMMAND / OFF ON HELP APA INPUT MUTING AUDIO PIC FUNCTION 1 2 MENU + VOLUME - LASER ENTER R CLICK RESET D ZOOM + - 1 2 3 4 5 6 7 8 9 0 - Sony VPL PX31 | Operating Instructions - Page 54
de piles dans la télécommande puisque son alimentation est assurée via la prise CONTROL S IN du projecteur. qd Touche RESET qf Touche ENTER qg Touche MENU qh Touches FUNCTION 1/2 Lorsque vous raccordez le projecteur à un ordinateur, vous pouvez ouvrir un fichier à l'écran en appuyant simplement - Sony VPL PX31 | Operating Instructions - Page 55
Installation et projection Installation taille de l'écran. Utilisez le tableau suivant comme guide de référence. Distance entre l'écran et le • Cet appareil accepte les signaux VGA, SVGA, XGA et SXGA. Toutefois, nous vous recommandons de choisir XGA comme signal de sortie de votre ordinateur. • - Sony VPL PX31 | Operating Instructions - Page 56
peut ne pas fonctionner correctement en fonction de votre ordinateur. Raccordement à un ordinateur IBM PC/AT compatible Côté droit DIGITAL RGB RGB 5BNC REMOTE RS-232C OUTPUT CONTROL S VIDEO IN IN PLUG IN POWER S VIDEO VIDEO INPUT B L R (MONO) AUDIO MONITOR INPUT A USB AUDIO DIGITAL RGB - Sony VPL PX31 | Operating Instructions - Page 57
connecteur DIGITAL RGB (TMDS) sur le panneau des connecteurs. Côté droit Câble de télécommande vers le port RS232C Ordinateur DIGITAL RGB RGB 5BNC REMOTE RS-232C OUTPUT CONTROL S VIDEO IN IN PLUG IN POWER S VIDEO VIDEO INPUT B L R (MONO) AUDIO MONITOR INPUT A USB AUDIO DIGITAL RGB RGB - Sony VPL PX31 | Operating Instructions - Page 58
DIGITAL RGB R/R-Y/PR G/Y B/B-Y/PB SYNC/HD VD Côté droit DIGITAL RGB RGB 5BNC REMOTE RS-232C OUTPUT CONTROL S VIDEO IN IN PLUG IN POWER S VIDEO VIDEO INPUT • Réglez le format d'image à l'aide du paramètre FORMAT du menu REGL ENTREE en fonction du signal d'entrée. • Pour raccorder un appareil - Sony VPL PX31 | Operating Instructions - Page 59
/ TEMP/ POWER ON/ COVER FAN SAVING STANDBY 4, 5, 6 3 2 VOL + MENU HELP INPUT VOL - ENTER RESET APA LIGHT Projection VOL + VOL - Indicateur ON/ STANDBY LAMP/ TEMP/ POWER ON/ COVER FAN SAVING STANDBY MENU HELP ENTER RESET INPUT APA LIGHT 2 3 Touche APA 4 (Avant) 1 1 Introduisez la - Sony VPL PX31 | Operating Instructions - Page 60
netteté de l'image. Remarque Ne regardez pas vers l'objectif en cours de projection car vous risquez sinon de vous blesser les yeux. Pour Régler le volume ésente toujours une forme trapézoïdale, corrigez-la dans TRAPEZE NUMER du menu REGL. INSTAL. Lorsque le bord de base est plus long que le bord - Sony VPL PX31 | Operating Instructions - Page 61
élevée, ce qui peut entraîner une panne du projecteur. Sur le nettoyage du filtre à air Nettoyez le filtre à air toutes les 300 heures afin d'assurer des performances optimales. Projection Outils nécessaires pour votre présentation Pour agrandir l'image (fonction de zoom numérique) Vous pouvez - Sony VPL PX31 | Operating Instructions - Page 62
une minute. Pour restaurer des paramètres modifiés Appuyez sur la touche RESET. Le message "Effectué!" (terminé) apparaît sur l'écran et les réglages affichés sont restaurés à leur valeur par défaut. 20 (FR) Le menu CTRL IMAGE Le menu CTRL (contrôle) IMAGE sert à régler l'image. Les paramètres non - Sony VPL PX31 | Operating Instructions - Page 63
paramètre Utilisez la touche M ou m pour sélectionner un menu et appuyez ensuite sur la touche , ou ENTER. 2. Ajustez le tre. Plus la valeur de réglage est faible, plus l'image prend une teinte rougeâtre. Le menu CTRL IMAGE NETTETE Ajuste la netteté de l'image. Plus la valeur de réglage est élevée, - Sony VPL PX31 | Operating Instructions - Page 64
-le sur AUTO. Si l'image présente des distorsions ou n'a pas de couleurs, sélectionnez le système couleur en fonction du signal d'entrée. Le menu REGL ENTREE Le menu REGL ENTREE sert au réglage du signal d'entrée. Les paramètres non réglables suivant le signal d'entrée ne sont pas affichés dans le - Sony VPL PX31 | Operating Instructions - Page 65
un pixel de l'écran LCD. L'image affichée est claire, mais d'une taille inférieure. Remarque Lorsqu'un signal XGA ou SXGA est entré, ce paramè en fonction du type de signal. Vous pouvez ajuster l'image à l'aide du menu REGL ENTREE. Ce projecteur est également doté de 20 types de mémoires utilisateur - Sony VPL PX31 | Operating Instructions - Page 66
Le menu REGL XGA VESA 70 Hz 56,476 69,955 H-nég V-nég 1328 25 XGA VESA 75 Hz 60,023 75,029 H-pos V-pos 1312 26 XGA VESA 85 Hz 68,677 84,997 H-pos V-pos 1376 27 1152 × 864 SXGA DEPL. Signal Super Mac-2 SGI-1 Macintosh 19" Macintosh 21" Sony News PC-9821 1280 × 1024 WS Sunmicro N° de mémoire - Sony VPL PX31 | Operating Instructions - Page 67
original, appuyez sur la touche ENTER ou - Sony VPL PX31 | Operating Instructions - Page 68
menu REGL. INSTAL. Le menu REGL. INSTAL. sert à modifier les réglages du projecteur. REGL. INSTAL. ENT.A MEMOIRE TRAPEZ: ON TRAPEZE NUMER: 0 INSTALLATION: PLAF.-FRONT. MODE LAMPE: STANDARD DUREE LAMPE inversée. MODE LAMPE Règle la luminosité de la lampe en cours de projection. STANDARD: Claire - Sony VPL PX31 | Operating Instructions - Page 69
Installation Exemples d'installation Exemples d'installation Installation au sol a: Distance entre l'écran et le centre de l'objectif b: Distance du sol au centre de l'objectif Mur Centre de l'écran c: Distance du sol au pied du projecteur x: Libre Distance entre l'avant du projecteur et le - Sony VPL PX31 | Operating Instructions - Page 70
d'installation Installation au plafond Si vous installez le projecteur au plafond, utilisez le support de suspension pour projecteur PSS-610. Pour une installation au plafond, adressez-vous à un personnel Sony qualifié. a: Distance entre l'écran et le centre de l'objectif b: Distance entre le - Sony VPL PX31 | Operating Instructions - Page 71
ventilation, le capteur de température se déclenche et le message "Surchauffe! Lampe OFF 1 min." s'affiche. Le projecteur se met alors automatiquement hors tension vous placez quelque chose devant les orifices de ventilation avant, l'air expulsé du projecteur risque d'être aspiré par les orifices de - Sony VPL PX31 | Operating Instructions - Page 72
;Remarques concernant l'installation Inclinaison vers l'avant/l'arrière et la droite/la gauche 20° 20° 20° 20° 20° Ne faites pas fonctionner l'appareil lorsqu'il est incliné de plus de 20 degrés. N'installez pas l'appareil ailleurs que sur le sol ou au plafond. Ces positions d'installation - Sony VPL PX31 | Operating Instructions - Page 73
Entretien Entretien Remarques • Si la lampe se brise, consultez le personnel Sony qualifié. • Extrayez la lampe par la poignée. Si vous touchez le module de lampe, vous risquez de vous brûler ou de vous blesser . • Pour retirer le module de lampe, maintenez-le bien à l'horizontale et tirez - Sony VPL PX31 | Operating Instructions - Page 74
Etant donné que les matériaux utilisés dans cette lampe sont similaires à ceux d'une lampe fluorescente, vous devez éliminer les lampes pour projecteur usagées de la même manière que les lampes fluorescentes. Nettoyage du filtre à air Le filtre à air doit être nettoyé toutes les 300 heures. Quand il - Sony VPL PX31 | Operating Instructions - Page 75
instructions cidessous. Si le problème persiste, prenez contact avec votre revendeur Sony lampe (voir page 31 (FR)). Refermez correctement le couvercle du filtre à air (voir page 32 (FR)). Image Symptôme Pas d'image L'image comporte des parasites. Les écrans de menu vers l'écran LCD de l'ordinateur - Sony VPL PX31 | Operating Instructions - Page 76
le personnel qualifié Sony. Messages d'avertissement du signal de Réglez la sortie sur XGA (voir page 13 (FR)). sortie de l'ordinateur menu REGLAGE est réglé sur COMPOSANT, DTV YPBPR ou DTV GBR. Réglez correctement ENT. A (voir page 25 (FR)). Le moment est venu de remplacer la lampe. Remplacez la lampe - Sony VPL PX31 | Operating Instructions - Page 77
Système de projection à 3 panneaux LCD, 1 objectif Panneau LCD VPL-PX21: panneau LCD TFT SONY de 1,3 pouces VPL-PX31: Panneau LCD TFT Sony 1,3 pouces à microlentille, 2.359.296 pixels (1024 × 768 pixels × 3) Objectif Zoom 1,3× approx. f 50,8 à 64,0 mm/F 1,7 to 2,0 Lampe 200 W UHP - Sony VPL PX31 | Operating Instructions - Page 78
un signal d'entrée de 500 mVrms, impédance inférieure à 5 kilohms REMOTE RS-232C: D-sub à 9 broches (femelle) CONTROL S IN/PLUG IN POWER W) Dissipation de la chaleur 989,6 BTU Température de service 0 à 40 °C (32 à 104 °F) Humidité de service 35 à 85 % (sans condensation) Température de - Sony VPL PX31 | Operating Instructions - Page 79
à air (de réserve) (1) Mode d'emploi (1) Manuel d'installation destiné aux revendeurs (1) Carte de référence rapide (1) Livret de garantie (1) La conception et les spécifications sont sujettes à modifications sans préavis. Accessoires en option Lampe pour projecteur LMP-P201 (de réserve) Support de - Sony VPL PX31 | Operating Instructions - Page 80
Spécifications Connecteur d'entrée DIGITAL RGB (DFP à 20 broches, femelle) 10 1 20 11 1 TX0- 11 TXC- 2 TX0+ 12 TXC+ 3 TX0 SHIELD 13 TXC SHIELD 4 TX2 SHIELD 14 TX1 SHIELD 5 TX2- 15 TX1- 6 TX2+ 16 TX1+ 7 DDC/SCL 17 NC 8 DDC/SDA 18 SENSE 9 NC 19 +5V DC 10 NC 20 GND Connecteur USB - Sony VPL PX31 | Operating Instructions - Page 81
142,6 (5 5/8) 89 (3 1/2) 24,5 (31/32) 100,7 (3 31/32) 22,4 (7/8) 106,2 (4 3/16) 109,4 (4 5/16) Dimensions Avant 339 (13 11/32) 142 (5 19/32) 55 (2 5/32) 64,3 (2 9/16) 58 (2 9/32) Dessus 16,6(21/32) 82 (3 7/32) Centre de l'objectif Centre de l'appareil 248 (9 3/4) Spécifications 257 (10 1/8) - Sony VPL PX31 | Operating Instructions - Page 82
Spécifications Côté 95 (3 3/4) 23,8 (15/16) 116,8 (4 19/32) 146 (5 3/4) 335,5 (13 7/32) 28,4 35,4 (1 1/8) (1 13/32) 45,4 (1 25/32) 0 - 2,1 (0 - 3/32) Bas 32 ( 1 1/4) 279 (10 31/32) 26,5 (1 1/32) 82,5 (3 1/4) 117,2 (4 5/8) 7,2 (9/32) 1,8 (1/16) 81,5 (3 7/32) 38,4(1 1/2) 16,8 (21/32) 51 - Sony VPL PX31 | Operating Instructions - Page 83
MODE GAMMA 21 (FR) MODE LAMPE 26 (FR) Molettes de réglage 8 (FR) N NETTETE 21 (FR) O OPTIMISEUR RVB 21 (FR) Orifices de ventilation prise d'air 8 (FR) sortie d'air 7 (FR) P, Q PHASE 23 (FR) Piles installation 12 (FR) remarques 12 (FR) Poignée de transport 7 (FR) Précautions 5 (FR) Projection 17 (FR - Sony VPL PX31 | Operating Instructions - Page 84
el láser hacia personas ni mire hacia el transmisor de láser. • Si el mando a distancia causa fallos de funcionamiento, consulte con personal especializado Sony. Dicho mando se sustituirá por otro nuevo en función de la garantía. Advertencia sobre la conexión de alimentación Utilice un cable de - Sony VPL PX31 | Operating Instructions - Page 85
idioma del men 17 (ES) Proyección 17 (ES) Herramientas efectivas para la presentación 19 (ES) Español Realización de ajustes mediante el menú Uso del MENU 20 (ES) Menú CTRL IMAGEN 20 (ES) Menú AJUS ENTRAD 22 (ES) Menú AJUSTE 24 (ES) Menú AJUSTE INST 25 (ES) Instalación Ejemplos de - Sony VPL PX31 | Operating Instructions - Page 86
Mantenimiento Otros Mantenimiento 30 (ES) Sustitución de la lámpara 30 (ES) Limpieza del filtro de aire 31 (ES) Solución de problemas 32 (ES) Especificaciones 34 (ES) Índice alfabético 40 (ES) 4 (ES) - Sony VPL PX31 | Operating Instructions - Page 87
sitúe la mano ni objetos cerca de los orificios de ventilación, ya que el aire que sale está caliente. • Tenga cuidado de no pillarse los dedos con el ajustador la unidad tal como la recibió de fábrica. Proyector LCD El proyector LCD está fabricado con tecnología de alta precisión. No obstante, - Sony VPL PX31 | Operating Instructions - Page 88
VPL-PX21 (sin microlente), y 2800 ANSI lumen para VPL-PX31) y una excelente uniformidad en la imagen. • Alta resolución Mediante la adopción de tres paneles XGA . de alto rendimiento exclusiva de Sony Es posible obtener la imagen más ). 2) VGA, SVGA, XGA y SXGA son marcas comerciales registradas de - Sony VPL PX31 | Operating Instructions - Page 89
Ubicación y función de los controles Parte frontal/izquierda 21 qs qa 0 9 3 8 45 7 6 Parte posterior/derecha/inferior w; qd qf qg qh qj qk ql Ubicación y función de los controles 1 Anillo de zoom Ajusta el tamaño de la imagen. 2 Anillo de enfoque Ajusta el enfoque de la imagen. 3 Objetivo Abra la - Sony VPL PX31 | Operating Instructions - Page 90
Ubicación y función de los controles qg Altavoz posterior qh Cubierta de la lámpara qj Orificios de ventilación (aspiración)/cubierta del filtro de aire Notas • No sitúe nada junto a los orificios de ventilación, ya que puede producirse recalentamiento interno. • No sitúe la mano ni objetos cerca de - Sony VPL PX31 | Operating Instructions - Page 91
Panel de control 1 2 34 LAMP/ COVER TEMP/ POWER ON/ FAN SAVING STANDBY 5 6 VOL + VOL - MENU HELP ENTER RESET INPUT APA LIGHT 7 qa 0 9 8 1 Teclas . • Parpadea si la cubierta de la lámpara o la del filtro de aire no está firmemente cerrada. TEMP (Temperatura)/FAN: Se ilumina o parpadea en - Sony VPL PX31 | Operating Instructions - Page 92
) AUDIO MONITOR INPUT A USB AUDIO DIGITAL RGB RGB 5BNC RGB RGB AUDIO MOUUSE AUDIO MOUUSE DIGITAL RGB R/R-Y/PR G/Y B/B-Y/PB SYNC/HD VD 4 3 5 6 REMOTE RS-232C OUTPUT CONTROL S VIDEO IN IN PLUG IN POWER S VIDEO VIDEO INPUT B L R (MONO) AUDIO MONITOR INPUT A USB AUDIO DIGITAL RGB RGB - Sony VPL PX31 | Operating Instructions - Page 93
) Se conecta a las tomas de salida de control S del equipo Sony. Se conecta a la toma CONTROL S OUT del mando a distancia qg qf qd COMMAND / OFF ON HELP APA INPUT MUTING AUDIO PIC FUNCTION 1 2 MENU + VOLUME - LASER ENTER R CLICK RESET D ZOOM + - 1 2 3 4 5 6 7 8 9 0 Ubicación y - Sony VPL PX31 | Operating Instructions - Page 94
caso, no es necesario instalar las pilas, ya que el mando se alimenta a través de la toma CONTROL S IN del proyector. qd Tecla RESET qf Tecla ENTER qg Tecla MENU qh Teclas FUNCTION 1/2 Si conecta el proyector a un ordenador, podrá abrir archivos en pantalla con solo pulsar la tecla FUNCTION. De esta - Sony VPL PX31 | Operating Instructions - Page 95
ón izquierdo Botón de ratón Mando universal Se corresponde con los movimientos del ratón Consulte también el manual de instrucciones del equipo que vaya a conectar. Notas • Esta unidad acepta señales VGA, SVGA, XGA o SXGA. No obstante, se recomienda ajustar la señal de salida del ordenador en - Sony VPL PX31 | Operating Instructions - Page 96
no funcionen correctamente según el tipo de ordenador. Si se conecta con un ordenador IBM PC/ AT compatible DIGITAL Lado derecho RGB RGB 5BNC REMOTE RS-232C OUTPUT CONTROL S VIDEO IN IN PLUG IN POWER S VIDEO VIDEO INPUT B L R (MONO) AUDIO MONITOR INPUT A USB AUDIO DIGITAL RGB RGB 5BNC - Sony VPL PX31 | Operating Instructions - Page 97
SMF-D110 (no suministrado) Cable de ratón Cable de conexión de audio estéreo (no suministrado) Conexión Lado derecho DIGITAL RGB RGB 5BNC REMOTE RS-232C OUTPUT CONTROL S VIDEO IN IN PLUG IN POWER S VIDEO VIDEO INPUT B L R (MONO) AUDIO MONITOR INPUT A USB AUDIO DIGITAL RGB RGB 5BNC - Sony VPL PX31 | Operating Instructions - Page 98
externos y equipos de 15k RGB/componente. Consulte también el manual de instrucciones del equipo que vaya a conectar. Al realizar conexiones cable, asegúrese de tirar del enchufe, no del propio cable. Lado derecho REMOTE RS-232C OUTPUT CONTROL S VIDEO IN IN PLUG IN POWER S VIDEO VIDEO INPUT - Sony VPL PX31 | Operating Instructions - Page 99
/ TEMP/ POWER ON/ COVER FAN SAVING STANDBY 4, 5, 6 3 2 VOL + MENU HELP INPUT VOL - ENTER RESET APA LIGHT Proyección VOL + VOL - Indicador ON/ STANDBY LAMP/ TEMP/ POWER ON/ COVER FAN SAVING STANDBY MENU HELP ENTER RESET INPUT APA LIGHT 2 3 Tecla APA 4 (Parte frontal) 1 1 Enchufe el - Sony VPL PX31 | Operating Instructions - Page 100
Proyección ENTRAD A: Selecciona señales de audio y vídeo del conector INPUT A. ENTRAD B: Selecciona señales de audio y vídeo del conector INPUT B. VIDEO: selecciona señales de audio y vídeo introducidas desde las tomas AUDIO/VIDEO (VIDEO IN). S-VIDEO: Selecciona señales de audio y vídeo introducidas - Sony VPL PX31 | Operating Instructions - Page 101
pudiendo producirse averías en el proyector. Utilice las teclas de flecha (M/m/ - Sony VPL PX31 | Operating Instructions - Page 102
menú correspondiente. Para que la pantalla de menú desaparezca Pulse la tecla MENU. La pantalla de menú desaparecerá automáticamente si no pulsa ninguna valores ajustados de fábrica de elementos ya ajustados Pulse la tecla RESET. La pantalla muestra "Completado!" y los ajustes que aparecen en - Sony VPL PX31 | Operating Instructions - Page 103
Menú CTRL IMAGEN Realización de ajustes mediante el menú Para que el número disminuya, pulse la tecla m o - Sony VPL PX31 | Operating Instructions - Page 104
o < para recuperar la pantalla original. FASE PUNTO Ajusta la fase de puntos del panel LCD y la señal introducida desde el conector INPUT A/B. Ajuste la imagen con mayor precisión de imagen introducido con el de la pantalla LCD. La imagen será nítida pero el tamaño de la imagen será menor. Nota - Sony VPL PX31 | Operating Instructions - Page 105
,023 75,029 Pos H Pos V 1312 26 XGA VESA 85 Hz 68,677 84,997 Pos H Pos V 1376 27 1152 × 864 SXGA VESA 70 Hz 63,995 70,016 Pos H Pos V 1472 28 SXGA VESA 75 Hz 67,500 75,000 Pos H Pos V 1600 29 SXGA VESA 85 Hz 77,487 85,057 Pos - Sony VPL PX31 | Operating Instructions - Page 106
señales, es posible utilizar dichos datos ajustando TAMANO H. Realice el ajuste con precisión ajustando DESPLAZ. Señal Super Mac-2 SGI-1 Macintosh 19" Macintosh 21" Sony News PC-9821 1280 × 1024 WS Sunmicro Número de memoria TAMANO H 23 1312 23 1320 25 1328 28 1456 36 1708 36 1600 37 - Sony VPL PX31 | Operating Instructions - Page 107
AHORRO ENERGIA Si lo ajusta en SI, el proyector entra en el modo de ahorro de energía si no se introduce ninguna señal durante 10 minutos. RECEPTOR SIRCS Selecciona los detectores de mando a distancia (receptor SIRCS) de la parte frontal y posterior del proyector. FRENTE&DETRAS: Activa los - Sony VPL PX31 | Operating Instructions - Page 108
Ejemplos de instalación Ejemplos de instalación Instalación en el suelo a: Distancia entre la pantalla y el centro del objetivo b: Distancia desde el suelo hasta el centro del objetivo Pared Centro de la pantalla c: Distancia desde el suelo hasta el pie del proyector x: Libre Distancia desde - Sony VPL PX31 | Operating Instructions - Page 109
en el techo, utilice el soporte de suspensión de proyector PSS-610. Para realizar la instalación en el techo, consulte con personal Sony especializado. a: Distancia entre la pantalla y el centro del objetivo b: Distancia entre el techo y el centro del objetivo x: Distancia entre el techo y el - Sony VPL PX31 | Operating Instructions - Page 110
la condensación de humedad, no instale la unidad en un lugar donde la temperatura pueda aumentar rápidamente. • Permita una circulación de aire adecuada para evitar el recalentamiento interno. No coloque la unidad sobre superficies (alfombras, mantas, etc.) ni cerca de materiales (cortinas, tapices - Sony VPL PX31 | Operating Instructions - Page 111
;Inclinación hacia la parte frontal/posterior y derecha/izquierda 20° 20° 20° 20° 20° Evite utilizar la unidad con una inclinación superior a 20 grados. Instale la unidad únicamente sobre el suelo o en el techo. Si la instala en otros lugares, pueden producirse fallos de funcionamiento. - Sony VPL PX31 | Operating Instructions - Page 112
Mantenimiento Mantenimiento Notas • Si la lámpara se rompe, consulte con personal Sony especializado. • Tire de la unidad de lámpara por el asa. Si toca la unidad de lámpara, puede quemarse o lesionarse. • Cuando extraiga la unidad de lámpara, - Sony VPL PX31 | Operating Instructions - Page 113
del panel de control en este orden durante menos de cinco segundos cada una: RESET, - Sony VPL PX31 | Operating Instructions - Page 114
, póngase en contacto con su proveedor Sony. Alimentación Síntoma La alimentación no se no está instalada. La cubierta del filtro de aire no está instalada. Solución Espere 120 segundos ordenador para que se envíe para enviarse a la pantalla LCD de éste sólo al monitor externo (consulte la pá - Sony VPL PX31 | Operating Instructions - Page 115
(consulte las páginas aire no está instalada. 30 (ES) y 31 (ES)). El indicador LAMP/COVER se La lámpara ventilador está roto. Consulte con personal Sony especializado. El indicador TEMP/FAN se señal de Defina el ajuste de la salida en XGA (consulte la salida del ordenador es demasiado alto. pá - Sony VPL PX31 | Operating Instructions - Page 116
) de diámetro, máx. 1 W × 2 (estéreo) Características ópticas Sistema de proyección 3 paneles LCD, 1 objetivo, sistema de proyección Panel LCD VPL-PX21: Panel LCD SONY TFT de 1,3 pulgadas VPL-PX31: Panel LCD SONY TFT de 1,3 pulgadas de hilera de microlentes, 2.359.296 píxeles (1024 × 768 - Sony VPL PX31 | Operating Instructions - Page 117
. AUDIO OUT (salida variable): Minitoma estéreo máx. 1 Vrms, Cuando la señal de entrada es de 500 mVrms, la impedancia es inferior a 5 kiloohmios REMOTE RS-232C: D-sub de 9 pines (hembra) CONTROL S IN/PLUG IN POWER Minitoma estéreo 5Vp-p, potencia por enchufe, 5V CC Normas de seguridad - Sony VPL PX31 | Operating Instructions - Page 118
Projector Station Version 2.00 (1) Tapa del objetivo (1) Correa para el mando a distancia (1) Cable de alimentación de CA (1) Filtro de aire (para sustitución) (1) Manual de instrucciones (1) Manual información, póngase en contacto con el proveedor Sony más próximo. Asignación de pines Conector de - Sony VPL PX31 | Operating Instructions - Page 119
Conector de entrada DIGITAL RGB (DFP de 20 pines, hembra) 10 1 20 11 1 TX0- 11 TXC- 2 TX0+ 12 TXC+ 3 TX0 SHIELD 13 TXC SHIELD 4 TX2 SHIELD 14 TX1 SHIELD 5 TX2- 15 TX1- 6 TX2+ 16 TX1+ 7 DDC/SCL 17 NC 8 DDC/SDA 18 SENSE 9 NC 19 +5V DC 10 NC 20 GND Conector USB Enchufe B (hembra) - Sony VPL PX31 | Operating Instructions - Page 120
Especificaciones Dimensiones Parte frontal 339 (13 11/32) 142 (5 19/32) 55 (2 5/32) 64,3 (2 9/16) 58 (2 9/32) 16,6(21/32) 82 (3 7/32) Centro del objetivo Centro de la unidad Parte superior 248 (9 3/4) 142,6 (5 5/8) 89 (3 1/2) 24,5 (31/32) 100,7 (3 31/32) 22,4 (7/8) 106,2 (4 3/16) 109,4 (4 5/ - Sony VPL PX31 | Operating Instructions - Page 121
Parte lateral Especificaciones 95 (3 3/4) 23,8 (15/16) 116,8 (4 19/32) 146 (5 3/4) 335,5 (13 7/32) 28,4 35,4 (1 1/8) (1 13/32) 45,4 (1 25/32) 0 - 2,1 (0 - 3/32) Parte inferior 32 ( 1 1/4) 279 (10 31/32) 26,5 (1 1/32) 82,5 (3 1/4) 117,2 (4 5/8) 7,2 (9/32) 1,8 (1/16) 81,5 (3 7/32) 38,4(1 - Sony VPL PX31 | Operating Instructions - Page 122
26 (ES) en el techo 27 (ES) ENTRAD A 24 (ES) Especificaciones 34 (ES) ESTADO (indicación en pantalla) 24 (ES) F, G, H FASE PUNTO 22 (ES) Filtro de aire 31 (ES) Función APA 9 (ES), 18 (ES) I, J, K, L IDIOMA 24 (ES) IMAG DI (dinámica) 21 (ES) INSTALACION 25 (ES) Interruptor DIGITAL RGB/5BNC/RGB 10
-
 1
1 -
 2
2 -
 3
3 -
 4
4 -
 5
5 -
 6
6 -
 7
7 -
8
-
9
-
10
-
11
-
12
-
13
-
14
-
15
-
16
-
17
-
18
-
19
-
20
-
21
-
22
-
23
-
24
-
25
-
26
-
27
-
28
-
29
-
30
-
31
-
32
-
33
-
34
-
35
-
36
-
37
-
38
-
39
-
40
-
41
-
42
-
43
-
44
-
45
-
46
-
47
-
48
-
49
-
50
-
51
-
52
-
53
-
54
-
55
-
56
-
57
-
58
-
59
-
60
-
61
-
62
-
63
-
64
-
65
-
66
-
67
-
68
-
69
-
70
-
71
-
72
-
73
-
74
-
75
-
76
-
77
-
78
-
79
-
80
-
81
-
82
-
83
-
84
-
85
-
86
-
87
-
88
-
89
-
90
-
91
-
92
-
93
-
94
-
95
-
96
-
97
-
98
-
99
-
100
-
101
-
102
-
103
-
104
-
105
-
106
-
107
-
108
-
109
-
110
-
111
-
112
-
113
-
114
-
115
-
116
-
117
-
118
-
119
-
120
-
121
-
122
 |
 |

2000 Sony Corporation
4-080-134-
11
(2)
VPL-PX21
VPL-PX31
Operating Instructions
Mode d’emploi
Manual de instrucciones
FR
ES
LCD Data Projector
GB
VPL-PX21/PX31