Sony VPL PX31 Operating Instructions - Page 13

Remote Commander - reset

Page 13 highlights

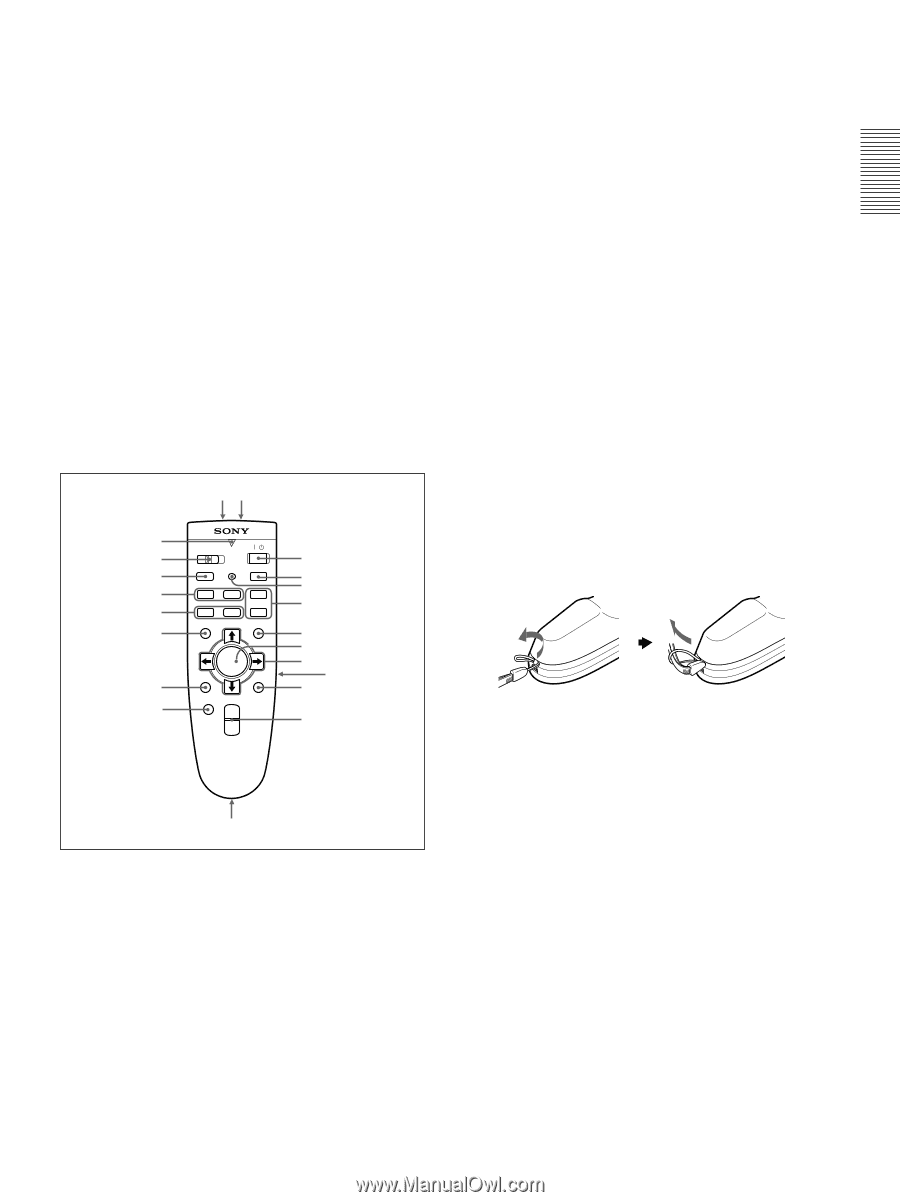
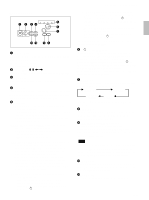
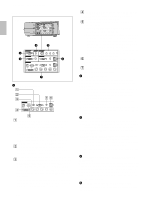
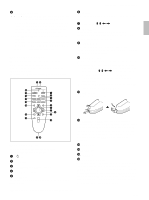
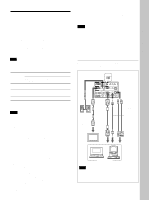
Location and Function of Controls 6 OUTPUT connectors MONITOR (HD D-sub 15-pin, female): Connects to the video input connector on the monitor. Outputs signals from the selected channel in the INPUT A (RGB or 5BNC) or INPUT B (RGB) connector. This connector does not output any signals from the DIGITAL RGB connector. AUDIO (phono type): Connects to external active speakers. The volume of the speakers can be controlled by the VOLUME +/- keys on the Remote Commander or the VOL +/- keys on the control panel. Remote Commander The keys which have the same names as on the control panel function identically. You can control a connected computer using the Remote Commander. For details, see "Connecting with a Computer" on page 15 (GB). wa ws w; ql qk qj qh qg qf qd COMMAND / OFF ON HELP APA INPUT MUTING AUDIO PIC FUNCTION 1 2 MENU + VOLUME - LASER ENTER R CLICK RESET D ZOOM + - 1 2 3 4 5 6 7 8 9 0 qa,qs 6 Joy stick Functions as a mouse of a computer connected to the unit. 7 Arrow keys (M/m/

  • 1
  • 2
  • 3
  • 4
  • 5
  • 6
  • 7
  • 8
  • 9
  • 10
  • 11
  • 12
  • 13
  • 14
  • 15
  • 16
  • 17
  • 18
  • 19
  • 20
  • 21
  • 22
  • 23
  • 24
  • 25
  • 26
  • 27
  • 28
  • 29
  • 30
  • 31
  • 32
  • 33
  • 34
  • 35
  • 36
  • 37
  • 38
  • 39
  • 40
  • 41
  • 42
  • 43
  • 44
  • 45
  • 46
  • 47
  • 48
  • 49
  • 50
  • 51
  • 52
  • 53
  • 54
  • 55
  • 56
  • 57
  • 58
  • 59
  • 60
  • 61
  • 62
  • 63
  • 64
  • 65
  • 66
  • 67
  • 68
  • 69
  • 70
  • 71
  • 72
  • 73
  • 74
  • 75
  • 76
  • 77
  • 78
  • 79
  • 80
  • 81
  • 82
  • 83
  • 84
  • 85
  • 86
  • 87
  • 88
  • 89
  • 90
  • 91
  • 92
  • 93
  • 94
  • 95
  • 96
  • 97
  • 98
  • 99
  • 100
  • 101
  • 102
  • 103
  • 104
  • 105
  • 106
  • 107
  • 108
  • 109
  • 110
  • 111
  • 112
  • 113
  • 114
  • 115
  • 116
  • 117
  • 118
  • 119
  • 120
  • 121
  • 122

13
(GB)
.........................................................................................................................................................................................................
1) Macintosh is a registered trademark of Apple Computer, Inc.
Remote Commander
The keys which have the same names as on the
control panel function identically.
You can control a connected computer using the
Remote Commander.
For details, see “Connecting with a Computer” on page
15 (GB).
Notes on laser beam
• Do not look into the laser transmitter.
• Do not aim the laser at people.
1
I
/
1
key
2
INPUT key
3
APA (Auto Pixel Alignment) key
4
VOLUME +/– keys
5
LASER key
Emits laser beam from the laser transmitter when you
press this key.
Location and Function of Controls
COMMAND
MUTING
VOLUME
HELP
/
INPUT
APA
FUNCTION
MENU
LASER
ENTER
RESET
D ZOOM
+
+
R CLICK
PIC
AUDIO
ON
OFF
1
2
6
7
9
qd
qa
,
qs
qf
qg
qh
qj
qk
ql
w;
wa ws
0
8
5
4
2
1
3
6
OUTPUT connectors
MONITOR (HD D-sub 15-pin, female):
Connects
to the video input connector on the monitor.
Outputs signals from the selected channel in the
INPUT A (RGB or 5BNC) or INPUT B (RGB)
connector.
This connector does not output any
signals from the DIGITAL RGB connector.
AUDIO (phono type):
Connects to external active
speakers.
The volume of the speakers can be controlled by the
VOLUME +/– keys on the Remote Commander or
the VOL +/– keys on the control panel.
6
Joy stick
Functions as a mouse of a computer connected to the
unit.
7
Arrow keys (
M
/
m
/
<
/
,
)
8
L CLICK key
Functions as a left button on a mouse. When
connected to a Macintosh
1)
computer, the L CLICK
key functions as a mouse button.
9
R CLICK key
Functions as a right button on a mouse. When
connected to a Macintosh computer, the R CLICK key
functions as a mouse button.
0
D ZOOM +/– key
Enlarges the image at a desired location on the screen.
+:
Pressing the + key once displays the icon.
This
icon indicates the point you want to enlarge.
Use
an arrow key (
M
/
m
/
<
/
,
) to move the icon to
the point to be enlarged.
Press the + key
repeatedly until the image is enlarged to your
requirements.
–:
Pressing the – key reduces an image that has been
enlarged with the D ZOOM + key.
qa
Strap holder
Attaches the supplied strap.
qs
CONTROL S OUT jack (stereo minijack)
Connects to the CONTROL S IN jack on the projector
with the connecting cable (not supplied) when using
the Remote Commander as a wired one. In this case,
you do not need to install the batteries since the power
is supplied via the CONTROL S IN jack on the
projector.
qd
RESET key
qf
ENTER key
qg
MENU key
qh
FUNCTION 1/2 keys
When you connect the projector with a computer, you
can open a file on the screen by just pressing the
FUNCTION key. This will enhance your presentation.
To use this function, allocate a file to the FUNCTION
key by using the application software.
For details on
how to allocate a file to the FUNCTION key, refer to
the help file of the application software.