Stihl MS 150 C-E Instruction Manual - Page 41
Maintaining and Sharpening, the Saw Chain
 |
View all Stihl MS 150 C-E manuals
Add to My Manuals
Save this manual to your list of manuals |
Page 41 highlights
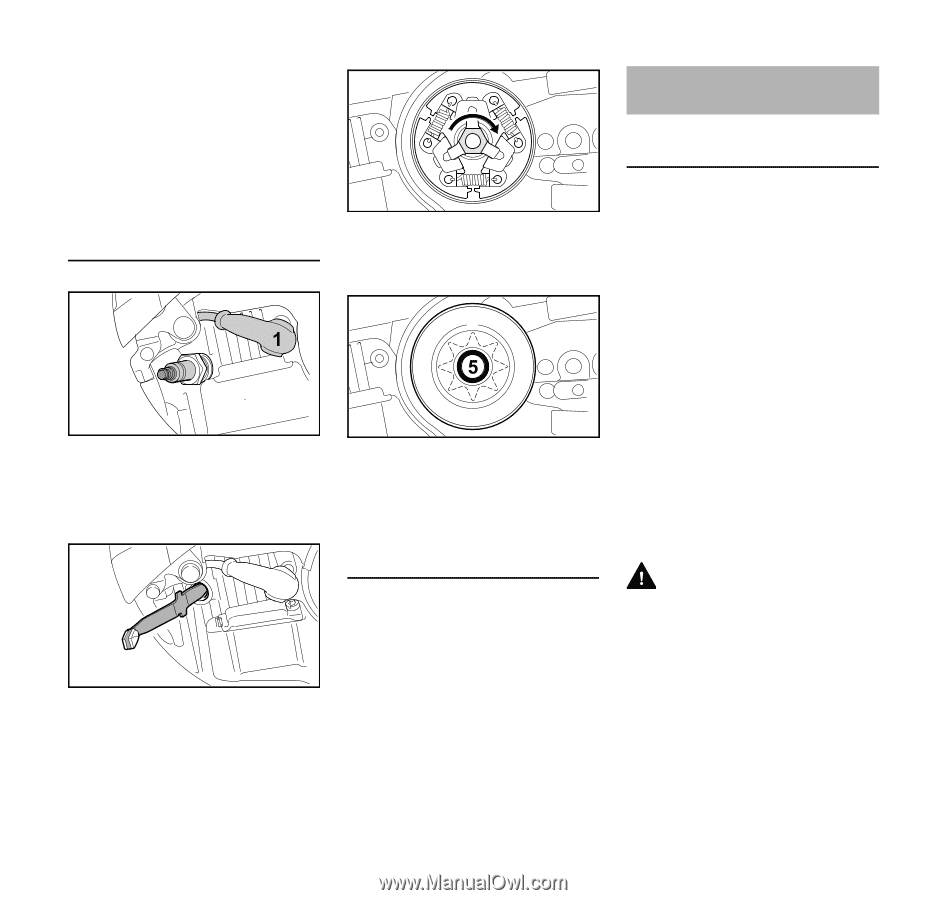
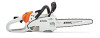
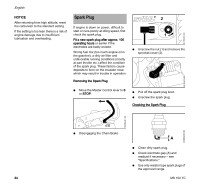
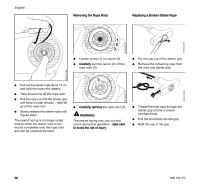
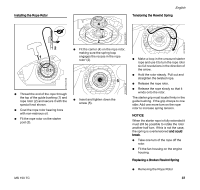
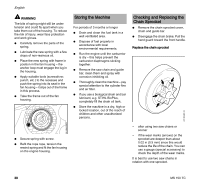
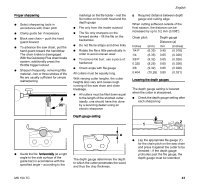
A locking strip is required to block the piston in the cylinder when the chain sprocket and clutch are removed and installed as described below. The locking strip is supplied as standard with the replacement sprocket. STIHL recommends the use of original STIHL sprockets to ensure correct operation of the chain brake. Removing 2 N Remove the spark plug boot (1). N Unscrew the spark plug (2). N Turn the clutch until the piston is about bottom dead center. 3 N Insert the locking strip (3) into the cylinder through the spark plug hole. N Turn the clutch clockwise until the piston butts against the locking strip. 3006BA016 KN 3006BA015 KN N Loosen the clutch hexagon clockwise (left-hand thread). N Unscrew the clutch. 4 N Pull the chain sprocket (4) and needle cage (5) off the crankshaft. N Clean the crankshaft stub and needle cage, and lubricate with STlHL grease (special accessory). Installing N Push the needle cage and chain sprocket onto the crankshaft. N Screw the clutch onto the crankshaft (counterclockwise). N Tighten down the clutch to a torque of 15 Nm. N Remove the locking strip from the cylinder. Fit the spark plug and tighten it down firmly. N Refit boot on the spark plug. 3006BA018 KN 3006BA017 KN English Maintaining and Sharpening the Saw Chain Sawing effortlessly with a properly sharpened saw chain A properly sharpened saw chain cuts through wood effortlessly even with very little pushing. Never use a dull or damaged saw chain - this leads to increased physical strain, increased vibration load, unsatisfactory cutting results and increased wear. N Clean the saw chain N Check the saw chain for cracks and damaged rivets N Replace damaged or worn chain components and adapt these parts to the remaining parts in terms of shape and level of wear - rework accordingly Carbide-tipped (Duro) saw chains are especially wear-resistant. For an optimal sharpening result, STIHL recommends STIHL servicing dealers. WARNING Compliance with the angles and dimensions listed below is absolutely necessary. An improperly sharpened saw chain - especially depth gauges that are too low - can lead to increased kickback tendency of the chain saw - risk of injury! MS 150 TC 39
-
 1
1 -
2
-
3
-
4
-
5
-
6
-
7
-
8
-
9
-
10
-
11
-
12
-
13
-
14
-
15
-
16
-
17
-
18
-
19
-
20
-
21
-
22
-
23
-
24
-
25
-
26
-
27
-
28
-
29
-
30
-
31
-
32
-
33
-
34
-
35
-
 36
36 -
 37
37 -
 38
38 -
 39
39 -
 40
40 -
 41
41 -
 42
42 -
 43
43 -
 44
44 -
 45
45 -
 46
46 -
47
-
48
-
49
-
50
-
51
-
52
-
53
-
54
-
55
-
56
-
57
-
58
-
59
-
60
-
61
-
62
-
63
-
64
-
65
-
66
-
67
-
68
-
69
-
70
-
71
-
72
-
73
-
74
-
75
-
76
-
77
-
78
-
79
-
80
-
81
-
82
-
83
-
84
-
85
-
86
-
87
-
88
-
89
-
90
-
91
-
92
-
93
-
94
-
95
-
96
-
97
-
98
-
99
-
100
-
101
-
102
-
103
-
104
-
105
-
106
-
107
-
108
-
109
-
110
-
111
-
112
-
113
-
114
-
115
-
116
-
117
-
118
-
119
-
120
 |
 |