TEAC AD-RW900 AD-RW900 - Page 45
TEAC AD-RW900 Manual
 |
View all TEAC AD-RW900 manuals
Add to My Manuals
Save this manual to your list of manuals |
Page 45 highlights
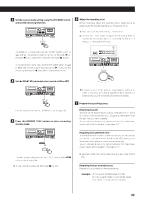
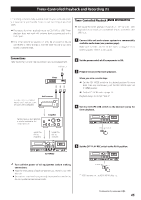
Timer-Controlled Playback and Recording (1) Connecting a commercially available timer to your audio setup lets you wake up to your favorite music or start recording at specified times. < The source for timer playback must be CD, TAPE or USB. Timer playback does not work with external devices connected to the LINE inputs. < The timer recording source can only be an external device connected to the LINE inputs. And the timer recording can only record to cassette tape. Timer-Controlled Playback ( ) < The source for timer playback must be CD, TAPE or USB. Timer playback does not work with an external device connected to the LINE input. 1 Connect this unit and a stereo system to a commercially available audio timer (see previous page). Make sure that the outlet that the timer is plugged into is receiving power when it is being used. Connections Referring to the illustration below, connect your audio equipment. Wall socket 2 Set the power switch of all components to ON. 3 Prepare the source for timer playback. Timer When you set a cassette tape e Set the REV MODE switch to the desired position. To make both sides play continuously, set the REV MODE switch to the p position. e Set the DOLBY NR switch. (page
-
 1
1 -
2
-
3
-
4
-
5
-
6
-
7
-
8
-
9
-
10
-
11
-
12
-
13
-
14
-
15
-
16
-
17
-
18
-
19
-
20
-
21
-
22
-
23
-
24
-
25
-
26
-
27
-
28
-
29
-
30
-
31
-
32
-
33
-
34
-
35
-
36
-
37
-
38
-
39
-
 40
40 -
 41
41 -
 42
42 -
 43
43 -
 44
44 -
 45
45 -
 46
46 -
 47
47 -
 48
48 -
 49
49 -
 50
50 -
51
-
52
 |
 |
