TEAC AD-RW900 AD-RW900 - Page 46
TEAC AD-RW900 Manual
 |
View all TEAC AD-RW900 manuals
Add to My Manuals
Save this manual to your list of manuals |
Page 46 highlights
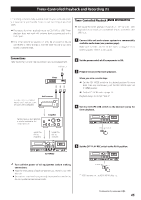
Timer-Controlled Playback and Recording (2) 6 Set the audio timer to your desired start (power on) and stop (power off) times. When this setting is completed, the power to all components should be turned off. At this time, do not press the AD-RW900 POWER button. Leave the button pushed in (the on position). If the POWER button is in the off position, timer playback will not function. When the preset start time is reached, power will be supplied and playback will start automatically. < When you do not want to use the timer, set the OFF-PLAY-REC switch to the OFF position. Timer-Controlled Recording ( ) < The timer recording source can only be an external device connected to the LINE inputs. And the timer recording can only record to cassette tape. < The recording level is set to 0 dB; it cannot be adjusted. (Example: Recording a broadcast program) 1 Connect this unit and a stereo system to a commercially available audio timer (see previous page). 2 Set the power switches of all components to ON. 3 Prepare the cassette tape that you want to record to with timer recording. Recording always starts from "side A". To record on a single tape side, set the REV MODE switch to u. To record on both tape sides, set the REV MODE switch to j or p. Set the DOLBY NR switch (page
-
 1
1 -
2
-
3
-
4
-
5
-
6
-
7
-
8
-
9
-
10
-
11
-
12
-
13
-
14
-
15
-
16
-
17
-
18
-
19
-
20
-
21
-
22
-
23
-
24
-
25
-
26
-
27
-
28
-
29
-
30
-
31
-
32
-
33
-
34
-
35
-
36
-
37
-
38
-
39
-
40
-
 41
41 -
 42
42 -
 43
43 -
 44
44 -
 45
45 -
 46
46 -
 47
47 -
 48
48 -
 49
49 -
 50
50 -
 51
51 -
52
 |
 |