TP-Link Archer C50 Archer C50 V1 User Guide - Page 107
Archer C50, Description, URL Address, Delete Selected, For example, Add New, Access Control,
 |
View all TP-Link Archer C50 manuals
Add to My Manuals
Save this manual to your list of manuals |
Page 107 highlights
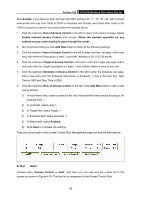
Archer C50 AC1200 Wireless Dual Band Router Figure 4-84 Add or Modify an Access Target Entry I) In Description field, create a unique description for the target (e.g. Target_1). II) In Add URL Address field, enter the domain name, either the full name or the keywords (for example, tp-link) in the blank. Any domain name with keywords in it (www.tp-link.com) will be blocked or allowed. Click Add to save the address, 3. Click the Save button. Click the Delete Selected button to delete the selected entries in the table. For example: If you desire to restrict the internet activities of host with MAC address 00:11:22:33:44:AA in the LAN to access www.tp-link.com only, you should first follow the settings below: 1. Click Add New button in Figure 4-81 to enter the Add or Modify an Access Target Entry page. 2. In Mode field, select URL Address from the drop-down list. 3. In Description field, create a unique description for the target (e.g. Target_1). 4. In Add URL Address field, enter www.tp-link.com. And then click Add to save the entry. 5. Click Save to complete the settings. Then you will go back to the Target Settings page and see the following list. 4.15.4 Schedule Choose menu "Access Control → Schedule", and then you can view and set a Schedule list in the next screen as shown in Figure 4-85. The Schedule list is necessary for the Access Control Rule. - 96 -
-
 1
1 -
2
-
3
-
4
-
5
-
6
-
7
-
8
-
9
-
10
-
11
-
12
-
13
-
14
-
15
-
16
-
17
-
18
-
19
-
20
-
21
-
22
-
23
-
24
-
25
-
26
-
27
-
28
-
29
-
30
-
31
-
32
-
33
-
34
-
35
-
36
-
37
-
38
-
39
-
40
-
41
-
42
-
43
-
44
-
45
-
46
-
47
-
48
-
49
-
50
-
51
-
52
-
53
-
54
-
55
-
56
-
57
-
58
-
59
-
60
-
61
-
62
-
63
-
64
-
65
-
66
-
67
-
68
-
69
-
70
-
71
-
72
-
73
-
74
-
75
-
76
-
77
-
78
-
79
-
80
-
81
-
82
-
83
-
84
-
85
-
86
-
87
-
88
-
89
-
90
-
91
-
92
-
93
-
94
-
95
-
96
-
97
-
98
-
99
-
100
-
101
-
 102
102 -
 103
103 -
 104
104 -
 105
105 -
 106
106 -
 107
107 -
 108
108 -
 109
109 -
 110
110 -
 111
111 -
 112
112 -
113
-
114
-
115
-
116
-
117
-
118
-
119
-
120
-
121
-
122
-
123
-
124
-
125
-
126
-
127
-
128
-
129
-
130
-
131
-
132
-
133
-
134
-
135
-
136
-
137
-
138
-
139
-
140
-
141
-
142
-
143
-
144
-
145
 |
 |
