TP-Link Archer C50 Archer C50 V1 User Guide - Page 26
L2TP/ Russia L2TP
 |
View all TP-Link Archer C50 manuals
Add to My Manuals
Save this manual to your list of manuals |
Page 26 highlights
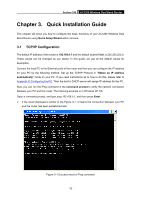
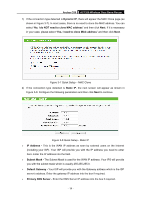
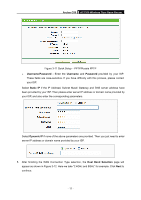
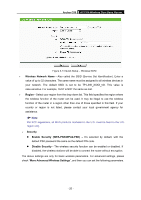
Archer C50 AC1200 Wireless Dual Band Router Secondary DNS Server-(Optional) If your ISP provides another DNS server, enter it into this field. 3) If the connection type detected is PPPoE/Russia PPPoE, the next screen will appear as shown in Figure 3-9. Configure the following parameters and then click Next to continue. Figure 3-9 Quick Setup - PPPoE User Name/Password - Enter the User Name and Password provided by your ISP. These fields are case-sensitive. If you have difficulty with this process, please contact your ISP. Confirm Password - Enter the password again to make sure that the password is correct. Secondary Connection - It's available only for PPPoE Connection. If your ISP provides an extra Connection type such as Dynamic/Static IP to connect to a local area network, then you can check the radio button of Dynamic/Static IP to activate this secondary connection. Disabled - The Secondary Connection is disabled by default, so there is PPPoE connection only. This is recommended. Dynamic IP - You can check this radio button to use Dynamic IP as the secondary connection to connect to the local area network provided by ISP. Static IP - You can check this radio button to use Static IP as the secondary connection to connect to the local area network provided by ISP. 4) If your connection type is L2TP/ Russia L2TP, select L2TP/Russia L2TP in Figure 3-6 and the next screen will appear as shown in Figure 3-10.Configure the following parameters and then click Next to continue. - 15 -
-
 1
1 -
2
-
3
-
4
-
5
-
6
-
7
-
8
-
9
-
10
-
11
-
12
-
13
-
14
-
15
-
16
-
17
-
18
-
19
-
20
-
 21
21 -
 22
22 -
 23
23 -
 24
24 -
 25
25 -
 26
26 -
 27
27 -
 28
28 -
 29
29 -
 30
30 -
 31
31 -
32
-
33
-
34
-
35
-
36
-
37
-
38
-
39
-
40
-
41
-
42
-
43
-
44
-
45
-
46
-
47
-
48
-
49
-
50
-
51
-
52
-
53
-
54
-
55
-
56
-
57
-
58
-
59
-
60
-
61
-
62
-
63
-
64
-
65
-
66
-
67
-
68
-
69
-
70
-
71
-
72
-
73
-
74
-
75
-
76
-
77
-
78
-
79
-
80
-
81
-
82
-
83
-
84
-
85
-
86
-
87
-
88
-
89
-
90
-
91
-
92
-
93
-
94
-
95
-
96
-
97
-
98
-
99
-
100
-
101
-
102
-
103
-
104
-
105
-
106
-
107
-
108
-
109
-
110
-
111
-
112
-
113
-
114
-
115
-
116
-
117
-
118
-
119
-
120
-
121
-
122
-
123
-
124
-
125
-
126
-
127
-
128
-
129
-
130
-
131
-
132
-
133
-
134
-
135
-
136
-
137
-
138
-
139
-
140
-
141
-
142
-
143
-
144
-
145
 |
 |
