TP-Link RE305 RE305EU V1 User Guide - Page 26
To Connect Your Wireless Devices to the Extender via WPS, AP's PIN: Enable
 |
View all TP-Link RE305 manuals
Add to My Manuals
Save this manual to your list of manuals |
Page 26 highlights
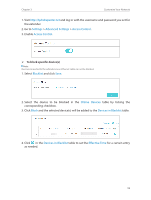
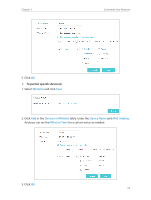
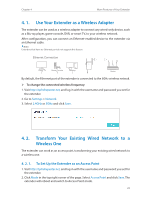
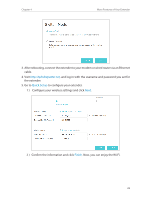
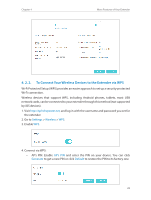
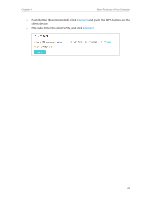
Chapter 4 More Features of Your Extender 4. 2. 2. To Connect Your Wireless Devices to the Extender via WPS Wi-Fi Protected Setup (WPS) provides an easier approach to set up a security-protected Wi-Fi connection. Wireless devices that support WPS, including Android phones, tablets, most USB network cards, can be connected to your extender through this method (not supported by iOS devices). 1. Visit http://tplinkrepeater.net, and log in with the username and password you set for the extender. 2. Go to Settings > Wireless > WPS. 3. Enable WPS. 4. Connect via WPS: • AP's PIN: Enable AP's PIN and enter the PIN on your device. You can click Generate to get a new PIN or click Default to restore the PIN to its factory one. 23
-
 1
1 -
2
-
3
-
4
-
5
-
6
-
7
-
8
-
9
-
10
-
11
-
12
-
13
-
14
-
15
-
16
-
17
-
18
-
19
-
20
-
 21
21 -
 22
22 -
 23
23 -
 24
24 -
 25
25 -
 26
26 -
 27
27 -
 28
28 -
 29
29 -
 30
30 -
 31
31 -
32
-
33
-
34
-
35
-
36
-
37
-
38
-
39
-
40
-
41
 |
 |
23
Chapter 4
More Features of Your Extender
4. 2. 2.
To Connect Your Wireless Devices to the Extender via WPS
Wi-Fi Protected Setup (WPS) provides an easier approach to set up a security-protected
Wi-Fi connection.
Wireless devices that support WPS, including Android phones, tablets, most USB
network cards, can be connected to your extender through this method (not supported
by iOS devices).
1. Visit
http://tplinkrepeater.net
, and log in with the username and password you set for
the extender.
2. Go to
Settings
>
Wireless
>
WPS
.
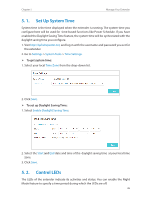
3. Enable
WPS
.
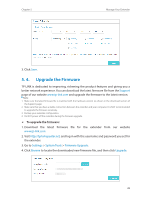
4. Connect via WPS:
•
AP’s PIN: Enable
AP’s PIN
and enter the PIN on your device. You can click
Generate
to get a new PIN or click
Default
to restore the PIN to its factory one.