TP-Link TL-SG3109 User Guide - Page 31
Device Port Default Settings, 4.3 Booting the Device
 |
UPC - 845973020484
View all TP-Link TL-SG3109 manuals
Add to My Manuals
Save this manual to your list of manuals |
Page 31 highlights
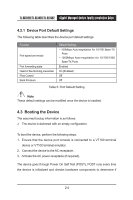
TL-SG3109/TL-SL3428/TL-SL3452 Gigabit Managed Switch Family Installation Guide 4.2.1 Device Port Default Settings The following table describes the device port default settings. Function Port speed and mode Port forwarding state Head of line blocking prevention Flow Control Back Pressure Default Settings • 100Mbps Auto-negotiation for 10/100 Base-TX Ports • 1000Mbps Auto-negotiation for 10/100/1000 Base-TX Ports Enabled On (Enabled) Off Off Table 5: Port Default Setting Note These default settings can be modified once the device is installed. 4.3 Booting the Device The assumed bootup information is as follows: The device is delivered with an empty configuration. To boot the device, perform the following steps: 1. Ensure that the device port console is connected to a VT100 terminal device or VT100 terminal emulator. 2. Connect the device to the AC receptacle. 3. Activate the AC power receptacle (if required). The device goes through Power On Self Test (POST). POST runs every time the device is initialized and checks hardware components to determine if 24
-
 1
1 -
2
-
3
-
4
-
5
-
6
-
7
-
8
-
9
-
10
-
11
-
12
-
13
-
14
-
15
-
16
-
17
-
18
-
19
-
20
-
21
-
22
-
23
-
24
-
25
-
 26
26 -
 27
27 -
 28
28 -
 29
29 -
 30
30 -
 31
31 -
 32
32 -
 33
33 -
 34
34 -
 35
35 -
 36
36 -
37
-
38
-
39
-
40
-
41
-
42
-
43
-
44
-
45
-
46
-
47
-
48
-
49
-
50
-
51
-
52
-
53
-
54
 |
 |
