TRENDnet THA-103AC User's Guide - Page 7
QR Code, admin, >>
 |
View all TRENDnet THA-103AC manuals
Add to My Manuals
Save this manual to your list of manuals |
Page 7 highlights
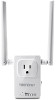
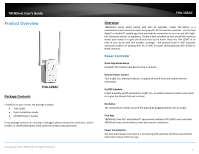
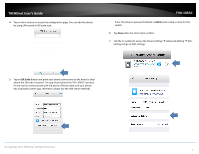
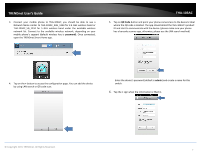
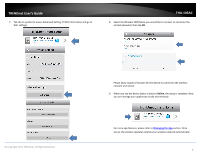
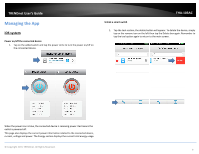
TRENDnet User's Guide 4. Tap on the + button to access the configuration page. You can add the device by using LAN search or QR code scan. THA‐103AC Enter the device's password (default is admin) and create a name for this switch. 6. Tap Done after the information is filled. 7. Tab the >> symbol to access the Device Settings Advanced Setting WiFi Setting and go to WiFi settings. 5. Tap on QR Code button and point your phone camera lens to the device's label where the QR code is located. The app should detect the THA‐103AC's product ID and start to communicate with the device. (Please make sure your phone has a barcode scanner app, otherwise, please use the LAN search method). © Copyright 2015 TRENDnet. All Rights Reserved. 5
-
 1
1 -
 2
2 -
 3
3 -
 4
4 -
 5
5 -
 6
6 -
 7
7 -
 8
8 -
 9
9 -
 10
10 -
 11
11 -
 12
12 -
13
-
14
-
15
-
16
-
17
-
18
-
19
-
20
-
21
-
22
-
23
-
24
-
25
-
26
-
27
-
28
-
29
 |
 |

© Copyright 2015 TRENDnet. All Rights Reserved.
TRENDnet User’s Guide
THA
‐
103AC
5
4.
Tap on the
+
button to access the configuration page. You can add the device
by using LAN search or QR code scan.
5.
Tap on
QR Code
button and point your phone camera lens to the device’s label
where the QR code is located. The app should detect the THA
‐
103AC’s product
ID and start to communicate with the device. (Please make sure your phone
has a barcode scanner app, otherwise, please use the LAN search method).
Enter the device’s password (default is
admin
) and create a name for this
switch.
6.
Tap
Done
after the information is filled.
7.
Tab the
>>
symbol to access the Device Settings
Advanced Setting
WiFi
Setting and go to WiFi settings.