Thermador HMWB36WS Installation Instructions - Page 12
Hood Transition
 |
View all Thermador HMWB36WS manuals
Add to My Manuals
Save this manual to your list of manuals |
Page 12 highlights
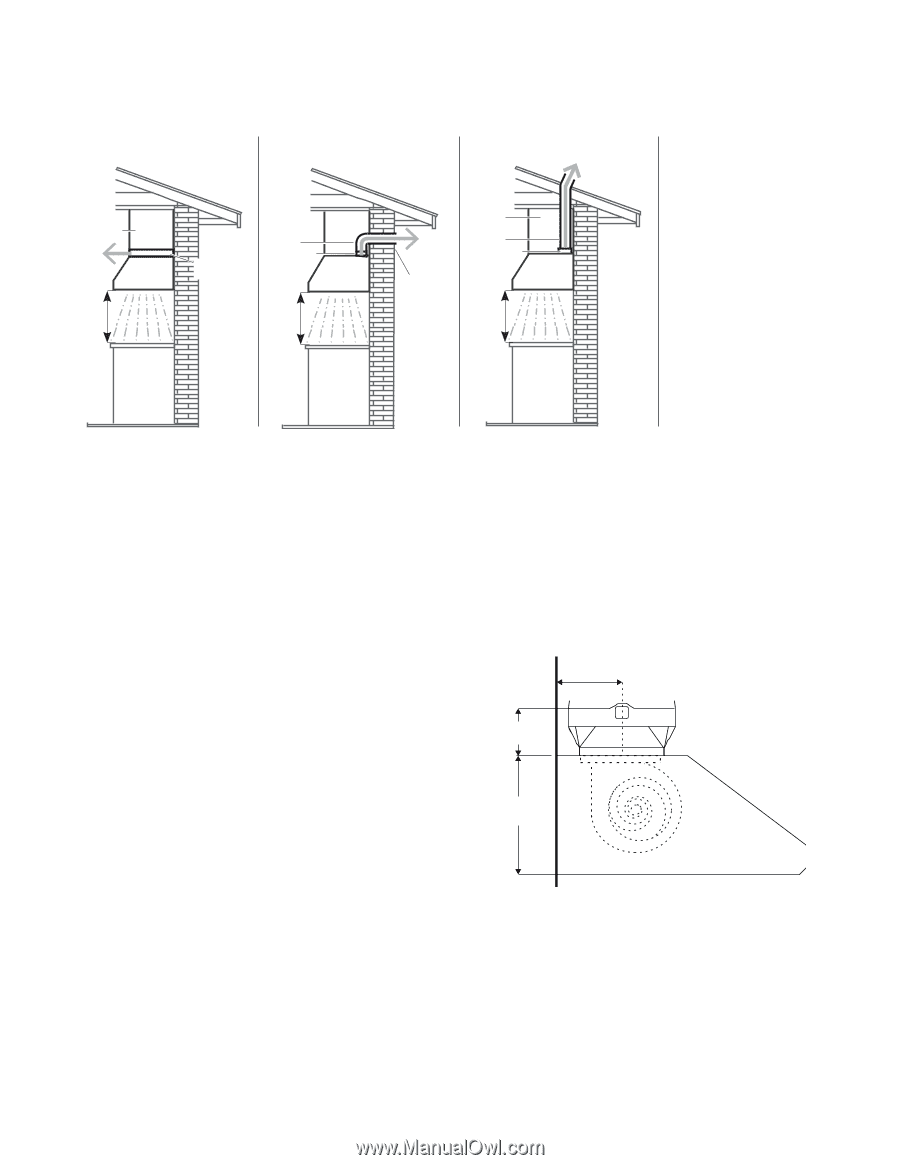
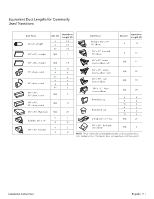
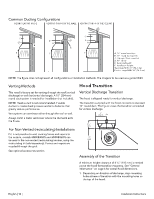
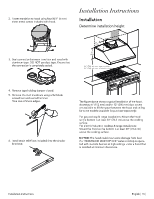
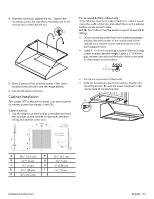
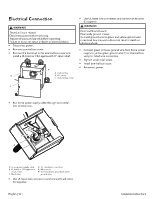
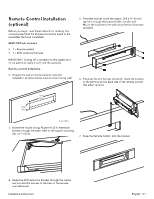
Common Ducting Conigurations RECIRCULATING MODE VENTING THROUGH THE WALL VENTING THROUGH THE CEILING C E F D A F C B A B F A. 10" round transition B. 10" round duct system C. Cabinet / Duct cover kit D. 90° elbow E. Recirculating kit F. Installation height: Gas range MIN: 30" (76.2 cm) Electric range MIN: 30" (76.2 cm) NOTE: The igure does not represent all conigurations or installation methods. The image is to be used as a guide ONLY. Venting Methods This hood is factory set for venting through the roof (vertical discharge) or wall (horizontal discharge). A 10" (254 mm) round duct system is needed for installation (not included). NOTE: Flexible duct is not recommended. Flexible ductwork creates back pressure and air turbulence that greatly reduce performance. Vent system can terminate either through the roof or wall. Always install a metal vent cover where the ductwork exits the house. For Non-Vented (recirculating) Installations If it is not possible to vent cooking fumes and vapors to the outside, models HMWB30WS and HMWB36WS can be used in the non-vented (recirculating) version, using the recirculating kit (sold separately). Fumes and vapors are recycled through the grid. See optional accessories section. Hood Transition Vertical Discharge Transition The hood is shipped ready for vertical discharge. The transition supplied with the hood connects to standard 10" round duct. The igure shows the transition connected for vertical discharge. 6" (152.5) CL 45/16" (110) 11" (280) Assembly of the Transition A minimum height clearance of 4 5⁄16'' (110 mm) is needed above the hood for transition mounting. See "General Information" on page 6 for overall hood dimensions. 1. Depending on direction of discharge, align mounting holes at base of transition with the mounting holes on the top of the hood. English | 12 | Installation Instructions
-
 1
1 -
2
-
3
-
4
-
5
-
6
-
 7
7 -
 8
8 -
 9
9 -
 10
10 -
 11
11 -
 12
12 -
 13
13 -
 14
14 -
 15
15 -
 16
16 -
 17
17 -
18
-
19
-
20
-
21
-
22
-
23
-
24
-
25
-
26
-
27
-
28
-
29
-
30
-
31
-
32
-
33
-
34
-
35
-
36
-
37
-
38
-
39
-
40
-
41
-
42
-
43
-
44
-
45
-
46
-
47
-
48
-
49
-
50
-
51
-
52
-
53
-
54
-
55
-
56
-
57
-
58
-
59
-
60
 |
 |