Thermador HMWB36WS Installation Instructions - Page 20
Recirculating Kit optional
 |
View all Thermador HMWB36WS manuals
Add to My Manuals
Save this manual to your list of manuals |
Page 20 highlights
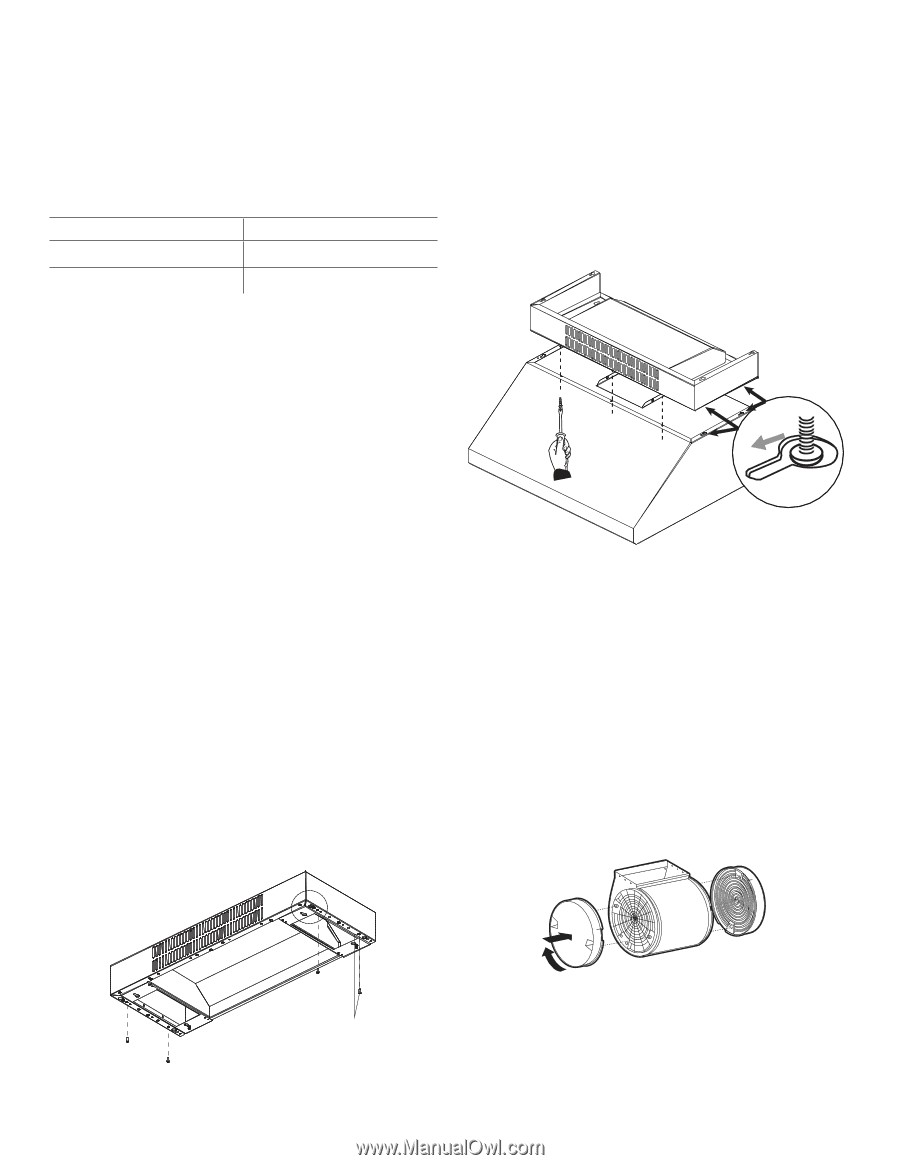
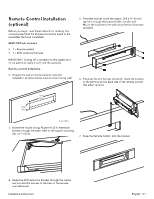
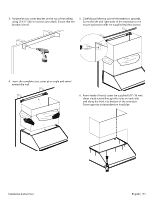
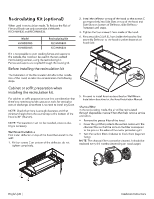
Recirculating Kit (optional) When used in recirculation mode, To Reduce the Risk of Fire and Shock use only conversion kit Models RECHMWB30 and RECHMWB36. Model HMWB30WS HMWB36WS Recirculating Kit RECHMWB30 RECHMWB36 2. Install the delector on top of the hood so that screws C go respectively into Side Slots on top of the hood and Side Slots on bottom of Delector, slide Delector frontward until stops. 3. Tighten the four screws C from inside of the hood. 4. Fit screws (dim:3.5x9.5), from inside the hood to inal assembly Delector to the hood (number depends on hood size). If it is not possible to vent cooking fumes and vapors to the outside, the hood can be used in the non-vented (recirculating) version, using the recirculating kit. Fumes and vapors are recycled through the round grid. Before installing the recirculation kit The Installation of the Recirculation kit affects the installation of the hood, so take into consideration the following steps. Cabinet or sofit preparation when installing the recirculation kit. For cabinet or sofit preparation take into consideration that there's no need to provide cutouts on walls for vertical or rear air discharge, since there is no need to install any Duct. NOTE: Check that there is enough clearance and that minimum height from the countertop to the bottom of the hood is 30" (76.2 cm). NOTE: The transition must not be installed, since no ducting is necessary. Wall Mount Installation First install delector on top of the hood then install to the wall: 1. Fit four screws C on bottom of the delector, do not tighten completely. 5. Proceed to install hood as described on Wall Mount Installation described at the Hood Installation Manual. Charcoal ilter In the reciruclating mode, the air will be recirculated through disposable charcoal ilters that help remove smoke and odors. • Remove the grease ilter of the hood. • Cover the grill that protects the suction motor with the charcoal ilter so that the slots on the ilter correspond to the pins on the sides of the motor protection grill. • Turn the carbon ilter clockwise to block them (bayonet ixing). NOTE: The charcoal ilters cannot be cleaned. It should be replaced every 4-6 months (depending on hood usage). C C English | 20 | C C Installation Instructions
-
 1
1 -
2
-
3
-
4
-
5
-
6
-
7
-
8
-
9
-
10
-
11
-
12
-
13
-
14
-
 15
15 -
 16
16 -
 17
17 -
 18
18 -
 19
19 -
 20
20 -
 21
21 -
 22
22 -
 23
23 -
 24
24 -
 25
25 -
26
-
27
-
28
-
29
-
30
-
31
-
32
-
33
-
34
-
35
-
36
-
37
-
38
-
39
-
40
-
41
-
42
-
43
-
44
-
45
-
46
-
47
-
48
-
49
-
50
-
51
-
52
-
53
-
54
-
55
-
56
-
57
-
58
-
59
-
60
 |
 |