Thermador HMWB36WS Installation Instructions - Page 17
Remote Control Installation, optional
 |
View all Thermador HMWB36WS manuals
Add to My Manuals
Save this manual to your list of manuals |
Page 17 highlights
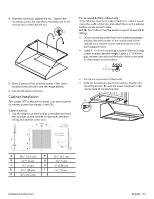
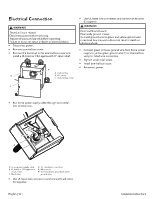
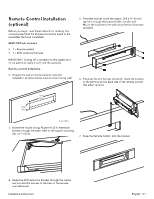
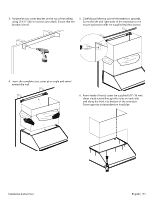
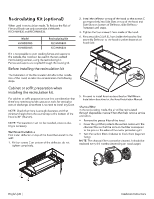
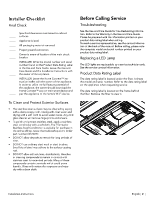
Remote Control Installation (optional) Before you begin, read these instructions carefully. It is recommended that the Remote Control be wired to the hood after the hood is installed. REMCPW Parts Included • 1 - Remote control • 1 - 30 ft. extension harness IMPORTANT: Cutting off a connector to the appliance or to the extension cable kit will void the warranty. Remote Control Installation 2. Prepare the wall (or similar surface) cutout for installation as shown below (view is shown facing wall) 5. Press the bracket inside the cutout. Drill a ¼'' (6 mm) tap hole through the bracket holes into the wall. Mount the bracket to the wall using the four (4) screws provided. 6. Hook up the wire harness connector inside the bracket to the terminal on the back side of the remote control. Use either terminal. 2 5/8" (65) 13 5/8" (346) inches (mm) 3. Access the hood's wiring. Route the 30 ft. extension harness through the strain relief to the square mounting clip until it clicks. 7. Snap the Remote Control into the bracket. 4. Route the 30 ft extension harness through the cutout and connect the harness to the back of the remote control bracket. Installation Instructions English | 17 |
-
 1
1 -
2
-
3
-
4
-
5
-
6
-
7
-
8
-
9
-
10
-
11
-
 12
12 -
 13
13 -
 14
14 -
 15
15 -
 16
16 -
 17
17 -
 18
18 -
 19
19 -
 20
20 -
 21
21 -
 22
22 -
23
-
24
-
25
-
26
-
27
-
28
-
29
-
30
-
31
-
32
-
33
-
34
-
35
-
36
-
37
-
38
-
39
-
40
-
41
-
42
-
43
-
44
-
45
-
46
-
47
-
48
-
49
-
50
-
51
-
52
-
53
-
54
-
55
-
56
-
57
-
58
-
59
-
60
 |
 |
