Toshiba 65UL610U User Manual - Page 40
From the Menu, From the Quick menu, Adjusting 2D to 3D Depth
 |
View all Toshiba 65UL610U manuals
Add to My Manuals
Save this manual to your list of manuals |
Page 40 highlights
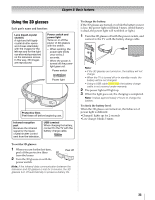
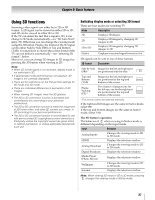
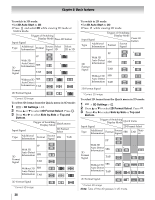
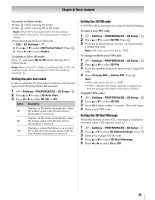
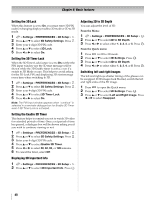
Chapter 6: Basic features Setting the 3D Lock When this feature is set to On, you must enter 3D PIN code for changing display mode to 3D mode or 2D to 3D mode. 1 > Settings > PREFERENCES > 3D Setup > OK . 2 Press B or b to select 3D Safety Settings. Press . OK 3 Enter your 4-digit 3D PIN code. 4 Press B or b to select 3D Lock. 5 Press C or c to select On. Setting the 3D Timer Lock When the 3D Timer Lock feature is set to On, neither the PIN input window nor the 3D start message will be shown while the 3D Enable timer is active, even if a switch to 3D Mode occurs. This helps to avoid asking for the 3D Lock PIN and displaying 3D start message every time when switching to 3D. 1 > Settings > PREFERENCES > 3D Setup > OK . 2 Press B or b to select 3D Safety Settings. Press . OK 3 Enter your 4-digit 3D PIN code. 4 Press B or b to select 3D Timer Lock. 5 Press C or c to select On. Note: The PIN input window appears when "continue" is selected in a reminder dialogue box for Enable 3D Timer even if 3D Timer Lock is activated. Setting the Enable 3D Timer This feature helps to remind you not to watch 3D video for extended periods of time. Once a set period of time has passed, a dialogue box will be shown asking you if you wish to continue viewing or not. 1 > Settings > PREFERENCES > 3D Setup > OK . 2 Press B or b to select 3D Safety Settings. Press . OK 3 Enter your 4-digit 3D PIN code. 4 Press B or b to select Enable 3D Timer. 5 Press C or c to select 30, 60, 90, or 120 minutes. 6 To cancel the timer, select Off. Displaying 3D Important Info 1 > Settings > PREFERENCES > 3D Setup > OK . 2 Press B or b to select 3D Important Info. Press . OK Adjusting 2D to 3D Depth You can adjust the level of 3D. From the Menu: 1 > Settings > PREFERENCES > 3D Setup > OK . 2 Press B or b to select 2D to 3D Depth. 3 Press C or c to select either 1, 2, 3, 4, or 5. Press . OK From the Quick menu: 1 Press in 2D to 3D mode. 2 Press B or b to select 3D Settings. Press . OK 3 Press B or b to select 2D to 3D Depth. 4 Press C or c to select either 1, 2, 3, 4, or 5. Press . OK Switching left and right images The left and right eye shutter timing of the glasses can be swapped. If 3D images look blurred, switch the left and right sides of the 3D image. 1 Press to open the Quick menu. 2 Press B or b to select 3D Settings. Press . OK 3 Press B or b to select Left and Right Image. Press C or c to select Swapped. 40
-
 1
1 -
2
-
3
-
4
-
5
-
6
-
7
-
8
-
9
-
10
-
11
-
12
-
13
-
14
-
15
-
16
-
17
-
18
-
19
-
20
-
21
-
22
-
23
-
24
-
25
-
26
-
27
-
28
-
29
-
30
-
31
-
32
-
33
-
34
-
 35
35 -
 36
36 -
 37
37 -
 38
38 -
 39
39 -
 40
40 -
 41
41 -
 42
42 -
 43
43 -
 44
44 -
 45
45 -
46
-
47
-
48
-
49
-
50
-
51
-
52
-
53
-
54
-
55
-
56
-
57
-
58
-
59
-
60
-
61
-
62
-
63
-
64
-
65
-
66
-
67
-
68
-
69
-
70
-
71
-
72
-
73
-
74
-
75
-
76
-
77
-
78
-
79
-
80
-
81
-
82
-
83
-
84
-
85
-
86
-
87
-
88
-
89
-
90
-
91
-
92
-
93
-
94
-
95
-
96
-
97
-
98
-
99
-
100
-
101
-
102
-
103
-
104
-
105
-
106
 |
 |