Toshiba A205-S4777 Maintenance Manual - Page 146
Display Assembly - laptop battery
 |
UPC - 032017913844
View all Toshiba A205-S4777 manuals
Add to My Manuals
Save this manual to your list of manuals |
Page 146 highlights
4 Replacement Procedures 4.10 Display Assembly Removing the Display Assembly To remove the display assembly, first remove the battery and any optional devices. Also remove the keyboard, as described in the previous sections. Then follow the steps below: 1. Turn over the laptop. Remove seventeen (17) M2.5x8 screws securing the bottom cover, and three M2x3 screws from inside the battery compartment. Figure 4-28 Removing screws from the bottom cover 2. Turn over the laptop. Remove four M2.5x8 screws from the top cover. Figure 4-29 Removing screws from the top cover 4-28 Minnesota 10M/10MG Series Maintenance Manual
-
 1
1 -
2
-
3
-
4
-
5
-
6
-
7
-
8
-
9
-
10
-
11
-
12
-
13
-
14
-
15
-
16
-
17
-
18
-
19
-
20
-
21
-
22
-
23
-
24
-
25
-
26
-
27
-
28
-
29
-
30
-
31
-
32
-
33
-
34
-
35
-
36
-
37
-
38
-
39
-
40
-
41
-
42
-
43
-
44
-
45
-
46
-
47
-
48
-
49
-
50
-
51
-
52
-
53
-
54
-
55
-
56
-
57
-
58
-
59
-
60
-
61
-
62
-
63
-
64
-
65
-
66
-
67
-
68
-
69
-
70
-
71
-
72
-
73
-
74
-
75
-
76
-
77
-
78
-
79
-
80
-
81
-
82
-
83
-
84
-
85
-
86
-
87
-
88
-
89
-
90
-
91
-
92
-
93
-
94
-
95
-
96
-
97
-
98
-
99
-
100
-
101
-
102
-
103
-
104
-
105
-
106
-
107
-
108
-
109
-
110
-
111
-
112
-
113
-
114
-
115
-
116
-
117
-
118
-
119
-
120
-
121
-
122
-
123
-
124
-
125
-
126
-
127
-
128
-
129
-
130
-
131
-
132
-
133
-
134
-
135
-
136
-
137
-
138
-
139
-
140
-
 141
141 -
 142
142 -
 143
143 -
 144
144 -
 145
145 -
 146
146 -
 147
147 -
 148
148 -
 149
149 -
 150
150 -
 151
151 -
152
-
153
-
154
-
155
-
156
-
157
-
158
-
159
-
160
-
161
-
162
-
163
-
164
-
165
-
166
-
167
-
168
-
169
-
170
-
171
-
172
-
173
-
174
-
175
-
176
-
177
-
178
-
179
-
180
-
181
-
182
-
183
-
184
-
185
-
186
-
187
-
188
-
189
-
190
-
191
-
192
-
193
-
194
-
195
-
196
-
197
-
198
-
199
-
200
-
201
-
202
-
203
-
204
-
205
-
206
-
207
-
208
-
209
-
210
-
211
-
212
-
213
-
214
-
215
-
216
-
217
-
218
-
219
-
220
-
221
-
222
-
223
-
224
-
225
-
226
-
227
-
228
-
229
-
230
-
231
-
232
-
233
-
234
-
235
-
236
-
237
-
238
-
239
-
240
-
241
-
242
-
243
 |
 |
4
Replacement Procedures
4.10 Display Assembly
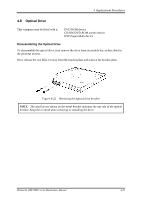
Removing the Display Assembly
To remove the display assembly, first remove the battery and any optional devices. Also
remove the keyboard, as described in the previous sections. Then follow the steps below:
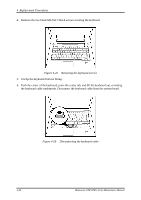
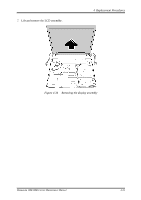
1.
Turn over the laptop. Remove seventeen (17) M2.5x8 screws securing the bottom cover,
and three M2x3 screws from inside the battery compartment.
Figure 4-28
Removing screws from the bottom cover
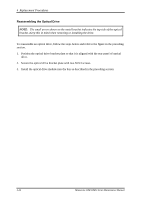
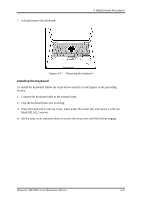
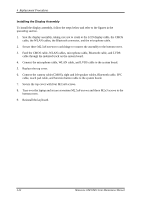
2.
Turn over the laptop. Remove four M2.5x8 screws from the top cover.
Figure 4-29
Removing screws from the top cover
4-28
Minnesota 10M/10MG Series Maintenance Manual