Toshiba Qosmio G50 PQG55C-01R039 Users Manual Canada; English - Page 140
Display, Boot Priority, Setup, Power On Display, Boot Priority Options
 |
View all Toshiba Qosmio G50 PQG55C-01R039 manuals
Add to My Manuals
Save this manual to your list of manuals |
Page 140 highlights
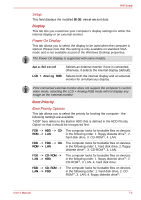
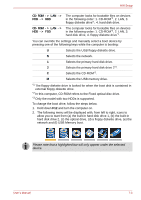
HW Setup Setup This field displays the installed BIOS version and date. Display This tab lets you customize your computer's display settings for either the internal display or an external monitor. Power On Display This tab allows you to select the display to be used when the computer is started. Please note that this setting is only available on standard VGA mode and is not available as part of the Windows Desktop properties. The Power On Display is supported with some models. Auto-Selected LCD + Analog RGB Selects an external monitor if one is connected, otherwise, it selects the internal display (default). Selects both the internal display and an external monitor for simultaneous display. If the connected external monitor does not support the computer's current video mode, selecting the LCD + Analog RGB mode will not display any image on the external monitor. Boot Priority Boot Priority Options This tab allows you to select the priority for booting the computer - the following settings are available: "HDD" here refers to the Built-in HDD that is defined in the HDD Priority Option so that it should be recognized first. FDD -> HDD -> CD- The computer looks for bootable files on devices ROM -> LAN in the following order: 1. floppy diskette drive*1, 2. hard disk drive, 3. CD-ROM*2, 4. LAN. HDD -> FDD -> CD- The computer looks for bootable files on devices ROM -> LAN in the following order: 1. hard disk drive, 2. floppy diskette drive*1, 3. CD-ROM*2, 4. LAN. FDD -> CD-ROM -> The computer looks for bootable files on devices LAN -> HDD in the following order: 1. floppy diskette drive*1, 2. CD-ROM*2, 3. LAN, 4. hard disk drive. HDD -> CD-ROM -> The computer looks for bootable files on devices LAN -> FDD in the following order: 1. hard disk drive, 2. CD- ROM*2, 3. LAN, 4. floppy diskette drive*1. User's Manual 7-2
-
 1
1 -
2
-
3
-
4
-
5
-
6
-
7
-
8
-
9
-
10
-
11
-
12
-
13
-
14
-
15
-
16
-
17
-
18
-
19
-
20
-
21
-
22
-
23
-
24
-
25
-
26
-
27
-
28
-
29
-
30
-
31
-
32
-
33
-
34
-
35
-
36
-
37
-
38
-
39
-
40
-
41
-
42
-
43
-
44
-
45
-
46
-
47
-
48
-
49
-
50
-
51
-
52
-
53
-
54
-
55
-
56
-
57
-
58
-
59
-
60
-
61
-
62
-
63
-
64
-
65
-
66
-
67
-
68
-
69
-
70
-
71
-
72
-
73
-
74
-
75
-
76
-
77
-
78
-
79
-
80
-
81
-
82
-
83
-
84
-
85
-
86
-
87
-
88
-
89
-
90
-
91
-
92
-
93
-
94
-
95
-
96
-
97
-
98
-
99
-
100
-
101
-
102
-
103
-
104
-
105
-
106
-
107
-
108
-
109
-
110
-
111
-
112
-
113
-
114
-
115
-
116
-
117
-
118
-
119
-
120
-
121
-
122
-
123
-
124
-
125
-
126
-
127
-
128
-
129
-
130
-
131
-
132
-
133
-
134
-
 135
135 -
 136
136 -
 137
137 -
 138
138 -
 139
139 -
 140
140 -
 141
141 -
 142
142 -
 143
143 -
 144
144 -
 145
145 -
146
-
147
-
148
-
149
-
150
-
151
-
152
-
153
-
154
-
155
-
156
-
157
-
158
-
159
-
160
-
161
-
162
-
163
-
164
-
165
-
166
-
167
-
168
-
169
-
170
-
171
-
172
-
173
-
174
-
175
-
176
-
177
-
178
-
179
-
180
-
181
-
182
-
183
-
184
-
185
-
186
-
187
-
188
-
189
-
190
-
191
-
192
-
193
-
194
-
195
-
196
-
197
-
198
-
199
-
200
-
201
-
202
-
203
-
204
-
205
-
206
-
207
-
208
-
209
-
210
-
211
-
212
-
213
-
214
-
215
-
216
-
217
-
218
-
219
-
220
-
221
-
222
-
223
-
224
-
225
-
226
-
227
-
228
-
229
-
230
-
231
-
232
-
233
-
234
-
235
-
236
-
237
-
238
-
239
-
240
-
241
-
242
-
243
-
244
-
245
-
246
-
247
-
248
-
249
-
250
-
251
-
252
-
253
-
254
-
255
-
256
-
257
 |
 |