Toshiba Tecra A8-EZ8512 User Guide - Page 133
Using the i.LINK® port, Using an expansion device
 |
View all Toshiba Tecra A8-EZ8512 manuals
Add to My Manuals
Save this manual to your list of manuals |
Page 133 highlights
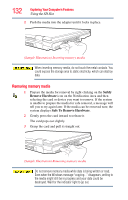
Exploring Your Computer's Features Using the i.LINK® port 133 Using the i.LINK® port (Available on certain models) The i.LINK® port on the back side of the computer provides an extremely fast data transfer rate. In addition to high speed, the i.LINK® port also supports isochronous data transfer (the delivery of data at a guaranteed rate). This makes it ideal for devices that transfer high levels of data in real-time, such as video devices. As with USB ports, the i.LINK® port supports both Plug-and- Play (automatic configuration) and hot swapping (the ability to connect and disconnect devices while the computer is on). Using an expansion device The expansion port is used to connect your computer to an expansion device. This is an excellent investment if you are using your computer both in and out of the office. When you return to your desk, you can then connect to your network, print reports from your computer, or use a mouse instead of your computer's pointing device. Connecting cables for each of these devices every time you return to the office can be time consuming. With an expansion device, you can leave external devices connected while you are using your computer away from your desk. When you return, you can quickly connect your computer and have immediate access to all the devices. For more information, see the accessories information package that comes with the device or visit accessories.toshiba.com. Using an Optional Advanced Port Replicator III Plus with your computer If you purchase an optional Advanced Port Replicator III Plus (APR III Plus) (not shipped with your system), you can connect this device to your computer's expansion port. In order to achieve a proper connection, the APR III Plus must be properly aligned with your computer. The correct position is indicated by symbols ( ) on both your computer and the APR III Plus. To properly connect the APR III Plus to your computer, see the Advanced Port Replicator III Plus User's Guide or visit pcsupport.toshiba.com.
-
 1
1 -
2
-
3
-
4
-
5
-
6
-
7
-
8
-
9
-
10
-
11
-
12
-
13
-
14
-
15
-
16
-
17
-
18
-
19
-
20
-
21
-
22
-
23
-
24
-
25
-
26
-
27
-
28
-
29
-
30
-
31
-
32
-
33
-
34
-
35
-
36
-
37
-
38
-
39
-
40
-
41
-
42
-
43
-
44
-
45
-
46
-
47
-
48
-
49
-
50
-
51
-
52
-
53
-
54
-
55
-
56
-
57
-
58
-
59
-
60
-
61
-
62
-
63
-
64
-
65
-
66
-
67
-
68
-
69
-
70
-
71
-
72
-
73
-
74
-
75
-
76
-
77
-
78
-
79
-
80
-
81
-
82
-
83
-
84
-
85
-
86
-
87
-
88
-
89
-
90
-
91
-
92
-
93
-
94
-
95
-
96
-
97
-
98
-
99
-
100
-
101
-
102
-
103
-
104
-
105
-
106
-
107
-
108
-
109
-
110
-
111
-
112
-
113
-
114
-
115
-
116
-
117
-
118
-
119
-
120
-
121
-
122
-
123
-
124
-
125
-
126
-
127
-
 128
128 -
 129
129 -
 130
130 -
 131
131 -
 132
132 -
 133
133 -
 134
134 -
 135
135 -
 136
136 -
 137
137 -
 138
138 -
139
-
140
-
141
-
142
-
143
-
144
-
145
-
146
-
147
-
148
-
149
-
150
-
151
-
152
-
153
-
154
-
155
-
156
-
157
-
158
-
159
-
160
-
161
-
162
-
163
-
164
-
165
-
166
-
167
-
168
-
169
-
170
-
171
-
172
-
173
-
174
-
175
-
176
-
177
-
178
-
179
-
180
-
181
-
182
-
183
-
184
-
185
-
186
-
187
-
188
-
189
-
190
-
191
-
192
-
193
-
194
-
195
-
196
-
197
-
198
-
199
-
200
-
201
-
202
-
203
-
204
-
205
-
206
-
207
-
208
-
209
-
210
-
211
-
212
-
213
-
214
-
215
-
216
-
217
-
218
-
219
-
220
-
221
-
222
-
223
-
224
-
225
-
226
-
227
-
228
-
229
-
230
-
231
-
232
-
233
-
234
-
235
-
236
-
237
-
238
-
239
 |
 |
