URC URC-WR7 Owners Manual - Page 10
Quick Set-up - universal remote control
 |
View all URC URC-WR7 manuals
Add to My Manuals
Save this manual to your list of manuals |
Page 10 highlights
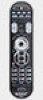
1. Quick Set-up Set-up one component at a time, and you'll move quickly through your system. Step 1: Turn on the component you want to activate. (Other components can be on or off, it doesn't matter.) STEP 2: Point your new WR7 universal remote toward the component and press the appropriately labeled Component button (TV for TV, DVD for DVD, etc.) While holding this button down,press the numeric assigned to your brand in the Quick Set-up Code Table(See Page 2) and release both Component button and the number key to save the code. The component light will blink three times to confirm that the code has been stored. STEP 3: Point the remote control at the component. STEP 4: Press the power button. If it turns off, it is programmed for your component. If it does not turn off, use the Pre-Programmed 3-Digit code Method or Auto-Search Method. Check your work Press the POWER [ON] button to turn the component back on. Next, test the VOLUME and CHANNEL buttons (or PLAY and STOP buttons for VCR and DVD) to make sure they all work. Repeat steps one through four until all your components are set up properly. COMPONENT BUTTONS NUMBER PAD Page | 9
-
 1
1 -
2
-
3
-
4
-
 5
5 -
 6
6 -
 7
7 -
 8
8 -
 9
9 -
 10
10 -
 11
11 -
 12
12 -
 13
13 -
 14
14 -
 15
15 -
16
-
17
-
18
-
19
-
20
-
21
-
22
-
23
-
24
-
25
-
26
-
27
-
28
-
29
-
30
-
31
-
32
-
33
-
34
-
35
-
36
-
37
-
38
-
39
-
40
-
41
-
42
-
43
-
44
-
45
-
46
-
47
-
48
-
49
-
50
-
51
-
52
 |
 |
